
Instructions / Assembly


INSTALLATION
1. Carefully unpack all items from the box. Place the base in the final position. There must be
a minimum of 24 in / 60.96 cm of clearance from the side of the table top to any combustible
walls.
2. Pour ALL of the provided media (fire ice or lava rock) into the burner pan. Burner MUST be
completely covered to ensure the appliance functions properly and safely. Remove any lava
rocks or fire ice on top of the ignition well. See figure 2.
Figure 2
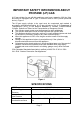
3. Slide the tank drawer out and place the LP tank in the drawer. Connect the regulator as
shown in Figure 3. Turn the black handle clockwise to tighten. Turn the handle
counterclockwise to remove. The hose must point down. Check that the valve is turned all the
way clockwise to the "OFF" position. Open the tank valve. Apply a solution of soapy water to the
tank-regulator connection and to the valve-hose connection to check for leaks. If soap bubbles
continue to form, the connection has a leak. If a leak is found, close the tank valve and tighten
all connections.
NOTE: NEVER USE A FLAME TO CHECK FOR LEAKS.
Figure 3
4. Tighten the threaded knobs found on the tank tray (Figure 4) so that the LP tank cannot move
from side to side. Do not remove the plastic cap from the end of the threaded section.
Figure 4
Page 9