
Assembly Instructions


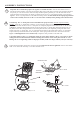
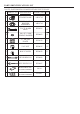

Table Of Contents

E
F
H
PARTS LIST
DESCRIPTION ORDER PART #
NUT COVER
BOLT COVER
HEX BOLT DRIVER
HEX WRENCH
1/4" NUT
1/4" X 25 MM BOLT
TABLE LEG
LEG CONNECTOR
BRACKET
TABLE TOP
QTY
8
4
1
1
12
8
4
4
1
1
HW0027
HW0105
HW0006
HW0009
HW0004
HW0014
HW0037
FC0030
FOOT CAP
FACTORY ASSEMBLY
FOOT CAP
A
B
C
D
E
F
G
H
I
J
K
G0003
1
TOUCH-UP PAINT
IMPORTANT!! PLEASE READ ENTIRE INSTRUCTION SHEET BEFORE ASSEMBLY!!
TO EXPEDITE ANY FUTURE WARRANTY CLAIMS, PLEASE KEEP INSTRUCTION SHEET, WARRANTY CARD AND RECEIPT
Step3: Attach a leg to the leg connector bracket by carefully
guiding the bolts already in place on the table legs
(each leg has two bolts) through the holes in the leg
connector bracket. Add a washer and a nut to the end
of each bolt . Hand tighten only. Do
not tighten completely. Repeat on the other three legs.
as shown in Fig.2
Step 4: After making any necessary adjustments to the
alignment of the table legs and the leg connector
bracket, use the hex bolt driver and hex wrench to
tighten all nuts and bolts. Note: each bolt and nut
must be tightened a few revolutions at a time. In
order to apply equal pressure to all bolt joints, we
recommend working in a cross corner (X fashion).
Repeat until all bolts are tight. Do not over tighten.
Over tightening may strip bolts. Cover all nuts and
bolts with covers.
Step 5: With the help of another person, turn the table in the
upright position. Your table is now ready for use. If
you have any questions, please call our Customer
Service Center at 1-800-416-3511.
IMPORTANT NOTE: Damage to welds or frames
resulting from over tightened bolts or improper assembly
is not covered under our warranty. Please read all
instructions carefully before assembly. If you have any
questions regarding your assembly, call our Customer
Service Center at 1-800-416-3511.
* NOTE: PARTS SHOWN ON PARTS LIST ARE NOT TO SCALE
Step 1: Remove all protective materials and set parts on a flat,
non-abrasive surface. Identify parts packed in carton
against the parts list. If you are missing any parts or are
unsure how to proceed with assembly, call our Customer
Service Center at 1-800-416-3511. Do not attempt
assembly if any parts are missing or damaged.
Step 2: Place the table top upside down on a flat, non-abrasive
surface. Attach a table leg to the table top by using the
bolt and washer as shown in Fig.1. Place the leg beneath
the table top corner bracket. Guide the bolt through the
hole in the table top corner bracket and into the pre-drilled
hole in the table leg. Hand tighten only 3-4 revolutions
only. Do not tighten completely. Repeat for the other
three legs.
Ø6.5 X 1.0 MM
WASHER
D
F
G
B
C
A
UMBRELLA POLE
LOCK KNOB & NUT
FACTORY ASSEMBLY
G0091
& HW0448
Fig.1
Fig.2
G0157
UMBRELLA HOLE
PROTECTIVE RING
FACTORY ASSEMBLY