Installation Instructions / Warranty C 04221XX0 E 04226XX0 S 04231XX0
Trim, Thermostat with Volume Control / Diverter 04221XX0 04231XX0 04226XX0 Technical Information / Données techniques / Datos tecnicos Recommended water pressure Pression d’eau recommandée Presión recomendada en servicio 15 - 75 psi Max. water pressure Pression d’eau maximum Presión en servicio max. 145 psi Recommended hot water temp. Température recommandée d'eau chaude Temperatura recomendada del agua caliente 120� - 140� F* Max.
Installation Considerations • For best results, Hansgrohe recommends that this unit be installed by a licensed, professional plumber. • Please read over these instructions thoroughly before beginning installation. Make sure that you have all tools and supplies needed to complete the installation. • This trim is for use with iBox Universal Plus model 01850181 (not included). • To prevent scald injury, the maximum output temperature of the shower valve must be no higher than 120°F.
English Installation 2. Remove the label (1). Close the stops using a 4 mm Allen wrench (2). closed 1. open Cut the plaster shield so that it extends ¹⁄₁₆" - ⅛" from the finished wall surface. 1. Seal the wall around the plaster shield with waterproof sealant (1). Failure to seal the wall can lead to possible water damage. Remove the flush insert screw, flush insert, and seals (2). 2.
Français Español Installation Instalación Retirez l’étiquette (1). Retire la etiqueta (1). Fermez l’eau à les butées d'arrêt d'isolation à l’aide d’une clé hexagonale de 4 mm (2). Cierre el paso del agua en la entrada del suministro o los cierres de servicio con una llave Allen de 4 mm (2). fermé cerrado ouvert abierto Coupez le protecteur de façon à ce qu’une partie de ¹⁄₁₆ à ⅛ po soit à l’extérieur de la surface du mur fini.
English Insert the function block. Install and tighten the function block screws using a 4 mm Allen wrench. Measure the distance from the front of the plaster shield to one of the screw-in flanges ("X"). Add ½" to this measurement. Cut each screw so that it is X + ½" long.
Français Español Insérez le bloc de fonction. Inserte el bloque de función. Installez les vis du bloc de fonction à l’aide d’une clé hexagonale de 4 mm. Instale los tornillos del bloque de función con una llave Allen de 4 mm. Mesurez la distance entre la surface du mur et la bride du vis. Notez la longueur mesurée (« X »). Mida la distancia entre la superficie de la pared y la brida de tornillo. Anote esta medida (“x”). Ajoutez ½ po à cette longueur « X ». Notez cette longueur. Agregue ½" a X.
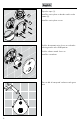
English Open the stops (1). 1. Install the carrier plate so that the notch is at the bottom (2). Install the carrier plate screws. 2. Push the thermostatic mixer sleeve on so that the indexing mark is at the 9:00 position. Push the volume control sleeve on. Install the escutcheon. Place a dab of waterproof sealant at each grout joint.
Français Español Ouvrez les butées d'arrêt d'isolation (1). Abra el paso del agua en los cierres de servicio (1). Installez la plaque-support de façon à ce que l’encoche soit vers le bas (2). Installez les vis de la plaque-support. Instale la placa del portador de manera que la ranura quede en la parte inferior (2). Coloque los tornillos de la placa del portador. Installez la douille thermostatique de façon à ce que la marque de repère soit à la position 9:00.
English Lubricate the adapter stems with a small amount of white plumber's grease (1). 1. Install the handle adapters and screws (2). Tighten the screws using a 3 mm Allen wrench. 2. Install the volume control handle (1). Tighten the screw using a 2 mm Allen wrench. Install the thermostatic mixer handle so that the safety stop override button is at the 9:00 position (2). 1. Tighten the handle screw using a 2.5 mm Allen wrench. 2.
Français Español Lubrifiez la tige de manoeuvre avec une petite quantité de graisse de plomberie blanche (1). Lubrique el vástago de la válvula con una pequeña cantidad de grasa blanca para plomería (1). Installez l’adaptateurs de poignées (2). Serrez les vis à l’aide d’une clé hexagonale de 3 mm. Instale el adaptador del mando (2). Apriete los tornillos con una llave Allen de 3 mm. Installez le poignée d'arrêt (1). Instale el mando del llave de paso (1).
English Set the high temperature limit stop** Remove the clip and stop ring from the cartridge stem. Turn the water on to one of the functions. Turn the cartridge stem until the output water is the desired high temperature, usually 110° - 112° F**. Replace the stop ring so that the tooth is against the cartridge stop. Replace the clip. It should not be possible to turn the stem further counter-clockwise. **Follow all applicable local plumbing codes when setting the high temperature limit stop.
Français Español Réglez la butée de limite d’eau chaude** Fije el tope de límite de alta temperatura** Retirez l’étrier et la bague de retenue de la tige de la cartouche. Retire la presilla y el aro de tope del vástago del cartucho. Faites couler l’eau en utilisant l’une des fonctions. Abra el paso del agua a una de las funciones. Tournez la tige de la cartouche jusqu’à ce que l’eau chaude soit à la température souhaitée, normalement entre 43 et 44 °C (110 et 112 °F)**.
English Justify the handle Loosen the handle screw. Remove the handle. Turn the cartridge stem until the output water is 100° F. Install the handle so that the override button is next to the sleeve indexing mark. Tighten the handle screw.
Français Español Réglez la poignée Ajuste el mando Desserrez la vis de la poignée. Retirez la poignée. Afloje el tornillo del mando Retire el mando. Tournez la tige de la cartouche jusqu’à ce que l’eau soit à une température de 100 °F. Gire el vástago del cartucho hasta que el agua de salida esté en100 °F. Installez la poignée de façon à ce que le bouton de surpassement soit près de la marque de repère du manchon.
English Modify the diverter to allow simultaneous use of both functions Do not carry out this modification if: • your local plumbing code does not allow the use of two shower functions simultaneously. • the homeowner does not desire this ability. Remove the diverter cartridge stop ring. Turn the diverter handle so that the indexing mark is at the 6:00 position to obtain water from both functions simultaneously.
Français Español Modifiez l'inverseur pour permettre l’usage simultané des deux fonctions Modifique el diverter para permitir el uso simultáneo de ambas funciones Ne pas exécuter cette modification si : No lleve a cabo esta modificación si: • Votre code local de plomberie ne permet pas l’usage de deux fonctions de douche simultanément. • Le propriétaire ne désire pas cette capacité. • Su código local de la plomería no permite el uso de dos funciones de ducha simultáneamente.
English Troubleshooting Problem Insufficient water Possible Cause Solution Supply pressure inadequate Check water pressure Cartridge filters dirty Clean the filters Showerhead or handshower filter dirty Clean the filter Crossflow: hot water forced into cold water supply or vice versa when mixture is closed Check valves dirty or worn Clean check valves, replace if necessary Output temperature does not correspond with temperature marked on handle Handle not justified Justify the handle Water he
Français Dysfonctionnement Pas assez d´eau Origine Pression d´alimentation insuffisante Filtre de l´élément thermostatique encrassé Joint-filtre de douchette encrassét Solution Contrôlez la pression Nettoyez les filtres Nettoyez le joint-filtre entre la douchette et le flexible Circulation opposée, l´eau chaude est comprimée dans l´arrivée d´eau froide et vice versa avec robinet fermé La température à la sortie ne correspond pas à la température de réglage Le réglage de la température n´est pas possible
Español Problema Sale poca agua Causa presión insuficiente filtro del termoelemento sucio filtro de la ducha sucio Solución comprobar presión limpiar filtro limpiar / cambiar filtros entre flexo y ducha Flujo de agua cruzada agua caliente entra en la tubería del agua fría o al revés Temperatura del agua no corresponde a lo marcado No es posible regular la temperatura válvula antirretorno sucia o pierde limpiar / cambiar válvula termostato no ha sido ajustado ajustar termostato termoelemento sucio/ll
Replacement Parts / Pièces détachées / Repuestos 22 7 11 23 10 21 16 9 5 17 29x3 14 8 6 2 4 48x3 3 23 15 1 24 5 29x3 12 14 6 4 23 48x3 20 18 15 19 13 21
1 E thermostat handle poignée thermostatique E mando del termostato E 2 E volume control handle poignée E mando E 3 escutcheon rosace florón 96552XX0 4 sleeve douille casquillo 96439XX0 5 sleeve douille casquillo 95253XX0 6 fixing screw vis du support tornillo portador 96454000 7 carrier plate support de rosace portador florón 96647000 8 thermostatic cartridge cartouche thermostatique termoelemento 94282000 9 noise reducer silencieux silenciador 10 check valve cla
Cleaning Recommendation for Hansgrohe Products Modern lavatory faucets, kitchen faucets, and showers consist of very different materials to comply with the needs of the market with regard to design and functionality. To avoid damage and returns, it is necessary to consider certain criteria when cleaning.
Recommandations pour le nettoyage des produits Hansgrohe Les robinetteries modernes de lavabo, de cuisine et de douche utilisent des matériaux très différents pour répondre aux besoins du marché en termes de conception et de fonctionnalité. Certaines règles de base doivent être respectées lors du nettoyage de ces produits afin d’éviter de les endommager ou d’avoir à les retourner.
Recomendación de limpieza para los productos de Hansgrohe Hoy en día, las griferías de baño y de cocina así como duchas modernas se componen de materiales muy distintos para satisfacer las exigencias del mercado respecto al diseño y la funcionalidad. Para evitar daños reclamaciones hay que tener en cuenta ciertos aspectos tanto en el uso como en su limpieza posterior.
Limited Lifetime Consumer Warranty This product has been manufactured and tested to the highest quality standards by Hansgrohe, Inc. (“Hansgrohe”). This warranty is limited to Hansgrohe products which are purchased by a consumer in the United States after March 1, 1996, and installed in either the United States or Canada. WHO IS COVERED BY THE WARRANTY This warranty extends to the original consumer purchaser only. This warranty is non-transferable.
Some States do not allow the exclusion or limitation of incidental or consequential damages, so the above limitation or exclusion may not apply to you. This warranty gives you specific legal rights, and you may have other rights which vary from State to State. You may be required by law to give us a reasonable opportunity to correct or cure any failure to comply before you can bring any action in court against us under the Magnuson-Moss Warranty Act.
www.hansgrohe-usa.com US - Installation Instructions • Part No. 90111601 • Revised 11/2009 Hansgrohe, Inc. • 1490 Bluegrass Lakes Parkway • Alpharetta, GA 30004 Tel.