Installation Instructions / Warranty Hansgrohe Water Filtration System C 04302XX0 E 04300XX0 S 04301XX0 Zuvo™ 04303XX0
Hansgrohe Water Filtration System C 04302XX0 E 04300XX0 S 04301XX0 Zuvo™ 04303XX0 Zuvo™ is a trademark of Zuvo™ Water, LLC
Installation Considerations • For best results, Hansgrohe recommends that this unit be installed by a licensed, professional plumber. • Please read over these instructions thoroughly before beginning installation. Make sure that you have all tools and supplies needed to complete the installation. • The Zuvo™ filter unit is intended for household use only. • This unit is intended to improve the taste and quality of otherwise potable, optically clear municipal or well water.
Consideraciones para la instalación • Para obtener mejores resultados, la instalación debe estar a cargo de un plomero profesional matriculado. • Antes de comenzar la instalación, lea estas instrucciones detenidamente. Asegúrese de tener las herramientas y los insumos necesarios para completar la instalación. • Este producto es pensado para el uso doméstico sólo. • Esta unidad es pensada mejorar el sabor y la calidad de de otro modo potable, vacía ópticamente agua municipal o pozo.
Technical Information / Données techniques / Datos tecnicos Recommended water pressure Pression d’eau recommandée Presión recomendada en servicio 15 - 75 psi Max. water pressure Pression d’eau maximum Presión en servicio max. 100 psi Hole size in mounting surface Dimension du trou dans la surface de montage Tamaño del orificio en la superficie de montaje 1⅜" Max.
English Installation Position the tap, escutcheon, and sealing ring on the mounting surface. Tighten the mounting nut. Wrap the threads on the ¼" adapter with 4 - 5 layers of Teflon tape. Install the adapter in the pipe tap. Close the faucet supply stops. Disconnect the cold supply hose from the stop. The Zuvo™ filter is for cold water only. Do not install the pipe tap on the hot supply stop. Install the pipe tap on the stop. Install the supply hose on the pipe tap.
Français Español Installation Instalación Placez le robinet, l’écusson et l’anneau d’étanchéité sur la surface de montage. Coloque el grifo, el escudo y los aros de sellado sobre la superficie de montaje. Serrez l’écrou de montage. Apriete la tuerca de montaje. Enveloppez les filets de l’adaptateur de ¼ po avec 4 – 5 couches de ruban Téflon. Envuelva las roscas en el adaptador de ¼” con 4 - 5 capas de cintas de Teflon. Installez l’adaptateur dans la pièce de raccordement.
English Trim the blue tube to length using a pair of scissors. Do not cut the tube too short. Push the blue tube into the ¼" adapter. The tube should enter the adapter approximately ⅜". Position the Zuvo™ filter unit at the desired location. Trim the red and clear tubes to the appropriate lengths. Do not cut the tubes too short. Push the red tube into the compression fitting on the elbow adapter until fully seated. Insert the elbow adapter in the inlet on the back of the filter until fully seated.
Français Coupez le tube bleu avec une paire de ciseaux pour obtenir une longueur appropriée. Ne le coupez pas trop court. Español Recorte el tubo azul hasta el largo adecuado con un par de tijeras. No corte demasiado el tubo. Poussez le tube bleu dans l’adaptateur de ¼ po. Le tube devrait entrer l’adaptateur approximativement ⅜ po. Empuje el tubo azul en el adaptador de ¼”. El tubo debe entrar el adaptador aproximadamente ⅜". Placez le filtre Zuvo™ à l’endroit souhaité.
English Pull outward on the hoses to make sure that they are secure. Hold the filter holder against the wall at the desired location. Confirm that there is sufficient space for the filter unit. Mark the positions of the screw holes. Drill the holes using a #32 bit. Install the filter holder. Rest the filter unit on the holder.
Français Español Tirez les tuyaux vers l’extérieur pour vous assurer de les avoir fixés solidement. Tire hacia afuera de las mangueras para asegurarse de que estén ajustadas. Tenez le porte-filtre contre le mur, à l’emplacement souhaité. Apoye el soporte del filtro contra la pared en la ubicación deseada. Assurez-vous de laisser un espace de dégagement suffisant pour le filtre. Asegúrese de que haya lugar suficiente para el la unidad del filtro. Percez les trous à l’aide d’une mèche no 32.
English Open the stops. Check all connections for leaks. When all connections are secure, plug the filter unit into the electrical outlet. Open the tap. Allow the tap to run for at least five minutes before using it for the first time. Do not drink the water coming from the system during this initial start-up. The flow from the tap may be unattractive for a few seconds when it is first turned on. Check the filter. Make sure that the ultraviolet light is on.
Français Español Ouvrez les robinets d’arrêt du robinet. Abra las llaves del grifo. Vérifiez l’étanchéité de tous les raccords. Verifique todas las conexiones para detectar pérdidas. Si tous les raccordements sont étanches, branchez le filtre à une prise électrique. Ouvrez le robinet. Cuando todas las conexiones estén ajustadas, conecte el filtro al tomacorriente. Abra el grifo. Laissez-le couler pendant au moins cinq minutes avant de l’utiliser pour la première fois.
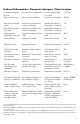
Troubleshooting Problem Possible Cause Solution Tap drips for several minutes after being turned off not a problem -- normal operation of tap Ultraviolet light does not turn on Filter is not plugged in Plug filter in Outlet is controlled by a switch Turn switch on Outlet is faulty Test the outlet Ultraviolet light must be replaced Replace ultraviolet light Flow is unattractive when tap is first turned on not a problem -- normal operation of tap Flow reduces over time Filter is dirty Replac
Dépannage Problème Cause possible Solution Le robinet dégoutte pendant plusieurs minutes après que vous l’ayez fermé Il ne s’agit pas d’un problème – ceci est normal La lumière ultraviolette ne s’allume pas Le filtre n’est pas branché Branchez le filtre La prise est contrôlée par un interrupteur Réglez l’interrupteur en position Marche (ON) La prise est défectueuse Testez la prise La lumière ultraviolette doit être remplacée Remplacez la lumière ultraviolette Le débit décroît avec le temps Le
Resolución de problemas Problema Causa posible Solución El grifo gotea por varios minutos una vez que está cerrado. No es un problema; es el funcionamiento normal del grifo. La luz ultravioleta no se enciende.
Cleaning Recommendation for Hansgrohe Products Modern lavatory taps, kitchen taps, and showers consist of very different materials to comply with the needs of the market with regard to design and functionality. To avoid damage and returns, it is necessary to consider certain criteria when cleaning.
• Un nettoyage régulier peut prévenir la formation de dépôts calcaires. • Si vous utilisez des nettoyants en vaporisateur, vaporisez d’abord sur une éponge ou un chiffon. Ne vaporisez jamais directement sur un robinet : des gouttelettes pourraient s’infiltrer dans les ouvertures et les interstices et endommager celui-ci. • Après le nettoyage, rincez abondamment avec de l’eau propre pour éliminer tout résidu de produit nettoyant.
Limited Consumer Warranty This product has been manufactured and tested to the highest quality standards by Hansgrohe, Inc. (“Hansgrohe”). This warranty is limited to Hansgrohe products that are purchased by a consumer in the United States or Canada after March 1, 1996, and installed in either in the United States or in Canada. WHO IS COVERED BY THE WARRANTY This warranty extends to the original purchaser only. This warranty is non-transferable.
When warranty service is completed, any repaired or replacement product or part will be returned to you postage prepaid. EXCLUSIONS AND LIMITATIONS REPAIR OR REPLACEMENT (OR, IN LIMITED CIRCUMSTANCES, REFUND OF THE PURCHASE PRICE) AS PROVIDED UNDER THIS WARRANTY IS THE EXCLUSIVE REMEDY OF THE PURCHASER. HANSGROHE NEITHER ASSUMES NOR AUTHORIZES ANY PERSON TO CREATE FOR IT ANY OTHER OBLIGATION OR LIABILITY IN CONNECTION WITH THIS PRODUCT.