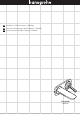
EN Installation / User Instructions / Warranty FR Instructions de montage / Mode d'emploi / Garantie ES Instrucciones de montaje / Manejo / Garantía PuraVida 15085xx1
English Technical Information 7¼" Recommended water pressure Max. water pressure Recommended hot water temp. Max. hot water temp Flow rate 15 - 75 psi 145 psi 120° - 140° F* 176°F* 1.5 gpm *Please know and follow all applicable local plumbing codes when setting the temperature on the water heater. 9⅞" 3¼" Installation Considerations • For best results, Hansgrohe recommends that this unit be installed by a licensed, professional plumber.
Français Español Données techniques Datos tecnicos Pression d’eau recommandée Pression d’eau maximum Température recommandée d'eau chaude Température maximum d'eau chaude Capacité nominale 15 - 75 psi 145 psi 120° - 140° F* 176°F* 1.5 gpm Presión recomendada en servicio Presión en servicio max. Temperatura recomendada del agua caliente Temperatura del agua caliente max. Caudal máximo 15 - 75 psi 145 psi 120� - 140� F* 176�F* 1.
English 1 Installation Turn the water off at the main before proceeding. Remove the caps. 2 3 Cut the plaster shields so that they extend ¹⁄₁₆" outside the surface of the finished wall. Seal the wall around the plaster shields using waterproof sealant. Failure to seal the wall can lead to possible water damage.
Français Español Installation Instalación Avant de commencer, fermez l’eau à la valve principale. Cierre el paso del agua en la entrada del suministro antes de comenzar. Retirez les capuchons. Retire las tapas. Coupez les protecteurs de façon à ce qu’une partie de ¹⁄₁₆ po soit à l’extérieur de la surface du mur fini. Corte los protectores de yeso de modo que sobresalgan ¹⁄₁₆" de la superficie de la pared terminada. Scellez le mur autour des protecteurs à l’aide d’un agent d’étanchéité.
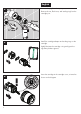
English Remove the plug from the spout port. 4 Remove the nut, flush insert, and sealing ring from the cartridge port. 30 mm 17 mm Install the cartridge adapter and sealing rings on the cartridge. 5 Lightly lubricate the cartridge o-ring and joystick using white plumbers grease. 6 6 ! Insert the cartridge in the cartridge cover, oriented as shown on the diagram.
Français Español Retirez le bouchon du port de bec de remplissage. Retire el tapón del orificio del surtidor. Retirez l’écrou, le compartiment affleurant et la bague d’étanchéité du port de cartouche. Retire la tuerca, el alojamiento de descarga y el anillo de sellado del orificio del cartucho. Installez l'adapteur et les bagues d’étanchéité dans la cartouche. Instale el adaptador y las juntas en el cartucho.
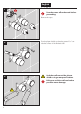
English 7 Install the cartridge. 8 Hold the cartridge stem steady with one hand. 9 Tighten the cover using a 27 mm wrench. With the other hand, rotate the cover clockwise to secure it to the rough.
Français Español Installez la cartouche. Instale el cartucho. Tenez la cartouche en place avec une main. Tenga el cartucho en el lugar con una mano. Serrez le capot avec l’autre main. Apriete la cobertura con la otra mano. Serrez la couverture à l’aide d’une clé de 27 mm. Apriete la cobertura con una llave de 27 mm.
English Measure the distance between the wall and the edge of the cartridge stem. 10 If the distance measures 1⅛" - 1⅝", select sleeves A. 11 10 ⅞" C ½" 1⅝" - 1⅞" B If the distance measures 1⅞" - 2¼", select sleeves C. 1⅞" - 2¼" 1¼" 1⅛" - 1⅝" If the distance measures 1⅝" - 1⅞" select sleeves B. A Connect the threaded rings to the selected sleeves.
Français Español Mesurez la distance entre le mur et le rebord de la cartouche. Mida la distancia entre la pared y el borde del cartucho. Si la distance mesure de 1⅛ - 1⅝ po, sélectionnez les gaines A. Si la distancia es de 1⅛" - 1⅝", seleccione los manguitos A. Si la distance mesure de 1⅝ - 1⅞ po, sélectionnez les gaines B. Si la distancia es de 1⅝" - 1⅞", seleccione los manguitos B. Si la distance mesure de 1⅞ - 2¼ po, sélectionnez les gaines C.
English 12 Install the handle. 13 Measure the distance from the surface of the spout port rough to the outside edge of the plaster shield ("X"). 14 Add 1¾" mm to X. ⁹⁄₁₆" + X + 1³⁄₁₆" 12 Cut the threaded nipple so that it is X + 1¾" long.
Français Español Installez la poignée. Instale la manija. Mesurez la distance entre la surface de la pièce du port de bec de remplissage et le rebord extérieur du protecteur (« X »). Mida la distancia desde la superficie de la parte interna del orificio del surtidor hasta el borde externo del protector de yeso (“X”). Ajoutez 1¾ po à la mesure « X ». Agregue 1¾" mm a X. Coupez le raccord fileté de façon à ce qu’il mesure « X » + 1¾ po de long. Corte el niple roscado para que tenga X + 1¾" de largo.
English 15 Wrap the threads on the nipple with Teflon tape. 16 Install the nipple. Tighten the nipple using an 8 mm Allen wrench. 8 mm 17 14 Install the baseplate.
Français Español Enveloppez les filets sur le raccord fileté avec du ruban Téflon. Envuelva las roscas del niple con cinta de Teflon. Installez le raccord fileté. Instale el niple. Serrez le raccord fileté à l’aide d’une clé hexagonale de 8 mm. Apriete el niple con una llave Allen de 8 mm. Installez la plaque de base. Instale la placa de base.
English 18 Install the sleeve/threaded ring assemblies. 19 Tighten the threaded rings using the service key. 20 Lightly lubricate the o-ring on the spout cover. Push the cover into place.
Français Español Installez les gaines et les bagues filetées. Instale los manguito y los aros roscados. Serrez-les en utilisant la clé de service. Apriete los aros usando la llave de servicio. Lubrifiez légèrement le joint torique du couvercle du bec de remplissage en utilisant de la graisse de plomberie blanche. Lubrique levemente la junta toroidal de la cobertura del surtidor utilizando grasa blanca para plomería. Instale la cobertura. Installez le couvercle.
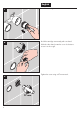
English 21 Push the spout over the nipple. Tighten the spout screw using a 2.5 mm Allen wrench. 2.5 mm 22 Lightly lubricate the o-ring on the handle cover. Install the cover. Install the flange.
Français Español Poussez le bec de remplissage en place sur le raccord fileté. Coloque el surtidor en su lugar sobre el niple. Serrez la vis du bec à l’aide d’une clé hexagonale de 2.5 mm. Lubrifiez légèrement le joint torique du couvercle de la poignée en utilisant de la graisse de plomberie blanche. Installez le couvercle. Apriete el tornillo del surtidor con una llave Allen de 2.5 mm. Lubrique la junta toroidal de la tapa con grasa blanca para plomería. Instale la tapa. Instale la brida.
97971000 A B C 20 31971000 (25 mm) 95775xx0 95777000 95290000 95282000 (34x2) 96339000 95169000 (21.95x1.78) (34x2) 95644000 98219000 96913000 (21x1.5) (57x2.5) 97601000 98128000 (13x2) 95626000 95778000 97601000 95287000 96912000 (57x2.
User Instructions / Instructions de service / Manejo on / ouvert /abierto off / fermé / cerrar cold / froid / frío hot / chaud / caliente 21
Cleaning / Nettoyage / Limpieza 1 22 2
Cleaning Recommendation for Hansgrohe Products Modern bathroom faucets, kitchen faucets and shower products are made from different materials to comply with the needs of the market with regard to design and functionality. To avoid damage to the product, it is necessary to take proper care of it. For best results: • Prevent the buildup of mineral scale and /or soap residue by cleaning your Hansgrohe product(s) when needed. • • Select a cleaning agent specifically intended for the type of product.
• Pour le nettoyage avec produit vaporisé liquide, en aucun cas sur la robinetterie, mais au contraire aspergé sur le chiffon (torchon, éponge) et effectuer comme cela le nettoyage, car les aérosols peuvent pénétrer dans les ouvertures et fentes de la robinetterie et peuvent provoquer des détériorations. • Après le nettoyage rincez avec suffisamment d’eau claire pour éliminer les restes de produits attachés.
Limited Consumer Warranty This product has been manufactured and tested to the highest quality standards by Hansgrohe, Inc. (“Hansgrohe”). This warranty is limited to Hansgrohe products that are purchased by a consumer in the United States or Canada after March 1, 1996, and installed in either in the United States or in Canada. WHO IS COVERED BY THE WARRANTY This warranty extends to the original purchaser only. This warranty is non-transferable.
EXCLUSIONS AND LIMITATIONS REPAIR OR REPLACEMENT (OR, IN LIMITED CIRCUMSTANCES, REFUND OF THE PURCHASE PRICE) AS PROVIDED UNDER THIS WARRANTY IS THE EXCLUSIVE REMEDY OF THE PURCHASER. HANSGROHE NEITHER ASSUMES NOR AUTHORIZES ANY PERSON TO CREATE FOR IT ANY OTHER OBLIGATION OR LIABILITY IN CONNECTION WITH THIS PRODUCT.
www.hansgrohe-usa.com US - Installation Instructions • Part No. 90147922 • Revised 03/2013 Hansgrohe, Inc. • 1490 Bluegrass Lakes Parkway • Alpharetta, GA 30004 Tel.