Installation Instructions / Warranty Metris 31063XX1 Metris 31263XX1 Talis 32310XX1 Focus 31730001
Metris Widespread Lavatory Faucet Metris Widespread Bidet Faucet Talis S Widespread Lavatory Faucet Focus Widespread Lavatory Faucet 31063XX1 31263XX1 32310XX1 31730XX1 Product Specification Requires 1/2” supply lines (not included) Max. mounting surface thickness Hole sizes in mounting surface Spout 1 3/8” Valves 1 1/4” Max. incoming water pressure Recommended incoming water pressure Max. incoming hot water temp. Recommended incoming hot water temp. Max.
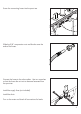
1730XX1 32310XX1 Note: To prevent shipping damage, the spout is attached to the spout escutcheon with two adhesive strips. These strips must be removed before the spout is installed. Loosen the spout screw with a 2.5 mm Allen wrench.Pull the spout away from the escutcheon. Remove the adhesive strips. adhesive strips Reassemble the spout assembly so that the hole for the pull rod is at the rear of the spout.
Installation Remove the valve mounting nuts from the valves. From below the mounting surface, push the valves up into the holes. Install the mounting nuts on the valves. Tighten the tensioning screws. Place the handles over the valve mounting nuts. Tighten the handles by rotating the escutcheons clockwise. The handles should be parallel to the basin. If necessary, loosen the tensioning screws and rotate the valve slightly. Install the spout.
Screw the connecting hoses into the spout tee. Slide the 3/8” compression nuts and ferrules over the ends of the hoses. Connect the hoses to the valve outlets. Use two wrenches so that the hoses do not twist or become loosened from the spout tee. Install the supply lines (not included). Install the drain. Turn on the water and check all connections for leaks.
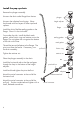
Install the pop-up drain Remove the plunger assembly. Unscrew the drain outlet flange from the tee. plunger Unscrew the tailpiece from the tee. Wrap the threads with two layers of Teflon tape and replace. height adjuster flange Install the white, flexible sealing gasket on the flange. Place it in the sink outlet. From under the sink, install the black mack gasket, white friction ring and retainer nut to the flange. Do not tighten the nut against the bottom of the sink at this time.
User Instructions Turn the right handle forward (clockwise) to turn the cold water on. Turn the handle back (counterclockwise) to turn the cold water off. Turn the left handle forward (counter-clockwise) to turn the hot water on. Turn it back (clockwise) to turn the hot water off.
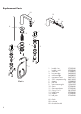
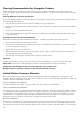
Replacement Parts 10 13 15 7 8 14 11 1 12 4 9 2 3 5 1 6 Metris 2 3 4 5 6 7 8 9 10 11 12 13 14 15 handle - hot handle - cold valve set hot cartridge cold cartridge connection hose 3/8” compression ftg aerator pull rod spout mounting kit spout spout escutcheon o-ring 11 x 2 bidet spout aerator ball joint XX = finish 00 = chrome 82 = brushed nickel 97503XX0 97502XX0 97960001 94009000 94008000 94071001 88513000 13085000 96657XX0 13961000 97504XX0 97505XX0 98127000 97506XX0 97360XX0 97362XX0
7 8 8 11 11 12 12 4 4 2 3 9 2 3 5 6 5 6 Talis Focus
Cleaning Recommendation for Hansgrohe Products Modern lavatory faucets, kitchen faucets, and showers consist of very different materials to comply with the needs of the market with regard to design and functionality. To avoid damage and returns, it is necessary to consider certain criteria when cleaning.
the product for use primarily for any other purpose, including, without limitation, a commercial purpose, this warranty extends only (i) for 1 year, with respect to Hansgrohe and Commercial products, and (ii) for 5 years, with respect to AXOR products. THIS WARRANTY DOES NOT COVER, AND HANSGROHE WILL NOT PAY FOR: A. Conditions, malfunctions or damage not resulting from defects in material or workmanship. B.
www.hansgrohe-USA.com US - Installation Instructions • Part No. 90597301 • Revised 12/2007 Hansgrohe, Inc. • 1490 Bluegrass Lakes Parkway • Alpharetta, GA 30004 Tel.