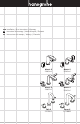
EN Installation / User Instructions / Warranty FR Instructions de montage / Mode d'emploi / Garantie ES Instrucciones de montaje / Manejo / Garantía Metris S 31063xx1 Metris S 31263xx1 Metris S 31067xx1 Metris S 31267xx1 Talis S 32310xx1 Focus S 31730001
English Français Technical Information Données techniques Recommended water pressure Max. water pressure Recommended hot water temp. Max. hot water temp Flow rate - lavatory Flow rate - bidet Hole size in mounting surface spout valves Max. depth of mounting surface Pression d’eau recommandée 15 - 75 PSI Pression d’eau maximum 145 PSI Température recommandée 120° - 140° F* d'eau chaude Température maximum d'eau chaude 176°F* Capacité nominale - lavabo 1.5 GPM Capacité nominale - bidet 2.
Español Datos tecnicos Presión recomendada en servicio 15 - 75 PSI Presión en servicio max. 145 PSI Temperatura recomendada del 120� - 140� F* agua caliente Temperatura del agua caliente max. 176�F* Caudal máximo - lavabo 1.5 GPM Caudal máximo - bidé 2.
31063xx1 31263xx1 4 31067xx1 31267xx1
32310xx1 31730xx1 5
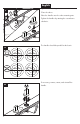
English Note: 1 2.5 mm To prevent shipping damage, the spout is attached to the spout escutcheon with two adhesive strips. Remove the strips before installing the spout. adhesive strips bandes adhésives tiras adhesivas 2 Installation For proper operation of the faucet, the hot supply must be on the left, and the cold supply must be on the right. red rouge rojo 3 6 Remove the valve mounting nuts from the valves. Push the valves up into the holes. Install the mounting nuts on the valves.
Français Español Avis: Aviso: Pour empêcher les dommages d’expédition, le bec est attaché à la rosace avec deux bandes adhésives. Para prevenir envío daño, el surtidor es conectado al de escudete con dos tiras adhesivas. Quite las tiras antes de instalar el surtidor. Enlevez les bandes avant installer le bec. Installation Instalación Installez la valve de l’eau chaude à gauche et celle de l’eau froide à droite.
English Tighten the tensioning screws. 4 Close the valves. 2 Place the handles over the valve mounting nuts. Tighten the handles by rotating the escutcheons clockwise. 1 8 3 5 The handles should be parallel to the basin. 6 If necessary, remove, rotate, and reinstall the handle.
Français Español Serrez les vis de pression. Apriete los tornillos tensores. Fermez les robinets. Cierre las válvulas. Placez les poignées sur les écrous de montage des valves. Coloque las manijas sobre las tuercas de montaje de las válvulas. Serrez les poignées en tournant les rosaces dans le sens horaire. Apriete las manijas girando los escudetes en sentido horario. Les poignées doivent être parallèles à la cuvette. Las manijas deben quedar paralelas al lavatorio.
English 7 Bidet faucets only: Place the spout on the mounting surface. Install the fiber washer, metal washer, and mounting nut. Tighten the mounting nut. Tighten the tensioning screws. Go to step 11. 8 Lavatory faucets only: Place the spout on the mounting surface. Install the fiber washer, metal washer, and mounting nut. Tighten the mounting nut. Tighten the tensioning screws.
Français Español Bidet seulement: Bidé solamente: Déposez le bec sur la surface de montage. Apoye el surtidor en la superficie de montaje. Installez la rondelle en fibre, la rondelle métalilique, et l’écrou de montage sur le bec. Instale la arandela de fibra, la arandela metálica y la tuerca de montaje en el surtidor. Serrez l'écrou de montage. Apriete la tuerca de montaje. Serrez les vis de pression. Apriete los tornillos tensores. Procédez à l'illustration 11. Continúe a la ilustración 11.
English 10 Screw the connecting hoses into the spout tee. 11 All models: Install the pull rod. Connect the hoses to the valve outlets. 12 9 mm 16 mm Use two wrenches so that the hoses do not twist or become loosened from the spout tee. Install the supply lines (not included).
Français Español Vissez les tuyaux de raccord dans le raccord en T du bec. Enrosque las mangueras de conexión a la “T” del surtidor. Tous les modèles: Todos modelos: Installez la tirette. Instale el tirador. Connectez les tuyaux sur les sorties de robinet. Conecte las mangueras a las salidas de las válvulas. Utilisez deux clés pour empêcher les torsions de tuyaux et pour éviter que ceux-ci ne se desserrent du raccord en T du bec. Installez les conduites d’alimentation (non comprises).
Installation / Installation / Instalación 1 2 3 4 5 6 Petroleum-based plumbers putty can damage the surface of some sinks. Please consult the manufacturer of the sink regarding compatible sealants. 14 Le mastic de pétrole-basé peut endommager la surface de quelque baignoires. S'il vous plaît consulter le fabricant du baignoire quant aux enduits d'étanchéité acceptables. Masilla de petróleo-basó puede dañar la superficie de algún bañeras.
Replacement Parts / Pièces détachées / Repuestos Metris S 97504xx0 97506xx0 97505xx0 97362xx0 97360xx0 13185xx0 96657xx0 97505xx0 97502xx0 98127000 11x2 98127000 11x2 97357001 97503xx0 13961000 94008000 94009000 13961000 96321001 98826xx0 - hot/ chaud/caliente 98827xx0 - cold/ froid/frío 88509xx0 xx = Colors / Couleurs / Acabados 00 = Chrome 82 = Brushed Nickel 83 = Polished Nickel 15
95339xx0 Talis S 97505xx0 96657xx0 96455xx0 95338xx0 Focus S 98127000 11x2 13185xx0 97357001 95337xx0 97505xx0 94008000 96657xx0 94008000 98127000 11x2 13961000 96321001 94009000 13961000 96321001 97357001 94009000 16
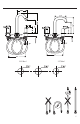
User Instructions / Instructions de service / Manejo closed fermé cerrado open ouvrir abrir hot chaud caliente cold froid frío 17
User Instructions / Instructions de service / Manejo 31063xx1, 31067xx1, 31730xx1 22 mm 32310xx1, 31263xx1, 31267xx1 1 2 3 18
Cleaning Recommendation for Hansgrohe Products Modern bathroom faucets, kitchen faucets and shower products are made from different materials to comply with the needs of the market with regard to design and functionality. To avoid damage to the product, it is necessary to take proper care of it. For best results: • Prevent the buildup of mineral scale and /or soap residue by cleaning your Hansgrohe product(s) when needed. • • Select a cleaning agent specifically intended for the type of product.
Conseil de nettoyage pour les produits Hansgrohe De nos jours le sanitaire moderne, la robinetterie et les douchettes se composent de matériaux très différents pour satisfaire à la demande concernant le design et la fonctionnalité. Pour éviter les détériorations et les réclamations, aussi bien pour l’utilisation que pour le nettoyage prochain, certains critères seront à prendre en considération.
Recomendación de limpieza para los productos de Hansgrohe Hoy en día, las griferías de baño y de cocina así como duchas modernas se componen de materiales muy distintos para satisfacer las exigencias del mercado respecto al diseño y la funcionalidad. Para evitar daños y reclamaciones hay que tener en cuenta ciertos aspectos tanto en el uso como en su limpieza.
Limited Consumer Warranty This product has been manufactured and tested to the highest quality standards by Hansgrohe, Inc. (“Hansgrohe”). This warranty is limited to Hansgrohe products that are purchased by a consumer in the United States or Canada after March 1, 1996, and installed in either in the United States or in Canada. WHO IS COVERED BY THE WARRANTY This warranty extends to the original purchaser only. This warranty is non-transferable.
EXCLUSIONS AND LIMITATIONS REPAIR OR REPLACEMENT (OR, IN LIMITED CIRCUMSTANCES, REFUND OF THE PURCHASE PRICE) AS PROVIDED UNDER THIS WARRANTY IS THE EXCLUSIVE REMEDY OF THE PURCHASER. HANSGROHE NEITHER ASSUMES NOR AUTHORIZES ANY PERSON TO CREATE FOR IT ANY OTHER OBLIGATION OR LIABILITY IN CONNECTION WITH THIS PRODUCT.
www.hansgrohe-usa.com US - Installation Instructions • Part No. 90597307 • Revised 07/2013 Hansgrohe, Inc. • 1490 Bluegrass Lakes Parkway • Alpharetta, GA 30004 Tel.