EN Installation / User Instructions / Warranty FR Instructions de montage / Mode d'emploi / Garantie ES Instrucciones de montaje / Manejo / Garantía Citterio M 34133xx1 Citterio M 34213xx1
English Technical Information Recommended water pressure Max. water pressure Recommended hot water temp. Max. hot water temp Flow rate - lavatory Flow rate - bidet Hole size in mounting surface spout valves Max. depth of mounting surface 15 - 75 PSI 145 PSI 120° - 140° F* 165°F* 1.5 GPM 2.2 GPM 1⅜" 1¼" 1⅜" *Please know and follow all applicable local plumbing codes when setting the temperature on the water heater.
Français Español Données techniques Datos tecnicos Pression d’eau recommandée 15 - 75 PSI Pression d’eau maximum 145 PSI Température recommandée 120° - 140° F* d'eau chaude Température maximum d'eau chaude 165°F* Capacité nominale - lavatory 1.5 GPM Capacité nominale - bidet 2.2 GPM Dimension du trou dans la surface de montage bec 1⅜ po robinets 1¼ po Profondeur maximale de la surface 1⅜ po de montage Presión recomendada en servicio 15 - 75 PSI Presión en servicio max.
English Installation To insure proper operation of the faucet, install the hot valve on the left, and the cold valve on the right. 1 Install the friction washer and fiber washer on the valve. Push the valve up through the hole in the mounting surface. Install the sealing ring, escutcheon, and nut. 2 (1) Rest the valve assembly on the mounting surface. 3 (2) Tighten the screws. (3) Push the handles into place.
Français Español Installation Instalación Pour vous assurer que le robinet fonctionne correctement, installez la valve d’eau chaude à gauche, et la valve d’eau froide à droite. Para asegurar el funcionamiento adecuado del grifo, instale la válvula de agua caliente en el lado izquierdo y la válvula de agua fría en el lado derecho. Installez la rondelle de friction et la rondelle en fibre sur la valve. Coloque la arandela de fricción y la arandela de de fibra en la válvula.
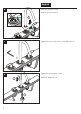
English 3 (1) Push the spout shank up through the mounting surface. 2 (2) Install the sealing ring, escutcheon, and shaft fastening ring. The notch on the shaft fastening ring and the notch on the shank must face away from the basin. 1 (3) Install the fiber washer, friction washer, and mounting nut. Tighten the mounting nut. 3 4 Check the alignment of the handles. 5 If one is not aligned, (1) pull it off, (2) turn it slightly, (3) and reinstall it.
Français Español (1) Poussez le corps du bec vers le haut, au travers de la surface de montage. (1) Empuje el tubo del surtidor hacia arriba a través de la superficie de montaje. (2) Installez l’anneau d’étanchéité, l’écusson et l’anneau de fixation de la tige. (2) Instale el aro de sellado, el escudo y el aro de ajuste del eje. L’encoche sur l’anneau de fixation de la tige et l’encoche sur le corps doivent pointer dans le sens opposé du bassin.
English 6 Lubricate spout the o-ring. Push the spout into place. 1 2 7 Tighten the spout screw with a 2 mm Allen wrench. 8 Tighten the mounting nut screws. Install the drain pull rod.
Français Español Lubrifieaz le joint torique du bec. Lubrique los retenes anulares del surtidor Poussez le bec pour le mettre en place. Coloque el surtidor en su lugar. Serrez la vis du bec à l’aide d’une clé hexagonale de 2 mm. Apriete el tornillo del surtidor con una llave Allen de 2 mm. Serrez les vis de l’écrou de montage. Apriete los tornillos de la tuerca de montaje. Installez la tige d’entraînement du trou d’écoulement. Instale el tirador de drenaje.
English 9 10 Screw the hoses into the spout shank by hand. Connect the hoses to the valves. Tighten using two wrenches. Do not allow the hoses to twist. Install the hot and cold supply lines (not included).
Français Español Vissez à la main les tuyaux dans le corps du bec. Atornille las mangueras en el tubo del surtidor manualmente. Raccordez les tuyaux aux valves. Serrez à l’aide de deux clés. Conecte las mangueras a las válvulas. Apriete utilizando dos llaves. Assurez-vous que les tuyaux ne s’entortillent pas. Installez les conduites d’alimentation en eau chaude et eau froide (non comprises). No permita que las mangueras se retuerzan.
Install the pop-up drain Remove the plunger. Unscrew the flange from the tee. Unscrew the tailpiece from the tee. Wrap the tailpiece threads with Teflon tape. Install the tailpiece on the tee. Install the sealing gasket on the flange. Rest the flange in the sink outlet. Install the mack gasket, friction ring and retainer nut on the flange. Install the tee and tailpiece on the flange. Tighten the retainer nut. Place the plunger in the drain.
Installez l’obturateur à clapet Instale el tapón elevable Retirez le plongeur. Retire el émbolo. Dévissez la collerette du raccord en T. Desenrosque la brida del tubo en “T”. Dévissez la queue du raccord en T. Desenrosque la alcachofa del tubo en “T”. Enveloppez les filets de la queue avec du ruban de Téflon. Installez la queue sur le raccord en T. Envuelva las roscas de la alcachofa con cinta de Teflon. Instale la alcachofa en el tubo en “T”. Installez le joint d’étanchéité sur la collerette.
Replacement Parts / Pièces détachées / Repuestos 98928xx0 98987000 95382000 30x1.
User Instructions / Instructions de service / Manejo off ferme cerrado on ouvert abierto Cleaning / Nettoyage / Limpiar 1 2 3 15
Cleaning Recommendation for Hansgrohe Products Modern bathroom faucets, kitchen mixers and showers consist of very different materials to comply with the needs of the market with regard to design and functionality. To avoid damage, it is necessary to consider certain criteria when cleaning. At the cleaning of the fittings and showers, in principle, it must be pointed out: • Only use cleaning material which is explicitly intended for this type of application.
fentes de la robinetterie et peuvent provoquer des détériorations. • Après le nettoyage rincez avec suffisamment d’eau claire pour éliminer les restes de produits attachés. • L’utilisation d’appareil de nettoyage à vapeur n’est pas autorisée, car les températures importantes peuvent détériorer les produits. Indications importantes • • Les produits pour le corps comme les savons liquides, les shampooings ou les gels de douche peuvent causer des détériorations.
Limited Consumer Warranty This product has been manufactured and tested to the highest quality standards by Hansgrohe, Inc. (“Hansgrohe”). This warranty is limited to Hansgrohe products that are purchased by a consumer in the United States or Canada after March 1, 1996, and installed in either in the United States or in Canada. WHO IS COVERED BY THE WARRANTY This warranty extends to the original purchaser only. This warranty is non-transferable.
When warranty service is completed, any repaired or replacement product or part will be returned to you postage prepaid. EXCLUSIONS AND LIMITATIONS REPAIR OR REPLACEMENT (OR, IN LIMITED CIRCUMSTANCES, REFUND OF THE PURCHASE PRICE) AS PROVIDED UNDER THIS WARRANTY IS THE EXCLUSIVE REMEDY OF THE PURCHASER. HANSGROHE NEITHER ASSUMES NOR AUTHORIZES ANY PERSON TO CREATE FOR IT ANY OTHER OBLIGATION OR LIABILITY IN CONNECTION WITH THIS PRODUCT.
www.hansgrohe-usa.com US - Installation Instructions • Part No. 90445726 • Revised 09/2010 Hansgrohe, Inc. • 1490 Bluegrass Lakes Parkway • Alpharetta, GA 30004 Tel.