EN Installation / User Instructions / Warranty FR Instructions de montage / Mode d'emploi / Garantie ES Instrucciones de montaje / Manejo / Garantía Logis 71500xx1 Focus E 04365xx0 Logis 71514xx1 Focus E 04366xx0
English Installation Considerations • For best results, Hansgrohe recommends that this unit be installed by a licensed, professional plumber. • Please read over these instructions thoroughly before beginning installation. Make sure that you have all tools and supplies needed to complete the installation. • The 4-Hole Roman Tub Set trim kits require rough 06646000 (not included). Rough 06646000 is listed by IAPMO.
Español Consideraciones para la instalación Tools Required / Outiles Utiles / Herramientas Útiles • Para obtener mejores resultados, la instalación debe estar a cargo de un plomero profesional matriculado. • Antes de comenzar la instalación, lea estas instrucciones detenidamente. Asegúrese de tener las herramientas y los insumos necesarios para completar la instalación. • Los juegos de pieza exterior de 4 orificios requieren la pieza interior 06646000 (no incluida).
8¼" 5½" 7⅞" 3⅛" 4¾" 6" 2⅞" 2⅜" 2" 2⅜" 2¾" 2⅜" 04366xx0 7⅞" 3⅛" 4¾" 6" 2⅞" 2⅜" 04365xx0 4 2¾" 2⅜"
4⅜" ° 40 2⅞" 7⅛" 2⅞" 9⅛" 9⅞" 6¾" 2⅜" 2¾" 4⅞" 2" 4⅞" 4⅞" 40° 2⅞" 2⅞" 7⅛" 9⅞" 71514xx1 2⅜" 2¾" 4⅞" 71500xx1 4⅞" 4⅜" 5
User Instructions / Instructions de service / Manejo off fermé cerrar on ouvert abierto 2 1 6
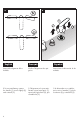
1 2 1 3 2 2 1 English Turn the water off at the main before beginning. Français Avant de commencer, fermez l'eau à la valve principale. Español Cierre el paso del agua en la entrada del suministro antes de comenzar. Remove the plaster shields from the hot and cold valves and the spout tee. Retirez les protecteurs. Install the handle escutcheons. Installez les écussons. Instale los floróns. Install the white plastic snap connectors and the screws.
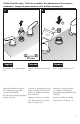
3 4 2 1 English Français 3 Español Inspect the alignment of the handles. Vérifiez l’alignement des poignées. Inspeccione la alineación de los mandos. If it is not satisfactory, remove the handle (1), turn it slightly (2), and reinstall (3). Si l’alignement n’est pas satisfaisant, retirez la poignée (1), tournez-la légèrement (2), puis réinstallez-la (3). Si la alineación no es satisfactoria, retire el mando (1), gírelo levemente (2) y reinstálelo (3).
3-Hole Trim Kits only / Pour les ensembles de robinetterie à 3 ouvertures seulement / Juegos de pieza exterior de 3 orificios únicamente 5 6 2 1 Arm atu Gre renfe ase tt Nr. 10 47 62 20 27 mm English Français Español Remove the brass plug from the tee. Retirez le bouchon du raccord en T. Retire el tapón del tubo en “T”. Lightly lubricate the o-rings on the sealing ring using white grease (not included).
7 2 1 3 mm English Install the spout escutcheon. Français Installez l’écusson. Poussez le robinet sur la bague Press the spout over the spout tee. Install and tighten the set d’étanchéité. screw with a 3 mm Allen wrench. Serrez la vis de pression à l’aide d’une clé hexagonale de 3 mm. Do not overtighten the set screw Ne serrez pas or the o-rings excessivement la on the sealing vis de pression ring will deform, ou les joints towhich will cause riques sur la baa leak.
4-Hole Trim Kits only / Pour les ensembles de robinetterie à 4 ouvertures seulement / Juegos de pieza exterior de 4 orificios únicamente 5 6 2 Ar ma G ture re as nfe e tt N r. 10 47 62 20 1 27 mm English Remove the brass plug from the tee. Lightly lubricate the diverter o-rings using white grease (not included). Press the diverter assembly firmly into the spout tee until it is fully seated. Français Español Retirez le bouchon du raccord en T. Retire el tapón del tubo en “T”.
7 8 2 3 1 3 mm English Français Español Install the spout escutcheon. Installez l’écusson. Instale el florón. Firmly press the spout over the tee and diverter. Tighten the set screw with the included 3 mm Allen wrench. Poussez le robinet sur le dispositif de dérivation. Serrez la vis de pression à l’aide d’une clé hexagonale de 3 mm. Presione el surtidor sobre el distribuidor. Apriete el tornillo de fijación con una llave Allen de 3 mm. Do not overtighten the screw. Install the pull rod.
9 10 3 2 1 2 1 English Français Español Pull out on the handshower hose. Tirez sur l’extrémité du tuyau pour l’éloigner du support. Screw the handshower holder escutcheon into place. Installez l’écusson. Tire el extremo de la manguera hacia afuera del soporte. Install the elbow. Installez le coude. Instale el codo. Place the screen washer in the elbow. Screw the handshower into the elbow. Installez le tamis dans le coude. Instale la arandela de filtro en el codo.
Replacement Parts / Pièces détachées / Repuestos Focus E 98607xx0 95941xx0 13914xx0 28504xx1 97660000 88651000 97779xx0 28071xx0 94074000 95929xx0 95819000 97159xx0 94184000 31098xx0 96775000 95937xx0 13914xx0 97660000 97779xx0 88512000 95929xx0 95819000 xx = Colors / Couleurs / Acabados 00 = Chrome 82 = Brushed Nickel 14 94184000 31098xx0
Logis 97660000 88512000 31098xx0 94184000 97779xx0 96774xx0 97660000 04332xx0 14x2.5 23x2.5 22x2 94246000 28071xx0 94074000 96775000 97159xx0 94184000 31098xx0 9x2.
Cleaning Recommendation for Hansgrohe Products Modern bathroom faucets, kitchen faucets and shower products are made from different materials to comply with the needs of the market with regard to design and functionality. To avoid damage to the product, it is necessary to take proper care of it. For best results: • Prevent the buildup of mineral scale and /or soap residue by cleaning your Hansgrohe product(s) when needed. • • Select a cleaning agent specifically intended for the type of product.
Ne pulvérisez pas les nettoyants directement sur le produit car des gouttes pourraient entrer dans les ouvertures et les fentes et causer des dommages. Lorsque vous utilisez des nettoyants par pulvérisation, pulvérisez le nettoyant sur un chiffon ou une éponge douce. Important • Les residus de produits pour le corps comme les savons liquides, shampooings, gels de douche, teintures pour cheveux, parfums, apres-rasage et vernis a ongles peuvent causer des deteriorations.
Limited Consumer Warranty This product has been manufactured and tested to the highest quality standards by Hansgrohe, Inc. (“Hansgrohe”). This warranty is limited to Hansgrohe products that are purchased by a consumer in the United States or Canada after March 1, 1996, and installed in either in the United States or in Canada. WHO IS COVERED BY THE WARRANTY This warranty extends to the original purchaser only. This warranty is non-transferable.
EXCLUSIONS AND LIMITATIONS REPAIR OR REPLACEMENT (OR, IN LIMITED CIRCUMSTANCES, REFUND OF THE PURCHASE PRICE) AS PROVIDED UNDER THIS WARRANTY IS THE EXCLUSIVE REMEDY OF THE PURCHASER. HANSGROHE NEITHER ASSUMES NOR AUTHORIZES ANY PERSON TO CREATE FOR IT ANY OTHER OBLIGATION OR LIABILITY IN CONNECTION WITH THIS PRODUCT.
www.hansgrohe-usa.com US - Installation Instructions • Part No. 90182703 • Revised 04/2015 Hansgrohe, Inc. • 1490 Bluegrass Lakes Parkway • Alpharetta, GA 30004 Tel.