EN Installation / User Instructions / Warranty FR Instructions de montage / Mode d'emploi / Garantie ES Instrucciones de montaje / Manejo / Garantía Talis C 14127xx1
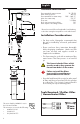
English Technical Information 4" 2⅛" 1¼" 3⅜" 7⅞" 6⅞" Recommended water pressure Max. water pressure Recommended hot water temp. Max. hot water temp Flow rate Hole size in mounting surface Max. depth of mounting surface 15 - 75 PSI 145 PSI 120° - 140° F* 176°F* 1.3 GPM 1⅜" 1⅝" *Please know and follow all applicable local plumbing codes when setting the temperature on the water heater.
Français Español Données techniques Datos tecnicos Pression d’eau recommandée 15 - 75 PSI Pression d’eau maximum 145 PSI Température recommandée 120° - 140° F* d'eau chaude Température maximum d'eau chaude 176°F* Capacité nominale 1.3 GPM Dimension du trou dans la surface 1⅜ po de montage Profondeur maximale de la surface 1⅝ po de montage Presión recomendada en servicio 15 - 75 PSI Presión en servicio max.
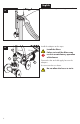
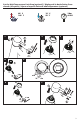
English Installation 1 Install the pull rod. Place the faucet and sealing ring on the mounting surface. 2 Install the fiber washer, metal washer and mounting nut. Tighten the mounting nut by hand.
Français Español Installation Instalación Installez la tirette. Instale el tirador. Placez le robinet et l’anneau d’étanchéité sur la surface de montage. Coloque el grifo y el aro de sellado sobre la superficie de montaje. Installez la rondelle en fibre, la rondelle métallique et l’écrou de montage. Instale la arandela de fibra, la arandela metálica y la tuerca de montaje. Serrez l’écrou de montage à la main. Apriete la tuerca de montaje con la mano.
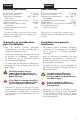
English 3 Tighten the tensioning screws using a screwdriver. 4 Install the adapters on the stops. 10 mm Install the filters. 19 mm Failure to install the filters may result in unsatisfactory operation of the faucet. 1 2 Connect the hot and cold supply hoses to the adapters. Use two wrenches as shown. Do not allow the hoses to twist.
Français Español Serrez les vis de pression à l’aide d’un tournevis. Apriete los tornillos tensores con un destornillador. Installez les adaptateurs sur les butées d’arrêt. Instale los adaptadores sobre los topes. Installez les filtres. Instale los filtros. Si ces filtres ne sont pas installés, il est possible que le robinet n’offre pas un rendement satisfaisant. Si no se instalan los filtros, el grifo puede funcionar en forma insatisfactoria.
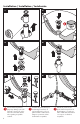
Installation / Installation / Instalación 1 2 3 4 5 6 Petroleum-based plumbers putty may damage some sink materials. Please refer to the instructions included with the sink regarding acceptable sealants. 8 Le mastic de pétrole-basé peut endommager la surface de quelque baignoires. S'il vous plaît consulter le fabricant du baignoire quant aux enduits d'étanchéité acceptables. Masilla de petróleo-basó puede dañar la superficie de algún bañeras.
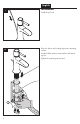
Set the High Temperature Limit Stop (optional) / Réglage de la butée limite d’eau chaude (en option) / Ajuste el tope de límite de alta temperatura (opcional) 60° C 140° F 1 4 6 10° C 50° F 2 3 Bar 44 PSI 3 5 7 9
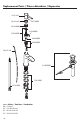
Replacement Parts / Pièces détachées / Repuestos 14191xx0 98863xx0 96338000 98864000 97685000 95140000 98865000 98866000 96657xx0 88509000 13961000 95141000 xx = Colors / Couleurs / Acabados 00 = Chrome 62 = Oil Rub Bronze 82 = Brushed Nickel 83 = Polished Nickel 10
User Instructions / Instructions de service / Manejo on ouvert abierto off fermé cerrar hot chaud caliente cold froid frío 1 2 10 mm 1 19 mm 2 If the flow of water diminishes over time, remove the hose filters. Si le débit d’eau diminue avec le temps, retirez les filtres de tuyau. Flush the filters with clear water. Rincez les filtres à l’eau claire. Install the filters. Installez les filtres. Si el caudal de agua disminuye con el tiempo, retire los filtros de la manguera.
Cleaning Recommendation for Hansgrohe Products Modern bathroom faucets, kitchen faucets and shower products are made from different materials to comply with the needs of the market with regard to design and functionality. To avoid damage to the product, it is necessary to take proper care of it. For best results: • Prevent the buildup of mineral scale and /or soap residue by cleaning your Hansgrohe product(s) when needed. • • Select a cleaning agent specifically intended for the type of product.
• Après le nettoyage rincez avec suffisamment d’eau claire pour éliminer les restes de produits attachés. • L’utilisation d’appareil de nettoyage à vapeur n’est pas autorisée, car les températures importantes peuvent détériorer les produits. Indications importantes • • Les produits pour le corps comme les savons liquides, les shampooings ou les gels de douche peuvent causer des détériorations. Ici aussi on doit: Après l’utilisation rincer soigneusement les restes avec de l’eau.
Limited Consumer Warranty This product has been manufactured and tested to the highest quality standards by Hansgrohe, Inc. (“Hansgrohe”). This warranty is limited to Hansgrohe products that are purchased by a consumer in the United States or Canada after March 1, 1996, and installed in either the United States or in Canada. WHO IS COVERED BY THE WARRANTY This warranty extends to the original purchaser only. This warranty is non-transferable.
Exclusions and Limitations REPAIR OR REPLACEMENT (OR, IN LIMITED CIRCUMSTANCES,REFUND OF THE PURCHASE PRICE) AS PROVIDED UNDER THIS WARRANTY IS THE EXCLUSIVE REMEDY OF THE PURCHASER.HANSGROHE NEITHER ASSUMES NOR AUTHORIZES ANY PERSON TO CREATE FOR IT ANY OTHER OBLIGATION OR LIABILITY IN CONNECTION WITH THIS PRODUCT.
www.hansgrohe-usa.com US - Installation Instructions • Part No. 90461521 • Revised 05/2013 Hansgrohe, Inc. • 1490 Bluegrass Lakes Parkway • Alpharetta, GA 30004 Tel.