
User's Manual
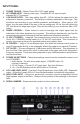

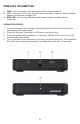


INPUT PANEL
1. POWER TOGGLE – Master Power ON / OFF toggle switch.
2. AC POWER INPUT – Mains power input. Standard IEC-C8 input accepts
standard IEC-C7 connector.
3. LOW PASS FILTER – This rotary setting from 60 – 160 Hz adjusts the upper end of the
subwoofer’s frequency response. This setting is innitely adjustable in the range. This
should be set according to your satellite speaker’s specications. When using a LFE
signal, turn this rotary knob all the way to the top setting past 160 Hz, this will bypass the
LPF and allow full range input signal. Only use this setting if your electronics has a LFE
output.
4. PHASE CONTROL – Phase control is used to time-align the output signal from the
subwoofer to the other speakers in your system. This setting is best done by ear from the
normal listening position listening to both the satellite and subwoofer speakers.
5. 12 VOLT TRIGGER – Using the 2 pin green phoenix connector, this controls the Nano
One’s ON / STANDBY setting based on a 12 Volt DC input signal. This connection is
polarity free meaning there is no specied positive and negative input.
6. IR CONTROL – Using a 3.5 mm Minijack input, this allows an external control system to
send IR commands directly to the subwoofer without the need for an external IR emitter.
7. LPF SLOPE – The two settings are 12 dB/octave and 24 dB/octave. This adjustment to
the Low Pass Filter controls the roll off or slope rate of the upper end of the subwoofer’s
frequency response. The proper setting depends on your satellite speaker’s specications
and personal taste.
8. POWER ON SETTINGS – These three settings control how the subwoofer comes in and
o u t of S TA N D B Y:
i. Audio Sense – On with active audio signal. STANDBY after ~30
minutes of inactivity.
ii. 12 Volt Trigger – On with 12 V Trigger input. See Item #5 above.
iii. On – On and Standby with the front button or IR remote
9. LFE / LINE LEVEL INPUT – Use this 3.5mm Minijack input for an AVR’s LFE / Subwoofer
output. Utilize the Female RCA to 3.5mm Minijack adapter included with this product.
10. HIGH LEVEL INPUT – Using the 4 pin phoenix connector, connect an amplied Left and
Right speaker output to the Nano. Please note the polarity of the markings on this input’s
label.
11. SERIAL NUMBER - Please save this number for future reference.
2