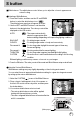
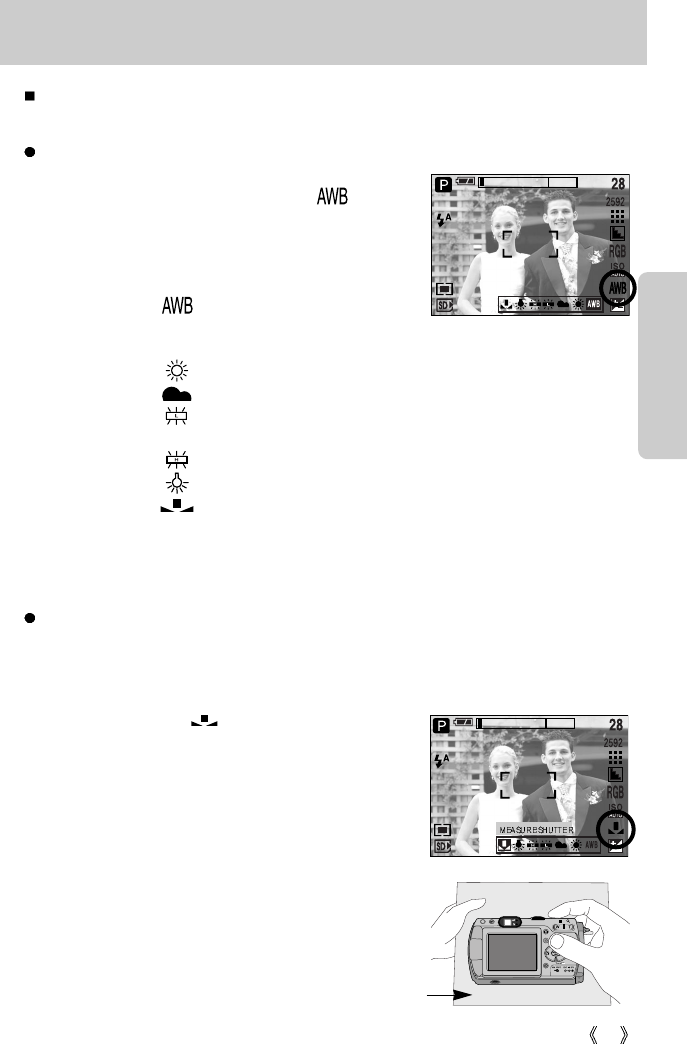
S button White balance : The white balance control allows you to adjust the colours to appear more natural looking. Selecting a White Balance 1. Press the S button, and then use the UP and DOWN buttons to select the white balance icon ( ). The white balance menu bar will appear as shown. 2. Use the LEFT and RIGHT buttons to set the white balance to the desired value. The value you set will be displayed on the LCD monitor.
S button ISO : You can select the ISO sensitivity when taking pictures. The speed or specific light-sensitivity of a camera is rated by ISO numbers. Selecting an ISO Sensitivity 1. Press the S button, and then use the UP and DOWN buttons to select the ISO icon ( ). The ISO menu bar will appear as shown. 2. Use the LEFT and RIGHT buttons to select the desired ISO sensitivity value. - AUTO : The camera's sensitivity is automatically changed by variables such as lighting value or subject brightness.
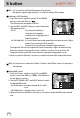
S button A/S/M : The user can manually set shutter speed or aperture value in the menu. Selecting the A/S/M shooting mode. 1. Turn the mode dial to select the ASM shooting mode. 2. Press the S button and use the Up and Down buttons to select the A/S/M shooting mode icon ( ) to open the A/S/M shooting mode menu as shown in the picture. 3. Press the Left and Right buttons to select desired option for the A/S/M shooting mode and press the S button.
S button Long Time shutter : This camera automatically adjusts the shutter speed and aperture values to the shooting environment. However, in NIGHT SCENE mode, you can set the shutter speed and aperture values to your preference. Adjusting the shutter speed and aperture values 1. Select the NIGHT SCENE mode by rotating the mode dial. 2. Press S button and Long Time shutter menu (LT, For selecting shutter speed and aperture value) will be displayed. 3.
MF button Use this button to select the focusing method. Repeatedly press the MF button to rotate [Manual focusing] [Continuous automatic focusing] [Automatic focusing]. Automatic focusing : Slightly press the shutter to let the camera measure distance to the object and select the best focusing. If successfully focused with the slight press of the shutter, the automatic focusing mark is turned green.
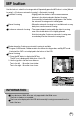
LCD button You can check the recording status in the LCD monitor. In any mode with the exception of VOICE RECORDING mode, pressing the LCD button will change the display as shown below. Pressing the LCD button [ Image & full information ] Pressing the LCD button [ Image & basic information ] [ LCD off ] Pressing the LCD button If the LCD monitor is turned off, the auto focus lamp will light up.
Using the LCD monitor to adjust the camera settings You can use the menu on the LCD monitor to set up recording functions. In any mode with the exception of VOICE RECORDING mode, pressing the MENU button displays the menu on the LCD monitor. INFORMATION The menu will not be displayed on the LCD monitor in the following circumstances: - When another button is being operated. - While image data is being processed. (when the green lamp next to the viewfinder blinks) - When there is no battery capacity.
Using the LCD monitor to adjust the camera settings Menu tab Main menu Sub menu Camera working mode Page NORMAL B&W EFFECT SEPIA p.51 NEGATIVE SOFT SHARPNESS NORMAL p.52 VIVID SINGLE SHOOTING CONTINUOS p.52 AEB MYSET1 LOAD MYSET2 p.53 MYSET3 MYSET1 SAVE MYSET2 p.53 MYSET3 SCENE CHILDREN LANDSCAPE CLOSE-UP PORTRAIT SUNSET DAWN BACKLIGHT FIREWORKS BEACH&SNOW * Menus are subject to change without prior notice. 48 p.
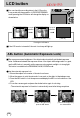
How to use the menu 1. Turn on the camera and press the MENU button. A menu for each camera mode appears. However, there is no menu for Voice Recording mode ( ). 2. Use the LEFT and RIGHT buttons to navigate through the menus. Press the LEFT or RIGHT button. 2592 QUALITY TIFF SUPER FINE FINE NORMAL 2592 METERING MULTI SPOT Press the LEFT or RIGHT button. EFFECT Press the UP or DOWN button. SAVE 2592 NORMAL B&W SEPIA NEGATIVE 3. Use the UP and DOWN buttons to select a sub menu.
Quality You can select the compression ratio appropriate for your application of the captured images. The higher the compression ratio, the lower the picture quality. 2592 QUALITY TIFF SUPER FINE FINE NORMAL TIFF [PROGRAM mode] STILL IMAGE mode Mode MOVIE CLIP mode Icon TIFF Sub menu TIFF S.FINE FINE NORMAL 30FPS 15FPS File Format tif jpeg jpeg jpeg avi avi INFORMATION TIFF is the highest quality and NORMAL is the lowest setting. Choose the setting appropriate for your needs.
Metering If you cannot obtain suitable exposure conditions, you can change the metering method to take brighter pictures. MULTI ( SPOT ( ) : Exposure will be calculated based on an average of the available light in the image area. However, the calculation will be biased towards the centre of the image area. This is suitable for general use. 2592 METERING MULTI SPOT ) : Only the rectangular area in the center of [ PROGRAM mode ] the LCD monitor will be metered for light.
Sharpness You can adjust the sharpness of the picture you want to take. You cannot check the sharpness effect on the LCD monitor before you take a picture, because this function is applied only when the captured image is stored on the memory. SHARPNESS SOFT NORMAL VIVID [ PROGRAM mode ] Sub menu SOFT NORMAL VIVID Icon Description The edges of the image are softened. This effect is suitable for editing images on your PC. The edges of the image are sharp. This is suitable for printing.
Save / Load the camera configuration (MySET) Use the MySET mode to save frequently used camera settings (SAVE) and use it later (LOAD) Saving the camera configuration : Available in the PROGRAM, A/S/M and NIGHT SCENE shooting modes. 1. Use the camera buttons and menu to set desired camera configuration. 2. Press the menu button in any modes except AUTO, SAVE MOVE: SET:OK MYSET1 VOICE RECORDING, MySET, MOVIE CLIP or SCENE MYSET2 mode. MYSET3 3. Press the Left/Right buttons to select the [SAVE] menu tap. 4.
Scene Select the [SCENE] submenu to automatically configure optimal settings, depending on the selected scene. Only available in the Scene Mode. 2592 SET UP FILE PWR SAVE LANGUAGE FORMAT DATE.TIME EXIT:MENU MOVE: RESET OFF NTSC 04/05/01 [ SCENE mode ] Sub menu Icon Description PORTRAIT To take picture of a person. CHILDREN Take a still picture of capturing moving children. LANDSCAPE CLOSE-UP SUNSET DAWN Scenery with green woods or blue sky.
Starting play mode Turn the camera on and select Play mode by pressing the play mode button ( ). The camera can now play back the images stored in the memory. If you have turned on the camera by pressing the POWER button, you can press the PLAY MODE button once to switch to Play mode and press it again to switch to Recording mode. You can turn the power on with the play mode button. You can set up the PLAY mode function by using the camera buttons and LCD monitor.
Starting play mode Playing back a movie clip Steps from 1-2 are the same as those to play back a still image. 3. Select the recorded movie clip that you want to play back by using the LEFT/RIGHT button. If you select a movie clip, the movie clip indicator ( ) will be displayed on the LCD monitor. 4. Press the play & pause button ( ) to play back a movie clip file. - To pause a movie clip file while playing it back, press the play & pause button again.
LCD monitor indicator The LCD monitor displays information about the shooting conditions. No. Description Icon Page 1 Battery 2 Play mode 3 File Type 4 Voice memo p.59 5 Protect indicator p.68 6 DPOF indicator p.71 7 Current memory card 8 Stored image number p.16 10/10 If you press the LCD button, you can check the following recording information: SIZE AV TV ISO FLASH DATE : : : : : : 2592X1944 F2.7 1/60 75 OFF 2004/05/01 SIZE AV TV ISO FLASH DATE : 2592X1944 Size : F2.
Using the camera buttons to adjust the camera In Play mode, you can use the buttons on the camera to conveniently set up the Play mode functions. Thumbnail ( ) / Enlargement ( ) button You can view multiple pictures, enlarge a selected picture, and crop and save a selected area of an image. Thumbnail display 1. While an image is displayed full screen, press the thumbnail button. 2. The thumbnail display will highlight the image that had been showing at the time the thumbnail mode was selected. 3.
Thumbnail( ) / Enlargement( ) button The maximum enlargement rate in proportion to the image size. Image size 2592 Maximum enlargement rate 9.00 2272 6.45 2048 5.33 1600 1024 5.00 4.00 640 3.33 Trimming : You can extract part of the image that you want and save it separately. 1. Select an image that you want to enlarge and press the TRIMMING? enlargement button. TRIM : OK CANCEL : 2. Different parts of the image can be viewed by pressing the 5 function button. 3.
Voice ( ) memo / Up button 3. Press the shutter button to start recording and voice will be recorded to the still image for 10 seconds. While the voice is recording, the recording status window will be displayed as shown alongside. 4. The recording can be stopped by pressing the shutter button again. STOP.SHUTTER REC 5. The ( ) icon will be displayed on the LCD monitor after voice memo recording has finished. - Voice memos can’t be recorded onto movie clip files.
LEFT/ RIGHT/ MENU/ OK button LEFT / RIGHT/ MENU/ OK buttons activate the following. - LEFT button : While the menu is showing, press the LEFT button to select the menu tab to the left of the cursor. - RIGHT button : While the menu is showing, press the RIGHT button to select the menu tab to the right of the cursor, or to move an secondary menu. - MENU button : When you press the MENU button, the play mode menu will be displayed on the LCD monitor.
Delete( ) button This deletes images stored on the memory card. Deleting Images in Play Mode 1. Select an image that you want to delete by pressing the LEFT / RIGHT button and press the DELETE( ) button. 2. A message will display as shown alongside on the LCD monitor. 3. Press the OK button to delete the image. DELETE? DEL. : OK CANCEL : INFORMATION Before deleting images from the camera, you should protect or download images to your computer that you wish to keep.
COPY button This function is used to copy images in a memory card to another memory card. Copying an image 1. Press the play mode button and use the Left/Right buttons to select an image to copy. 2. Press the Copy button to display the following message. 3. Press the OK button : The image is copied. Press the Left button : Cancel the copy operation. COPY? COPY : OK CANCEL : INFORMATION If there is not enough space in the memory card to save the image, [CARD FULL!] message is displayed.
Setting up the play back function using the LCD monitor PLAY mode functions can be changed by using the LCD monitor. In the PLAY mode, pressing the MENU button displays the menu on the LCD monitor. The menus you can set up in Play mode are as follows. To capture an image after setting up the play menu, press the PLAY button. The items indicated by are default settings. Menu tab Main menu DEL.
Setting up the play back function using the LCD monitor Menu tab Main menu D P O F Sub menu Secondary menu STANDARD - INDEX - SIZE - ONE PIC - ALL PICS - DEFAULT - Page p. 73 CANCEL p. 75 IMAGES POSTCARD SIZE 4X6, 8X10 A6, A4, B5 FULL LAYOUT P I T INDEX C C PLAIN U SETUP 1,2,4,6,8 p. 76 PAPER S PHOTO T FASTPHO. B O R DRAFT M QUALITY I NORMAL FINE D G ON DATE E OFF ON FILENAME OFF STANDARD - INDEX - p. 77 - p. 78 PRINT DPOF PRN NO RESET YES p.
Deleting images Of all the files stored in the memory card, the unprotected files in the DCIM subfolder will be deleted. Remember that this will permanently delete unprotected images. Important shots should be stored on a computer before deletion takes place. The startup image is stored in the camera's internal memory (i.e., not on the memory card) and it will not be deleted even if you delete all files on the memory card. Deleting images 1. Press the play mode button and press the menu button. 2.
Copy Pictures If all memory card slots are full, use this function to copy images in one memory card to another. Copy Pictures 1. Press the play mode button and press the menu button. 2. Press the LEFT/ RIGHT button and select the [COPY] menu tab. 3. Select a desired sub menu by pressing the UP/ DOWN button and press the RIGHT button. [SELECT] : Menu to select source memory card is displayed. 1) Use the Up/Down buttons to select a desired memory card and press the OK button.
Protecting images This is used to protect specific shots from being accidentally erased (LOCK). It also unprotects images that have been previously protected (UNLOCK). Protecting Images 1. Press the play mode button and press the menu button. 2. Press the LEFT/ RIGHT button and select the [PROTECT] menu tab. 3. Select a desired sub menu by pressing the UP/ DOWN button and press the OK button. [ONE PIC] : Only an image that is displayed on the LCD monitor is protected or unprotected.
Starting the slide show Images can be displayed continuously at pre-set intervals. You can view the slide show by connecting the camera to an external monitor. 1. Press the play mode button and press the menu button. 2. Press the LEFT/ RIGHT button and select the [SLIDE] menu tab. Setting play interval: Set the slide show play interval. 1. Use the Up/Down buttons to select the [Interval] menu and press the Right button 2. Use the Up/Down buttons to select the desired interval. 3.
Resize Change the resolution (size) of pictures taken. Select [LOGO] to save an image to be the start-up image. The resized image will have a new file name. 1. Press the play mode button and press the menu button. 2. Press the LEFT/ RIGHT button and select the [RESIZE] menu tab. 3. Select a desired sub menu by pressing the UP/ DOWN button and press the OK button.
Rotating an image You can rotate the stored images by 90, 180, or 270 degrees. You can view a picture in its proper orientation if the picture has been taken with the camera oriented vertically or up-sidedown. The rotated image can’t be enlarged or trimmed. 1. Press the play mode button and use the Left / Right buttons to select an image to rotate. 2. Press the menu button and use the Left / Right buttons to select the [ROTATE] menu tap. 3. Select a desired sub menu by pressing the UP/ DOWN button.
DPOF : STANDARD This function allows you to embed print quantity information on a stored image. 1. Press the play mode button and press the menu button. 2. Press the LEFT/ RIGHT button and select the [DPOF] menu tab. 3. Select the [STANDARD] menu by pressing the UP/ DOWN button and press the RIGHT button. 4. Select a desired sub menu by pressing the UP/ DOWN button and press the OK button. [SELECT] : A window for selecting the image to be printed is opened.
DPOF : PRINT SIZE You can specify the print size when printing images stored on the memory card. The [SIZE] menu is available only for DPOF 1.1 compatible printers. Setting the Print Size 1. Press the play mode button and press the menu button. 2. Press the LEFT/ RIGHT button and select the [DPOF] menu tab. 3. Select the [SIZE] menu by pressing the UP/ DOWN button and press the RIGHT button. 4. Select a desired sub menu by pressing the UP/ DOWN button and press the OK button.
PictBridge You can use the USB cable to connect this camera to a printer that supports PictBridge (sold separately) and print the stored images directly. Movie clips and voice files cannot be printed. You can set up the following settings from the PictBridge menu. IMAGES : Setting up the scope of PictBridge PRINTER SETUP : Setting up printing PRINT : Printing pictures DPOF AUTO PRINT : Printing the DPOF files RESET : Initializing the PictBridge functions Connecting the Camera to a Printer 1.
PictBridge: Picture Selection You can select the scope of the PictBridge function. 1. Connect the camera to your printer. The USB menu must be set to [PRINTER] before you PICTBRIDGE connect the camera to the printer.(See p.74) SELECT ONE PIC 2. The [PICTBRIDGE] menu will appear. PRINTER SETUP ALL PICS 3. Select the [SELECT] menu by pressing the UP/ DOWN PRINT DPOF PRINT button and press the RIGHT button. RESET 4. Use the UP and DOWN buttons to select the desired submenu value, and then press the OK button.
PictBridge: Print Setting You can select the Paper Size, Print Format, Paper Type, Print Quality, Date Print, and File Name Print menus for printed pictures. 1. Connect the camera to your printer. The USB menu must be set to [PRINTER] before you PICTBRIDGE connect the camera to the printer.(See p.74) SELECT 2. The [PICTBRIDGE] menu will appear. PRINTER SETUP 3. Select the [PRINTER SETUP] menu by pressing the UP/ PRINT DPOF PRINT DOWN button and press the RIGHT button. RESET 4.
PictBridge: Picture Printing Printing Pictures 1. Connect the camera to your printer. The USB menu must be set to [PRINTER] before you PICTBRIDGE connect the camera to the printer.(See p.74) SELECT 2. The [PICTBRIDGE] menu will appear. PRINTER SETUP 3. Select the [PRINT] menu by pressing the UP/ DOWN PRINT DPOF PRINT button and press the RIGHT button. RESET 4. Select a desired sub menu by pressing the UP/ DOWN button and press the OK button.
PictBridge : DPOF AUTO PRINT This allows you to directly print the files with DPOF information. For instructions on how to set up DPOF, refer to pages 72 to 73. 1. Connect the camera to your printer. The USB menu must be set to [PRINTER] before you connect the camera to the printer.(See p.74) 2. The [PICTBRIDGE] menu will appear. 3. Select the [DPOF PRINT] menu using the UP/DOWN button and press the RIGHT button. Next, select [YES] using the Up/Down button, and then press the OK button. 4.
Setup menu In this mode, you can set up basic settings. You can use the setup menu in all camera modes, except Voice Recording mode. The changed setup mode values will be maintained even if you turn the camera off and then back on. The items indicated by are default settings. Menu tab Main menu Sub menu Secondary menu RESET FILE Page p.80 SERIES POWER OFF CANCEL, 01 ~ 03 ~ 10MIN ENGLISH KOREAN FRENCH ENGLISH GERMAN LANGUAGE T Y P E SPANISH ITALIAN p.81 S.CHINESE T Y P E T.CHINESE p.
Setup menu Menu tab Main menu Sub menu Secondary menu Page DARK LCD NORMA p.85 BRIGHT NTSC VIDEO p.86 PAL OFF Q.VIEW p.87 1 ~ 5 SEC COMPUTER USB PRINTER p.87 NO RESET p.88 YES CARD SELECT SD/MMC p.88 MS File name This function allows the user to select the file naming format. Assigning File Names 1. In any mode other than Voice Recording mode, press the MENU button. 2592 2. Press the LEFT/ RIGHT button and select the [SETUP] SET UP BACK: SET:OK RESETS menu tab. FILE ERIES PWR SAVE 3.