ENGLISH •Digimax V10 User's Manual Thank you for buying a Samsung Camera. This manual will guide you through using the camera, including capturing images, downloading images and using the software applications. Please read this manual carefully before using your new camera.
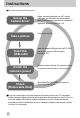
Instructions Use this camera in the following order Set up the camera driver Before connecting the camera to a PC, via the USB cable, you will need to set up the camera driver. Install the camera driver that is contained in Application software CD-ROM.(p.110) Take a picture (p.22) Take a picture Insert the USB cable Check the camera’s power Check [Removable Disk] Insert the supplied USB cable into the PC’s USB port and the camera’s USB connection terminal.(p.120) Check the camera’s power.
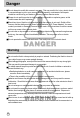
Contents READY Getting to know your camera About the icons Danger Warning Caution An FCC warning System chart Identification of features Front & Top Back Side/ 5-function button Mode dial Connecting to a Power Source Using the AC power adapter Using the batteries Removing the battery Instructions on how to use the memory card Inserting the memory card Removing the memory card When Using the Camera for the First Time 5 5 6 6 7 7 8 10 10 10 11 11 14 15 16 16 17 19 19 20 RECORDING LCD monitor indicator Start
Contents PLAY Starting play mode Playing back a still image Playing back a movie clip How to capture the movie clip On camera movie trimming Playing back a recorded voice LCD monitor indicator Using the camera buttons to adjust the camera Thumbnail / Enlargement button Voice memo / Up button Play & Pause/ Down button LEFT/ RIGHT/ MENU/ OK button LCD button Delete button Album button (MF button) Setting up the play back function using the LCD monitor Starting the slide show Protecting images Deleting images
Getting to know your camera Thank you for buying a Samsung Digital Camera. ●Prior to using this camera, please read the user manual thoroughly. ●When you require After Sales service, please bring the camera and the cause of the camera malfunction (such as Battery, Memory card etc.) to the A/S centre. ●Please check that the camera is operating properly prior to when you intend to use it (e.g. for a trip or an important event) to avoid disappointment.
Danger Do not attempt to modify this camera in any way. This may result in fire, injury, electric shock or severe damage to you or your camera. Internal inspection, maintenance and repairs should be carried out by your dealer or Samsung Camera Service centre. Please do not use this product in close proximity to flammable or explosive gases, as this could increase the risk of explosion. Should any form of liquid or a foreign object enter the camera, do not use it.
Caution Leaking, overheating, or burst batteries could result in fire or injury. Use batteries with the correct specification for the camera. Do not short circuit, heat or dispose of batteries in fire. Do not insert the batteries with the reverse polarities. Remove the batteries when not planning to use the camera for a long period of time. Batteries may leak corrosive electrolyte and permanently damage the camera's components. Do not fire the flash while it is in contact with hands or objects.
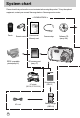
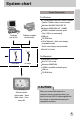
System chart Please check that you have the correct contents before using this product. To buy the optional equipment, contact your nearest Samsung dealer or Samsung service centre. < Included items > Pouch Remote control DPOF compatible printer(see p.81) User manual Waranty card Camera strap SD memory card (see p.17) AC adapter (SAC-32, DC 3.3V 2.0A) Rechargeable battery (SLB-1137) CHARGE AC cord 8 Battery charger (SBC-L3) Software CD (see p.
System chart System Requirements For Windows Computer (see p.120) PictBridge compatible printer(see p.83) PC with processor better than Pentium II 450MHz (Pentium 700MHz or better is recommended) Windows 98/ 98SE/ 2000/ ME/ XP Minimum 64MB RAM (XP : 128MB) 200MB of available hard-disk space (Over 1GB is recommended) USB port CD-ROM drive 1024x768 pixels, 16-bit colour display compatible monitor (24-bit colour display recommended) DirectX 9.
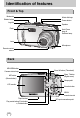
Identification of features Front & Top Mode dial Mode dial lamp Shutter button Power button Jog dial Speaker Flash Auto Focus lamp & Selftimer lamp Lens Microphone Remote control sensor Back AEL/ASM button Camera status lamp Zoom W button (Thumbnail) Zoom T button (Digital zoom) MF button (Album button) Strap eyelet LCD monitor 5-function button USB/ AV connection terminal Tripod socket Play mode button/ Print button +,-/Delete button 10 DC input connection point
Identification of features Side/ 5-function button Battery chamber cover Voice Recording/ Voice memo/ UP button FLASH/ LEFT button Battery chamber Battery holder Memory card slot SELF-TIMER/ Remote/ RIGHT button MENU/ OK button Macro/ Play & Pause button/ DOWN button 11
Identification of features Self-timer lamp (Based on 10-second Self-timer; see p. 37) Colour Status Red Blinking Camera Status - For the first 8 seconds, the LED blinks at 1second intervals. - For the final 2 seconds, the LED blinks quickly at 0.25-second intervals.
Connecting to a Power Source ■You should use the rechargeable battery (SLB-1137) supplied with the camera. ■SLB-0837 rechargeable battery Specification Model SLB-1137 Type Lithium Ion Capacity 1,130mAh Voltage 3.7V Charging time Approx. 170 MIN (Using the SBC-L3) ■Number of images and battery life Still image Movie Battery life Number of images Recording time Approx. 110 MIN Approx. 190 Approx.
Connecting to a Power Source Using the AC power adapter (SAC-32, DC 3.3V 2.0A, optional) If you have access to a mains supply, using an AC Adapter (SAC-32, DC 3.3V 2.0A) allows the camera to be used for long periods of time. Plug the adapter into the connection point (DC IN 3.3V) on the camera. Remove the batteries from the camera when using an AC adapter. DANGER Always turn off the power before taking the AC adapter out of the mains supply. As with all mains powered devices, safety is important.
Connecting to a Power Source Using the batteries : If the camera does not turn on after you have inserted batteries, please check whether the batteries are inserted with the correct polarity(+/-). 1. Open the battery chamber cover by pushing in the direction of the arrow. 2. Insert the batteries taking note of the polarity (+ / -). 3. To close the battery chamber cover, push it until it clicks. Removing the battery 1. Turn off the camera power.
Instructions on how to use the memory card Maintenance of the memory card Be sure to format the memory card (see p.91) if you are using a newly purchased memory for the first time, if it contains data that the camera cannot recognise, or if it contains images captured with a different camera. Turn off the camera power whenever the memory card is being inserted or removed. Repeated use of the memory card will eventually reduce the memory card’s performance.
Instructions on how to use the memory card INFORMATION Don't remove the memory card when the Auto focus lamp(Green) is blinking as this may cause damage to data in the memory card. The camera can use SD Memory Cards and MMC (Multi Media Cards). Please consult the enclosed manual for using the the MMC Cards. The SD memory card has a write protect switch that prevents image files from being deleted or formatted. By sliding the switch to the bottom of the SD memory card, the data will be protected.
Inserting the memory card 1. Turn off the camera’s power and pull the battery chamber cover in the direction of the arrow to open. 2. Have the front of the memory card facing toward the front of the camera (lens) and the card pins toward the back of the camera (LCD monitor), and then push the memory card into the card slot until you hear a click. 3. To close, push the battery chamber cover until you hear a click. If the memory card does not slide in smoothly, do not attempt to insert it by force.
When Using the Camera for the First Time If the camera is turned on for the first time, a menu will be displayed to set date, time and language in the LCD monitor. This menu will not be displayed after setting up the date, time and language. Set up the date, time and language before using this camera. Setting up the date, time and date type 1. Select the [D & Time] menu by pressing the UP/DOWN button and press the RIGHT button. Setup 2.
LCD monitor indicator ■The LCD monitor displays information about the shooting functions and selections. ① ② ③ ④ ⑳ ⑤ ⑲ ⑥ ⑱ ⑦ ⑰ ⑧ ⑯ ⑨ ⑮ ⑩ ⑪ ⑫⑬ ⑭ [ Image & Full Status ] No. Description 1 Battery p.16 2 Recording mode p.11~12 3 Shooting type p.52 4 Flash p.34 5 Self-timer p.37 6 Voice memo / MIC. Off p.32 7 Macro p.33 8 Metering p.51 9 Memory card indicator p.43 10 AEL p.44 11 Manual/ Continuous auto focus p.
LCD monitor indicator 16 White Balance p.41 17 ISO p.41 18 19 Sharpness 20 21 22 23 RGB RGB p.40 p.50 p.49 Image quality Image size Number of available shots remaining 12 Remaining time (Movie clip/ Voice recording) 00:01:30/ 01:00:00 Optical/ Digital Zoom bar/ Zoom rate Starting the recording mode How to use the AUTO mode ( ) 1. Insert the batteries (p.16). Insert the batteries taking note of the polarity (+ / -). 2. Insert the memory card. (p.19) 3. Close the battery chamber cover. 4.
Starting the recording mode How to use the PROGRAM mode ( ) Selecting the automatic mode will configure the camera with optimal settings. You can still manually configure all functions except the aperture value and shutter speed. Steps from 1-4 are the same as those for AUTO mode. 5. Select the PROGRAM mode by rotating the mode dial. 6. Press the menu button to configure advanced functions such as image size (p.49), quality (p.50), metering (p.51), continuous shooting (p.52) , picture effects (p.
Starting the recording mode How to use the SHUTTER PRIORITY mode ( ) Steps from 1-4 are the same as those for AUTO mode. 5. Select the SHUTTER PRIORITY mode by rotating the mode dial. 6. Select the desired shutter speed by rotating the jog dial. 7. Point the camera towards the subject and compose the image by using either the viewfinder or LCD monitor. 8. Press the shutter button to capture an image. * High Shutter speeds can capture a moving object in a still image as if the object is not moving.
Starting the recording mode How to use the MySET mode ( ) This mode allows users to save frequently used shooting settings for later use. Steps from 1-4 are the same as those for AUTO mode. 5. Select the MySET mode by rotating the mode dial. 6. Press the menu button. 7. Use the Left/Right buttons to select the [Load Myset] menu tap. Use the Up/Down buttons to select desired MySET number. 8. Press the OK button to load the camera configuration saved in the MySET number and close the menu screen. 9.
Starting the recording mode Pausing while recording a movie clip (Successive Recording) This camera allows you to temporarily stop during unwanted scenes, while recording a movie clip. Using this function, you can record your favourite scenes into a movie clip without having to create multiple movie clips. Using Successive Recording Steps from 1-6 are the same as those for MOVIE CLIP mode. 7. Point the camera towards the subject and compose the image by using the viewfinder or LCD monitor.
Starting the recording mode How to use the SCENE mode ( ) Use the menu to easily configure optimal settings for a variety of shooting situations. These include NIGHT, PORTRAIT, CHILDREN, LANDSCAPE, CLOSE UP, TEXT RECOGNITION, SUNSET, DAWN, BACKLIGHT, FIREWORKS and BEACH & SNOW scenes. Steps from 1-4 are the same as those for AUTO mode. 5. Select the SCENE mode by rotating the mode dial. 6. Press the menu button and select the [Scene] menu by pressing the left and right button. 7.
Things to Watch Out for When Taking Pictures Pressing the shutter button down half way. Lightly press the shutter button to confirm focus and flash battery charge. Press the shutter button all way down to take the picture. [ Lightly press the shutter button ] [ Press the shutter button ] The available recording time may vary depending on shooting conditions and camera settings.
Using the camera buttons to adjust the camera The RECORDING (AUTO, PROGRAM, APERTURE PRIORITY, SHUTTER PRIORITY, MANUAL, MySET, MOVIE CLIP, SCENE) mode function can be set up by using the camera buttons. POWER button Used for turning the camera’s power on / off. If there is no operation during the specified time, the camera's power will be turned off automatically to save battery life. Refer to page 90 for more information about the auto power off function.
ZOOM W/T button This camera has a 3X optical zoom and a 10X digital zoom function. Using both will offer a total zoom ratio of 30X. TELE Zoom Optical zoom TELE Digital zoom TELE : Pressing the ZOOM T button. This will zoom into the subject i.e. the subject will appear nearer. : When the maximum (3X) optical zoom is selected, pressing the ZOOM T button activates the digital zoom software. Releasing ZOOM T button stops the digital zooming at the required setting.
ZOOM W/T button INFORMATION To use the digital zoom the LCD monitor has to be turned on. Images taken using the digital zoom may take a little longer for the camera to process. Allow time for this to take place. The digital zoom cannot be used in movie clip shots. If the movie clip is being recorded, the zoom operation cannot be activated. You may notice a decrease in image quality when using the digital zoom.
Voice memo( ) / UP button While the menu is showing, press the UP button to move up the submenu cursor. When the menu is not displayed on the LCD monitor, the UP button operates as the voice memo ( ) button. You can add your voice-over to a stored still image. Recording a voice memo 1. Rotate the MODE DIAL to select a RECORDING mode with the exception of MOVIE CLIP mode. 2. Press the VOICE MEMO ( ) button. If the voice memo indicator is displayed on the LCD monitor, the setting is completed.
Macro( ) / Down button (Focusing) While the menu is showing, press the DOWN button to move from the main menu to a submenu, or to move down the submenu cursor. When the menu is not showing, you can use the MACRO/ DOWN button to take macro pictures (within the distance range of 4-80 cm).
Focus lock To focus on the subject positioned outside of the centre, use the focus lock function. Using the Focus Lock 1. Ensure the subject in the centre of the autofocus frame. 2. Press the SHUTTER button halfway. When the green auto lights up, it means the camera is focused on the subject. Be careful not to press the SHUTTER button all the way down to avoid taking an unwanted pictured. 3.
FLASH( ) / LEFT button Flash range ISO AUTO Unit : m AUTOFOCUS MACRO AUTO MACRO WIDE TELE WIDE TELE WIDE TELE 0.8~3.0 0.8~2.0 0.2~0.8 0.25~0.8 0.2~3.0 0.25~2.0 INFORMATION Using the flash frequently will reduce the life of the batteries. Under normal operating conditions the charging time for the flash is normally within 7 seconds. If the batteries are weak, the charging time will be longer. During the continuous shot, movie clip mode, the flash function will not operate.
FLASH( ) / LEFT button Flash mode indicator Icon Flash mode Description Auto flash If the subject or background is dark, the camera flash will operate automatically. Auto & Red eye reduction If a subject or background is dark, the camera flash will work automatically and will reduce the red-eye effect by using the red-eye reduction function. Fill in flash Slow synchro The flash fires regardless of available light.
Self-timer( ) / Remote ( )/ Right button When the menu is displayed on the LCD monitor, pressing the Right button makes the cursor shift to the right tab. The right button can also be used to move to a sub menu to select a different setting. When the menu is not displayed on the LCD monitor, the RIGHT button operates as the Selftimer ( ) and Remote ( ) button. This function is used when the photographer would also like to be in the image. Using the self-timer and remote control. 1.
Self-timer( ) / Remote ( )/ Right button Self-timer/ remote mode setting Mode dial Setting ( marked camera working mode is the default setting.) AUTO PROGRAM A/S/M, MySET Off 2s self-timer 10s self-timer Double self-timer Remote SCENE MOVIE CLIP Off 10s self-timer Remote INFORMATION When taking a picture using the self-timer, the self-timer lamp works as follows: 2 second self-timer setting : The self-timer lamp blinks at 0.25 second interval for 2 seconds.
Self-timer( ) / Remote ( )/ Right button Replacing batteries for the remote control Make sure the + polarity is toward the top and the - polarity is toward the bottom while installing batteries for the remote control. Replace batteries for the remote control in the local service centre. Use the CR 2025 3V batteries.
+/- button You can use the +/- button to adjust the values for the RGB, ISO, white balance and exposure compensation. Main menu Sub menu RGB R (Red), G (Green), B (Blue) ISO AUTO, 50, 100, 200, 400 WHITE BALANCE Exposure compensation Available camera mode AUTO, DAYLIGHT, CLOUDY, FLUORESCENT H, FLUORESCENT L, TUNGSTEN, CUSTOM. -2.0~0.0~+2.0(1/3EV steps) RGB : Allows the user to adjust the R (Red), G (Green), and B (Blue) values of the images to be captured. Setting RGB Values 1.
+/- button ISO: You can select the ISO sensitivity when taking pictures. The speed or specific light-sensitivity of a camera is rated by ISO numbers. Selecting an ISO Sensitivity 1. Press the +/- button, and then use the UP and DOWN buttons to select the ISO icon( ). The ISO menu bar will appear as shown. 2. Use the LEFT and RIGHT buttons to select the desired ISO sensitivity value. - AUTO : The camera's sensitivity is automatically changed by variables such as lighting value or subject brightness.