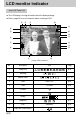
LCD monitor indicator Rear LCD/ Finder LCD ■ The LCD displays shooting information about the displayed image. ■ Refer to page 00 for more information about selecting an LCD. ③ ② ④ ⑤ ① 2005.07.01 13:00 PM ⑱ 100-0009 1/30 F2.2 100 ⑥ ⑰ ⑯ ⑮ ⑭ ⑬ ⑦ ⑫ ⑪ ⑧ 28 ⑩ ⑨ [ Image & Full information ] No. Description 1 Image size 2 Metering 3 Battery status 4 Date 2005.07.01 p.52 5 Time 13:00PM p.34 6 Contrast 7 Saturation 8 Quality 9 Sharpness 10 F No.
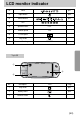
LCD monitor indicator 12 Flash p.51 13 Super Macro p.43 14 White balance p.51 15 ISO 16 Aperture value F2.2 17 Shutter speed 1/30 18 Colour space 19 Play mode 20 Folder name and Stored image number 100-0009 Top LCD ① ③ ② No. Description Icon Page 1 Play mode p.51 2 Battery status p.
Thumbnail button/ Enlarge button ■ In Play mode, you can use the buttons and the jog dial on the camera to conveniently set up the Play mode functions. ■ You can view multiple pictures, enlarge a selected picture, and crop and save a selected area of an image. ● Thumbnail display 1. While an image is displayed full screen, press the Thumbnail button( ). 2. The thumbnail display will highlight the image that had been showing at the time the thumbnail mode was selected. 2005.07.
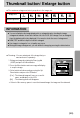
Thumbnail button/ Enlarge button ● The maximum enlargement rate in proportion to the image size. Image size Maximum enlargement rate ×10.20 ×10.20 ×10.20 ×6.82 ×4.64 ×4.00 ×3.33 INFORMATION ● You can tell whether the image displayed is an enlarged view by checking the image enlargement indicator shown at the bottom left of the LCD. (If the image is not an enlarged view, the indicator will not be displayed.) You can also check the area of enlargement.
Display/ Information button ( ■ The shooting and playing back information will be displayed on the LCD. The last image stored in the memory is displayed on the LCD by pressing the play mode button. ■ Pressing the Display/ Information button( ) in the PLAY mode will change the display as shown below. 2005.07.01 13:00 PM 100-0009 1/30 F2.2 100 28 [ Shooting information ] [ Playing back information ] [ Image only ] ■ Refer to page 00 for more information about the shooting information.
Album mode ■ You can organise the captured still images into albums. ■ This camera has 8 albums and each album can take up to 100 images. ■ The album menu loading time depends on the memory card type. ■ How to use the album ● Selecting the album 1. In the play mode, press the Album (Up) button. 2. Select the [ ] menu by pressing the Up/ Down button and press the Right button. Exit:OK Exit:OK Move: Move: 3.
Album mode 3. Select the still images you wish to add by pressing the Up/Down/Left/Right buttons and rotate the Front jog dial (JOG1). V marks are displayed on the selected images. * To cancel the selection, rotate the Front jog dial (JOG1) again. Select:JOG1 4. Press the OK button and a confirmation window will display. Select a desired sub menu by pressing the Up/ Down button and press the OK button. [Yes] : Inserts the selected images into the album. [No] : Cancels the inserting images.
Album mode ● Playing back the albums ◎ Playing back all of the albums 1. Select [ ] menu and press the OK button. All of the albums will be selected. 2. Select the [ ] menu by pressing the Up/ Down button and press the Right button. ※You can select [Start], [Interval], [Repeat] and [Effect] menus. - [Start] : Start the slide show - [Interval] : Set the slide show play interval - [Repeat] : Choose to repeat the slide show after finishing the first cycle.
5-function button ■ 5-function button activate the following. - Up button : While the menu is showing, press the Up button to move up the menu cursor. When the menu is not displayed on the LCD, the Up button operates as the Album button. - Down button : While the menu is showing, press the Down button to move down the menu cursor. If a still image with a voice memo or a movie clip is playing, pressing the Down button make the files play back or pause.
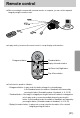
Remote control ■ After connecting the camera with a external monitor or computer, you can see the captured image by using the remote control. ■ In play mode, you can use the remote control to set up the play mode functions. Enlargement button Thumbnail button Display/ Information button Up/ Down/ Left/ Right button Play & Pause button ■ See below for operation of buttons - Enlargement button : In play mode, this button enlarges the selected image.
Remote control - Up/ Down/ Left/ Right button : In play mode, different parts of the enlarged image can be viewed by pressing these buttons. In the thumbnail mode, you can move to a desired image by pressing these buttons. - Play & Pause button : If a still image with a voice memo or a movie clip is playing, pressing this button make the files play back or pause. Delete button ( ) ■ This deletes images stored on the memory. ● Deleting Images in Play Mode 1.
Setting up the play back function using the LCD monitor ■ PLAY mode functions can be changed by using the LCD monitor. Press the Menu button and select the [▶] menu tab. The play back menu will display. The menus you can set up in Play mode are as follows. To capture an image after setting up the play menu, press the Play mode button or shutter button. Menu tab Main menu Slide Show Sub menu Secondary menu Interval 1, 3, 5, 10 sec Repeat Off, On Effect Cancel Page p.
Setting up the play back function using the LCD monitor ■ This menu is available while the camera is connected to a PictBridge supporting printer (direct connection to the camera, sold separately) with a USB cable. Menu tab Main menu Images Auto Set Sub menu Secondary menu One Pic - All Pics - No - Yes - Page p. 84 p. 85 Auto Postcard Card 4X6 Paper Size L 2L Letter A4 A3 Auto Full Custom Set 1 Layout 2 4 8 9 16 Auto Paper Type Plain Photo Fastphoto 《94》 p.
Setting up the play back function using the LCD monitor Menu tab Main menu Sub menu Secondary menu Page Auto Quality Draft Normal Fine Custom Set Auto Date Print Off p. 85 On Auto File Name Off On Print DPOF Print Reset Standard - Index - No - Yes - No - Yes - p. 86 p. 86 p. 87 ※ Menus are subject to change without prior notice.
Starting the slide show ■ Images can be displayed continuously at pre-set intervals. You can view the slide show by connecting the camera to an external monitor. 1. In play mode, press the Menu button and select the [▶] menu tab. 2. Press the Right button and select the [Slide Show] menu by pressing the Up/ Down button. 3. Press the Right button and select a desired sub menu by pressing the Up/ Down button.
Starting the slide show ● Configure slide show effects : Unique screen effects can be used for the slide show. 1. Select the [Effect] sub menu by pressing the Up/ Down button and press the Right button. 2. Use the Up/ Down button to select the type of effect. [Off] : Normal display. [Effect 1] : Image moves from the top left. off Repeat [Effect 2] : The image slides diagonally from top left Effect 1 Effect to bottom right.
Protecting images ■ This is used to protect specific shots from being accidentally erased (Lock). It also unprotects images that have been previously protected (Unlock). ● How to protect images 1. In play mode, press the Menu button. 2. Select the [▶] menu tab and press the Right button. 3. Select the [Protect] menu by pressing the Up/ Down button and press the Right button. 4. Select a desired sub menu by pressing the Up/ Down button and press the Right button.
Deleting images ■ Of all the files stored in the memory card, the unprotected files in the DCIM subfolder will be deleted. Remember that this will permanently delete unprotected images. Important shots should be stored on a computer before deletion takes place. The startup image is stored in the camera's internal memory (i.e., not on the memory card) and it will not be deleted even if you delete all files on the memory card. ● How to delete images 1. In play mode, press the Menu button. 2.
Voice memo ■ You can add your voice to a stored still image. ● How to add a voice to a still image 1. Select an image that you wish to add sound to by pressing the Left/ Right button. 2. Select the [▶] menu by pressing the Menu button and press the Right button. 3. Select the [Voice Memo] menu by pressing the Up/ Down button and press the Right button. 4. Select the [On] menu by pressing the Up/ Down button and press the OK button.
Resize ■ Change the resolution (size) of pictures taken. Select the [User Image] to save an image to be the start-up image. The resized image will have a new file name. 1. In play mode, press the Menu button and select the [▶] menu tab. 2. Press the Right button and select the [Resize] menu by pressing the Up/ Down button. Protect 3. Press the Right button and select a desired sub menu by Delete 640×480 pressing the Up/ Down button. Voice Memo User Image 4.
Rotating an image ■ You can rotate the stored images by various degrees. 1. In play mode, press the Menu button and select the [▶] menu. 2. Press the Right button and select the [Rotate] menu by pressing the Up/ Down button. 3. Press the Right button and select a desired sub menu by pressing the Up/ Down button.
DPOF ■ DPOF(Digital Print Order Format) allows you to embed printing information on your memory card’s MISC folder. Select the pictures to be printed and how many prints to make. ■ The DPOF indicator will display on the LCD when an image that has DPOF information plays back. Images can then be printed on DPOF printers, or at an increasing number of photo labs. ■ This function is not available for Movie clips and Voice recording files.
DPOF : INDEX ■ Images (except for movie clips and voice file) are printed as index type. 1. In play mode, press the Menu button and select the [▶] menu tab. 2. Press the Right button and select the [DPOF/Index] menu by pressing the Up/ Down button. Resize 3. Press the Right button and select a desired sub menu by Rotate DPOF/Standard pressing the Up/Down button. DPOF/Index If [No] is selected : Cancel the index print setting.
PictBridge ■ You can use the USB cable to connect this camera to a printer that supports PictBridge (sold separately) and print the stored images directly. RAW, TIFF and Movie clip files cannot be printed. You can set up the following settings from the PictBridge menu. Images : Select the pictures to be printed.
PictBridge : Picture Selection ■ Easy printing When you connect the camera to printer in the Play back mode, you can print a picture easily. - Pressing the shutter button : Currently displayed image will be printed with the printer’s default setting. - Pressing the Left/ Right button: Selects a previous/ next image. 100-0009 사진 이동:◀ ▶ SHUTER:출력 ■ Select pictures to print 1. Connect the camera to your printer. The USB menu must be set to [Printer] before you connect the camera to the 출력 printer. (See p.
PictBridge : Print Setting ■ AUTO SET 1. Connect the camera to your printer. The USB menu must be set to [Printer] before you connect the camera 초기화 to the printer. (See p.83) 이미지 2. Select the [Auto Set] menu by pressing the Left/ Right 아니오 자동 설정 예 button. 사용자 설정 출력 3. Press the Right button and select a desired sub menu by pressing the Up/ Down button. [No] : [Custom Set] values are kept. [Yes] : Press the OK button and a confirmation window will display.
PictBridge : Printing ■ Printing Pictures 1. Connect the camera to your printer. The USB menu must be set to [Printer] before you connect the camera 자동 설정 to the printer. (See p.83) 사용자 설정 출력 2. Select the [Print] menu by pressing the Left/ Right 초기화 button. 이미지 3. Press the Right button and select a desired sub menu by pressing the Up/ Down button. [Standard] : Print the pictures stored in the memory card in set numbers. One picture is printed on one piece of paper.
PictBridge : RESET ■ Initialises user-changed configurations. 1. Connect the camera to your printer. The USB menu must be set to [Printer] before you connect the camera 사용자 설정 to the printer. (See p.83) 출력 2. Select the [Reset] menu by pressing the Left/ Right 초기화 아니오 button. 예 이미지 자동 설정 3. Press the Right button and select a desired sub menu by pressing the Up/ Down button. If [No] is selected : Settings will not be reset. If [Yes] is selected : Press the OK button and a confirmation window will display.
Setup menu ■ In this mode, you can set up basic settings. The items indicated by are default settings. Menu tab Main menu Sub menu Secondary menu Series - Reset - Power Off Off, 1, 3, 5 10 min - p.90 LCD Off Off, 10, 20, 30, 60 sec - p.90 File Page p.89 ENGLISH 한국어 FRANÇAIS DEUTSCH ESPAÑOL ITALIANO 日本語 Language P”CCK»… PORTUGUÊS DUTCH DANSK SVENSKA SUOMI p.
Setup menu Menu tab Main menu World Time Sub menu Secondary menu Okhotsk Denver, Phoenix Wellington, Auckland Chicago, Dallas Samoa, Midway New York, Miami Honolulu, Hawaii Caracas, La Paz Alaska Buenos Aires LA, San Francisco Mid-Atlantic Page p.93 Off Imprint Date p.93 - Date & Time Sound Off Low Mediuml High p.94 Main LCD Brightness EVF Bright, Normal, Dark p.94 - p.94 Top LCD Video Out Quick View Auto Rotating USB Reset NTSC PAL Off, o.
File name ■ This function allows the user to select the file naming format. ● How to set the file names 1. Press the Menu button and select the [ ] menu tab by Auto Rotating pressing the Up/ Down button. USB Reset All 2. Press the Right button and select the [File] menu by Series File pressing the Up/ Down button. Reset Power Off 3. Press the Right button and select a desired sub menu by LCD Off Language pressing the Up/ Down button.
Auto power off ■ This function switches the camera off after a set amount of time in order to prevent unnecessary battery drainage. ● How to set the Auto power Off 1. Press the Menu button and select the [ ] menu tab by USB Reset All 5 min pressing the Up/ Down button. File 10 min 2. Press the Right button and select the [Power Off] menu by Power Off Off pressing the Up/ Down button. 1 min LCD Off 3 min Language 3. Press the Right button and select a desired sub menu by Format pressing the Up/ Down button.
Auto turning off the LCD ■ This function switches the LCD off after a set amount of time in order to prevent unnecessary battery drainage. ● How to set the auto turning off time 1. Press the Menu button and select the [ ] menu tab by pressing the Up/ Down button. 2. Press the Right button and select the [LCD Off] menu by pressing the Up/ Down button. 3. Press the Right button and select a desired sub menu by pressing the Up/ button. [Off] : The LCD will not turn off.
Language ■ There is a choice of languages that can be displayed on the LCD. Even if the battery or AC adapter are removed and inserted again, the language setting will be preserved. ● How to set the language 1. Press the Menu button and select the [ ] menu tab by File pressing the Up/ Down button. Power Off BAHASA LCD Off 2. Press the Right button and select the [Language] menu by Language ENGLISH pressing the Up/ Down button. Format 한국어 3.
Formatting a memory card ■ This is used for formatting the memory card. If you run [Format] on the memory card, all images, including the protected images, will be deleted. Be sure to download important images to your PC before formatting the memory card. ● How to format the memory card 1. Press the Menu button and select the [ ] menu tab by pressing the Up/ Down button. Power Oil LCD Off 2. Press the Right button and select the [Format] menu by Language pressing the Up/ Down button. No Format 3.
Setting up the Date & Time ■ You can change the date and time that will be displayed on the captured images. ● How to set the Date & Time 1. Press the Menu button and select the [ ] menu tab by pressing the Up/ Down button. 2. Press the Right button and select the [Date & Time] menu by pressing the Up/ Down button. 3. Press the Right button and select a desired sub menu by pressing the Up/ Down button. - Left/ Right button : Selects the year/ month/ day/ hour/ minute item.
World time ■ You can check the time of cities of various nations. ● How to check the time 1. Press the Menu button and select the [ ] menu tab by pressing the Up/ Down button. 2. Press the Right button and select the [World Time] menu by pressing the Up/ Down button. 3. Press the Right button and a world map will display as shown alongside. - Left/ Right or Rear jog dial (JOG2) : moves the red line to check the time of various cities. 4. Press the OK button to set the setting.
Imprinting the recording date ■ There is an option to include Date/Time on still images. ● How to imprint the date & time 1. Press the Menu button and select the [ ] menu tab by Date & Time pressing the Up/ Down button. Date Type 2. Press the Right button and select the [Imprint] menu by World Time Imprint pressing the Up/ Down button. Sound 3. Press the Right button and select a desired sub menu. Brightness [Off] : The DATE & TIME will not be imprinted on Video Out the image file.
Sound ■ If you set the operation sound to ON, various sounds will be activated for camera startup, when button are pressed, and if there is a card error, so that you can be aware of the camera operation status. ● How to set the sound 1. Press the Menu button and select the [ ] menu tab by pressing the Up/ Down button. 2. Press the Right button and select the [Sound] menu by pressing the Up/ Down button. 3. Press the Right button and select a desired sub menu. [Sound] sub menu : Off/ Low/ Medium/ High 4.
Selecting Video out type ■ The Movie output signal from the camera can be NTSC or PAL. Your choice of output will be governed by the type of device (monitor or TV, etc.) to which the camera is connected. PAL mode can support only BDGHI. ● How to set the video out type 1. Press the Menu button and select the [ ] menu tab by pressing the Up/ Down button. 2. Press the Right button and select the [Video Out] menu by pressing the Up/ Down button. 3.
Quick view ■ If you enable Quick View before capturing an image, you can view the image you just captured on the LCD for the duration set in the [Quick View] setup. Quick view is possible only with still images. ● How to set the quick view 1. Press the Menu button and select the [ ] menu tab by Sound pressing the Up/ Down button. Brightness Off Video Out 0.5 sec 2. Press the Right button and select the [Quick View] menu 1 sec Quick View by pressing the Up/ Down button. 3 sec Rotating 3.
Auto rotating sensor ■ When an image taking vertically plays back, the auto rotating sensor will rotate the image correctly. ■ You can view the reversed image correctly without rotating the image. ● How to set the auto rotating sensor 1. Press the Menu button and select the [ ] menu tab by pressing the Up/ Down button. 2. Press the Right button and select the [Auto Rotating] menu by pressing the Up/ Down button. 3. Press the Right button and select a desired sub menu by pressing the Up/ Down button.
Connecting an External Device (USB) ■ You can select an external device to which you want to connect the camera using the USB cable. ● How to set the external device 1. Press the Menu button and select the [ ] menu tab Video Out by pressing the Up/ Down button. Quick View 2. Press the Right button and select the [USB] menu by Auto Rotating pressing the Up/ Down button. USB Computer 3. Press the Right button and select a desired sub menu Printer Reset All File by pressing the Up/ Down button.
Setting up the MYCAM menu ■ You can set up a start up image, start up sound, shutter sound and sound effect. The items indicated by are default settings. Menu tab Main menu Start Image Start Sound Shutter Sound Sound Effect Sub menu Page Off Logo User Image - Off Sound 1 Sound 2 Sound 3 Off Shutter 1 Shutter 2 Shutter 3 Off Effect 1 Effect 2 Effect 3 p.97 p.98 p.98 p.98 * Menus are subject to change without prior notice.
Start up image ■ You can select the image that is first displayed on the LCD whenever the camera is turned on. ● How to set the start up image 1. Press the Menu button and select the [ ] menu tab by pressing the Up/ Down button. 2. Press the Right button and select the [Start Image] menu by pressing the Up/ Down button. 3. Press the Right button and select a desired sub menu by pressing the Up/ Down button. 4. Press the OK button to set the setting.
Shutter sound ■ You can select the shutter sound. ● How to select the shutter sound 1. Press the Menu button and select the [ ] menu tab by pressing the Up/ Down button. 2. Press the Right button and select the [Shutter Sound] menu by pressing the Up/ Down button. 3. Press the Right button and select a desired sub menu by pressing the Up/ Down button. 4. Press the OK button to set the setting.
Important notes Be sure to observe the following precautions! ■ This unit contains precision electronic components. Do not use or store this unit in the following locations. - Areas exposed to severe changes in temperature and humidity. - Areas exposed to dust and dirt. - Areas exposed to direct sunlight or the inside of a vehicle in hot weather. - Environments where there is high magnetism or excessive vibration. - Areas with high explosives or highly flammable materials.
Important notes ■ Caution on Using the Lens - If the lens is subjected to direct sunlight, it could result in discoloration and deterioration of the image sensor. - Pay attention not to get fingerprints or foreign substances on the surface of the lens. ■ If the digital camera is not used for a long period, an electric discharge can occur. It is a good idea to remove the batteries and the memory card if you do not intend using the camera for an extended period of time.
Warning indicator ■ There are several warnings that may appear on the LCD display. Card Error ! ㆍMemory card error → Turn off the camera power and turn it on again → Insert the memory card again → Insert the memory card and format the memory card (p.
Warning indicator Set USB ㆍ [USB] sub menu and connected device are not matched. → Reconfigure [USB] in the [Setup] menu. Out Of Number ㆍWhen selecting too many printing pages in the PictBridge menu. → Select printing page within the limitation. Before contacting a service centre ■ Please check the following The camera doesn’t switch on ㆍThere is low battery capacity. → Insert charged battery. ㆍBatteries are inserted incorrectly with the reverse polarities.
Before contacting a service centre Camera does not take images when pressing the Shutter button ㆍThere is insufficient memory capacity. → Delete unnecessary image files ㆍThe memory card has not been formatted → Format the memory card (p.91) ㆍThe memory card is exhausted → Insert a new memory card ㆍThe memory card is locked → Refer to [Card Locked !] error message (p.101) ㆍThe camera’s power is off → Turn the camera power on ㆍThe batteries are exhausted → Insert charged battery.
Before contacting a service centre The images don't play back ㆍIncorrect file name (Violation of DCF format) → Do not change the image file name Colour of image is different to the original scene ㆍWhite balance setting is incorrect → Select appropriate White balance Images are too bright ㆍExposure is excessive → Reset exposure compensation No image on external monitor ㆍThe external monitor has not been connected properly with the camera → Check the connection cables ㆍThere are incorrect files in the memory
Specifications Image Sensor Lens Type Effective Pixel Total Pixel Focal Length F No. Digital Zoom Electronic Viewfinder Viewfinder LCD Monitor Type Modes Focusing Range Shutter Type Speed Control Exposure Compensation ISO Equivalent High Speed Mode Modes Flash Sharpness Range Recharging Time External Flash (optional) Effect Color Space White Balance Voice Recording Date Imprinting Shooting 《134》 Still Image 2/3″CCD Approx. 8.0 Mega-pixel Approx. 8.3 Mega-pixel Schneider Lens f = 7.2 ~ 108.
Specifications Movie Clip Media File Format Image Size Storage Capacity (64MB) Image Play Type Editing Interface Power Source Dimensions (WxHxD) Weight Operating Temperature Operating Humidity Camera Driver Software Application Special Features With stereo audio (recording time : memory capacity dependent) Size : 640x480, 320x240, 160x120 Frame rate : 25 fps, 15 fps CompactFlash Card Type I or Type II (Up to 4GB guaranteed) Still Image : RAW(DNG), TIFF, JPEG (DCF), EXIF 2.2, DPOF 1.1, PictBridge 1.