
Manual


English _23
●
NETWORK CONNECTION AND SETUP
CONNECTING THE CAMERA DIRECTLY TO A DHCP
BASED DSL/CABLE MODEM
1. Connect the user PC directly with the network camera.
2. Run the IP Installer and change the IP address of the camera so that you can use
the web browser on your desktop to connect to the Internet.
3. Use the Internet browser to connect to the web viewer.
4. Move to [Setup] page.
5. Move to [Network] – [DDNS] and configure the DDNS settings.
6. Move to [Network] – [Interface], and set the network type to [DHCP].
7. Connect the camera, which was removed from your PC, directly to the modem.
8. Restart the camera.
M
For registering the DDNS settings, refer to “Registering with DDNS”. (page 71)
For configuring the DDNS settings, refer to “DDNS”. (page 70)
For setting the network type, refer to “Interface”. (page 68)
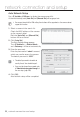
Camera External Remote PC
DDNS Server
(Data Center, KOREA)
DSL/Cable Modem
INTERNET