Webthru SWC 306 User’s Guide ※ This manual is for Webthru SWC 306 Firmware version 1.4.0. If you have later version of firmware, please download the last updated user’s guide from Samsung Web Camera’s homepage. (www.webthru.net) System Requirements For Webthru SWC 306 10 Base-T LAN (Leased line, xDSL, Cable Modem, ISDN) For a PC to access Webthru SWC 306 Processor: Pentium II and above RAM: 64MB and more OS: Windows 98/NT/2000 Web browser: Internet Explorer 5.
FCC Compliance Statement Caution : Any changes or modifications in construction of this device which are not expressly approved the party responsible for compliance could void the user's authority to operate the equipment. NOTE : This equipment has been tested and found to comply with the limits for a Class B digital device, pursuant to part 15 of the FCC Rules. These limits are designed to provide reasonable protection against harmful interference in a residential installation.
CONTENTS I. Introduction........................................................................................................................................ 5 II. Product Description ......................................................................................................................... 6 1. Contents ....................................................................................................................................... 6 2. Webthru SWC 306 View and Descriptions...........
6) Security Configuration ...................................................................................................... 23 7) Video Configuration .......................................................................................................... 26 8) Application Configuration ................................................................................................. 27 9) Pan/Tilt/Zoom Configuration ......................................................................................
I. Introduction • What is Webthru SWC 306? The Webthru SWC 306 is a network CCTV camera server solution with an integrated Internet server, image compression device, flash memory, and many other features. No other hardware is necessary for use. The Webthru SWC 306 relays video source from a CCTV camera to network and provides real time images over networks and the Internet. Simply provide power and connect LAN cable and video cable to the Webthru SWC 306.
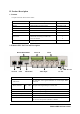
II. Product Description 1. Contents * Unpack and check all the items as below. Item Description Remarks Webthru SWC 306 Network server for CCTV camera Manual Webthru SWC 306 User's Guide Provided on CD Crossover Cable 1 m crossover cable Red-colored Direct Cable 2 m direct cable White-colored Adapter & Power Cable DC 12V, 1.0A Accessories brackets for 19-inch rack bracket for connecting two SWC 306 Screw for bracket CD ROM title Setup program and manual 2 1 8 2.
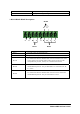
Sensor In Alarm Out To input video signal through 6 coaxial cables To output video signal through 6 coaxial cables 3. RS232/RS422/RS485 Descriptions RS485 P G Rx Tx S+ S- G R+ R- T+ T- RS422 RS232 Connector Name Description Power To supply power to external devices Ground To ground cables of power, communication, etc. RS-232 To communicate between Webthru SWC 306 and external devices such a CCTV camera or an external modem.
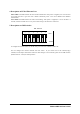
4. Description on LED of Ethernet Port Yellow LED: This LED indicates the status of data transmission. After power is supplied, it is on for the first 4-5 seconds and then it goes off. And it blinks continuously when a user access Webthru and Webthru transmits data. Green LED: This LED indicates the status of networking. After power is supplied, it is on for the first 1-2 seconds, and then it blinks once at every one second as long as the network is connected. 5.
III. Webthru SWC 306 Installation Summary, Connection & Placing 1. Installation Summary z z z z Connect Ethernet and Power to Webthru on local network for configuration. Install Webthru Setup Program into a PC on local network. Assign an IP address to Webthru and configure administrator’s condition. Configure user’s condition. z Place Webthru, re-connect power and Ethernet. 2. Connecting z Connect Ethernet line to the Ethernet port in the rear. z Connect the power supply.
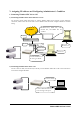
V. Assigning IP Address and Configuring Administrator’s Condition 1. Connecting Webthru SWC 306 to a PC 1) Connecting Webthru SWC 306 on Internet or LAN Use the direct cable (white colored one) to connect Webthru SWC 306 to Internet or LAN. With this connection, remote users will not be able to access Webthru until local user configures Webthru’s network setting. Dedicated line, xDSL line, cable modem line, and ISDN line are available.
2. Assigning IP address and Configuring administrator’s condition with Setup program 1) Starting Setup Program for Webthru SWC 306 Click the “WebthruSetup.exe” file on your PC. When the Setup Program is executed, the setup program detects and shows every Webthru connected on the local network. From the Webthrus listed, select one to assign a new IP address. (Default is 211.53.133.92) To choose a Webthru, click on its MAC Address or IP address.
2) Verifying Installation After successfully completing the above procedures, the following message (or similar) will appear on the screen. Request timed out : Request timed out Reply from 200.243.232.178: bytes=32 time=2ms TTL=255 Reply from 200.243.232.178: bytes=32 time=2ms TTL=255 Ping statistics for 200.243.232.
VI. Accessing Webthru SWC 306 Homepage & Monitoring Real-time Image After assigning Webthru an IP address, the Webthru can be configured within its self- contained homepage through any standard Web browser on a local network. However access to its Homepage by a remote network is not possible until gateway address, subnet mask, and broadcast address have been properly assigned. 1. Starting Web browser Start the web browser and enter the Webthru IP address. This will access the Webthru login homepage. 2.
3. Various viewers in Webthru homepage There are 3 viewers for real-time monitoring in the Webthru homepage: Default Viewer, Server-Push Viewer, and Java Applet Viewer. An administrator may set 3 different viewers as main viewer. (Single Viewer, Multi Viewer, and Server Push Viewer) 1) Real time monitoring through Default Single Viewer (1) (2) (3) (4) (5) At default viewer, a user may configure image transmission method and control integrated PTZ mechanism of a CCTV camera.
performance. Webthru can transmit up to 30 frames per second, but total frames transmitted by all 6 channels cannot surpass the maximum rate of 30 fps. (3) Camera selection Select cameras to monitor. User may select one specific camera or all 6 cameras. (4) Transmission Control Gray Mode On Images are displayed in black and white. Images can be transmitted at a higher speed under gray mode. Single Shot Mode On When this button is clicked, one frame of image is reproduced.
Admin To access administration page. (Refer to Chapter VII ‘Configuring Administrator’s Configuration at Homepage’) (7) Convenient pop-up menu A small window of 5 menus appears when you click the right button of the mouse. However only users who are permitted can utilize the functions such as ‘Quality Box’, ‘Focus Sensitivity’, and ‘Image Quality’. ‘Image Info’ and ‘Save As File’ menus are permitted to any user.
(8) Placing a company logo The Webthru logo, located on the left bottom of the viewer, can be replaced with a different company logo. 2) Real time monitoring through Default Multi Viewer (1) Single View / Multi View You can select a mode between single view and multi view. The button is toggled between the two functions. (2) Play/Stop Webthru generates and transfers six real-time images as soon as it is accessed. To stop transferring images, click the “Stop” button. To resume transfer, click “Play” button.
Frame Rate Control image transmission speed from 5 levels (fastest, 10fps, 5fps, 3fps, 1fps). “Fastest,” will receive images at the fastest speed possible within the network environment. The transmission speed is dependent on the network line’s capacity and user PC’s performance. (2) Camera Select cameras to monitor. User may select one specific camera to monitor real-time image. (3) Transmission Control On this viewer, “Channel Rotate Mode On” menu is not available.
VII. Configuring Administrator’s Condition at Webthru SWC 306 Homepage This page is for administrator. Administrator may control operating status remotely. This page can be accessed through Setup program by clicking ‘Start Configuration’ button. 1. Administrator Login 1) Accessing through setup program Select Webthru by clicking on the MAC address or IP address. Then type in the administrator’s ID and password (Default ID and password are ‘admin’), and click “Start Configuration” button.
Synchronization” button. The “Manual Date & Time” panel allows the user to set date and time. (5) Administrator’s E-mail Address In this panel, administrator records one’s e-mail address. If administrator put a ‘contact’ menu of e-mail communication on real time image viewer page, the linked e-mail address to the ‘contact’ menu is to be synchronized with this. So administrator can keep up e-mail address easily. (6) Initialize Flash Info This will initialize almost all the information saved on Flash Memory.
If Webthru is connected with Internet dedicated line, cable modem line or on LAN environment, you should select network interface as ‘Ethernet’. If Webthru is connected on xDSL line that needs PPPoE process to connect on Internet, administrator should select ‘xDSL (PPPoE)’. (3) Ethernet Interface Administrator may configure IP address, subnet mask, broadcast address, gateway address, and DNS addresses of Webthru.
To solve the problem, Samsung Techwin runs a server making a list of Webthrus that have dynamic IP addresses. On the server, Webthru registers its information such as name, location, and description, so those common users may detect a certain Webthru. Name, location and description are assigned at ‘System Configuration’ page. If administrator does not change them, the Webthru will register default information on the list, and it will be very difficult to point out and access a certain Webthru.
homepage, SWR (Webthru Registration Server) detects and shows all the Webthrus that you listed appear on your own list. Webthru Add & Delete: This menu is to append a certain Webthru on your own list. You may append Webthru on your own list as follows. • Key in serial number(e.g. W100000000000), MAC address(e.g. 00:00:00:00:00:00), and access token of a certain Webthru in the box. • Click ‘Append’ menu.
E.g. IP address in decimal: 192. 168. 1. 13 (It is equal to 11000000. 10101000. 00000001. 00001101) * Binary number 1 means to take the equivalent decimal number (27, 25, etc) and 0 means to disregard it. Network masking point is to be expressed with decimal number from 0 to 31. IP address is consisted in 4 bytes. 4 bytes are 32 bits. Network is to be masked on every bit from the first bit to the 32nd bit.
E 240 to 255 Reserved for specific utilization In C class network, the applied number of IP addresses with network masking is as below when you mask on host ID part (X4: the fourth byte).
17 From the first bit to the 17th bit 255.255.128.0 . . . 24 From the first bit to the 24th bit 255.255.255.0 25 From the first bit to the 25th bit 255.255.255.128 th 26 From the first bit to the 26 bit 255.255.255.192 27 From the first bit to the 27th bit 255.255.255.224 th 28 From the first bit to the 28 bit 255.255.255.240 th 29 From the first bit to the 29 bit 255.255.255.248 30 From the first bit to the 30th bit 255.255.255.252 st 31 From the first bit to the 31 bit 255.255.255.254 0 The 32nd bit 255.
(3) Camera Color Type It is to define whether images from a camera are color or Black/White (B/W). This will not change a camera’s original character (color cameras can be viewed in B/W or color, but they are still “color” cameras). Rather, this is to help define external cameras, and provide information to Webthru. (4) Video Signal Type It is to define whether the signals of external CCTV cameras are ‘NTSC’ or ‘PAL’.
delivered to a person who is defined as a recipient in the blank of ‘E-Mail Recipient’. The person who received e-mail can send a message of countermove to a person who is defined as an e-mail sender. (4) Check E-Mail Options Relay Mail Server: With the same problem of e-mail blocking, Webthru has a function to relay its e-mail through an available e-mail server so that e-mail can have the relay server’s domain name.
are the same as seen on ‘Video Configuration’ page. (2) Pan Tilt Function Administrator defines whether to utilize pan/tilt control function or not. (3) Zoom Function Administrator defines whether to utilize zoom control function or not. (4) Pan Reverse Mode Function This is to set command reverse direction against to right and left direction control arrows. This function is useful when PT driver is installed upside down.
Audio Device This protocol is for Webthru Audio device, which is an audio transmission device connected to Webthru. 11) Digital I/O Configuration This page is to configure digital input state and control script. Webthru sends e-mails or/and files when connected external sensors detect events. (1) Input Port 1, 2, 3, 4, 5, and 6 Administrator defines active state of 6 digital devices connected to six input ports such as infrared sensors.
(1) Web Server TCP Port Administrator assigns a web server TCP port for user access to Webthru and data transmission from Webthru. 80th port is assigned as default value. (2) Video Server TCP Port Administrator assigns a video server TCP port image transmission from Webthru. 8080th port is assigned as default value. (3) Select Main Page Administrator assigns a viewer for the main page of Webthru. Three viewing options are available: “Single Viewer”, “Multi Viewer”, and “Server Push Viewer”.
(Appendix 1) Detailed Specifications of Webthru SWC 306 1. General Hardware CPU Flash memory RAM ROM OS Video Channel Image Resolution 32bit RISC Embedded processor 8MB 16MB 64KB Embedded Linux NTSC or PAL video format are supported 6Ch. External Video Inputs 720X486, 720X243, 360X243, 180X121, 90X60 Image Compression Algorithm Rate Wavelet 20:1 ~ 300:1 Performance Transfer Rate Max. 120fps (With 3KB image) Max. 30fps(NTSC) / 25 fps(PAL) (on 360X243) Decoding Rate 2 ~ 30fps Local Compression rate Max.
Management Configuration is achieved by private setup program and Web server built in administration page. 3. Mechanical Dimension Weight H x W x L = 45mm x 215mm x 252mm 1.45 kg (without power supply and accessories) 4. Compatible external devices and software PTZ control Sensor input RS-232, RS485/RS422 6 auxiliary inputs are supported, made of ‘Opto coupler’ Opto coupler stands with 3-5V and 10-20mA 5. Environmental (*) This data is a target specification.