
Product manual


Page 4 For technical questions, please call 1-888-866-5797. Items 62353 62354
Operating Instructions
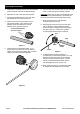
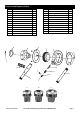
1. Assemble the Handle Rod parts and insert threaded
portion of Handle Tube into the Ratchet Holder.
2. Determine the size of the pipe to be threaded.
3. Pick the appropriate Die to be used. Die sizes
are stamped on the outside of each Die.
4. Place the rear of the Die over the end of the
pipe to be threaded. Verify that the inside
diameter of the Die matches the outside
diameter of the pipe (see Figure A).
These measurements
should be equal.
Figure A
5. Insert the Die into the Ratchet Holder. It is a
force fitting, and once the Die is in the Ratchet
Holder, it may require light tapping with a wooden
mallet to remove the Die (see Figure B).
Figure B
6. Fill an Oil Can with Thread Cutting Oil (not included).
Keep it nearby during the threading operation.
CAUTION: Make sure the pipe end and threads of the
Die are sufficiently oiled at all times. Otherwise, Die
life will be shortened and the threads will be rough.
7. Make sure that the pipe to be threaded
is properly secured in a vise.
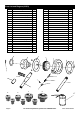
8. While applying pressure to the end of the pipe,
use the Handle to rotate the Ratchet Holder
around the pipe to engage the Die with the pipe
end (see Figure C). Continue this operation
until the desired thread length is achieved.
Pipe
Die
Ratchet
Holder
Handle
Knob
Figure C
9. To disengage the Die after threading is
complete, pull out the reversing Knob, turn it 180
degrees until the arrow points in the opposite
direction and drop it back into place. Use the
Handle to rotate the Ratchet Holder until the
Die disengages fully from the pipe end.
10. When sliding the pipe out of the Ratchet Holder,
be careful not to damage newly cut threads.