
Product manual
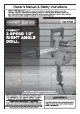


Page 10
For technical questions, please call 1-800-444-3353.
Item 97622
Operating Instructions
Read the
ENTIRE
IMPORTANT SAFETY INFORMATION
section at the beginning of this
manual including all text under subheadings therein before set up or use of this product.
Tool Set Up
TO PREVENT SERIOUS INJURY FROM ACCIDENTAL
OPERATION:
Release the Trigger and unplug the tool from its electrical outlet before adjusting tool or installing bits.
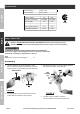
Installing Bits
Installing Bits
1.
This Drill is designed to accept drill bits (not included)
with a bit shank diameter from 1/8″ to 1/2″. Do not
use drill bits larger than the capacity of this Drill;
damage to the gears and/or motor may result. Use
a drill bit that is designed for the specific drilling job.
2.
Insert the Chuck Key (24) into the Chuck (43),
and turn the Chuck Key counterclockwise to open
the jaws wide enough to insert the drill bit.
3.
Insert the shank of the drill bit into the Chuck,
and turn the Chuck Key clockwise to secure it.
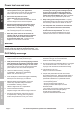
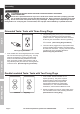
Changing Speeds
Changing Speeds
•
The “HIGH” setting on the Speed Switch
runs the Drill at 0 to 1,375 RPM.
•
The “LOW” setting on the Speed Switch
runs the Drill at 0 to 340 RPM.
1.
Before changing speeds, turn the
Trigger (69) to the “OFF” position.
2.
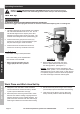
HIGH
LOW
Speed
Speed
Switch
Switch
(34)
(34)
FIGURE C
While rotating the Chuck with one hand,
have the Speed Switch all the way to the
new setting position. (See Figure C.)
NOTICE:
Speed Switch must be completely in the
“UP” or “DOWN” position. Do not set the Speed Switch
while the Drill is running, under a load, or when the tool
is completely stopped. Failure to follow this procedure
can result in damage to the Drill’s internal gears.
Work Piece and Work Area Set Up
1.
Designate a work area that is clean and well-lit.
The work area must not allow access by children
or pets to prevent distraction and injury.
2.
Route the power cord along a safe route to reach
the work area without creating a tripping hazard or
exposing the power cord to possible damage. The
power cord must reach the work area with enough
extra length to allow free movement while working.
3.
Secure loose work pieces using a vise or clamps
(not included) to prevent movement while working.
4.
There must not be objects, such as utility lines,
nearby that will present a hazard while working.
SAFETY OPERATION MAINTENANCESETUP