
Product manual


Page 4 For technical questions, please call 1-888-866-5797. Item 46342
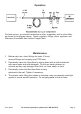
Assembly
Refer to Assembly Drawings on page 7.
1. Slide the Handle (3) into the Handle Sleeve (4), then insert the Rubber
Sleeve (2) and secure with a Screw (1), creating a handle assembly.
2. Insert the handle assembly into the hole on the Link Lever
(5) and secure with a Washer (6) and Nut (7).
3. Attach the Reels on the Axle and secure with
Screw (20), Nut (22) and Washer (21).
4. The Air Hose Reel can be attached to the floor, ceiling or wall. It
must be secured to a location that is capable of supporting the
weight of the hose reel and hose and also capable of supporting the
rotating force exerted when taking the hose on or off the reel. In
the four holes at the base of the Hose Reel, use four 3/8″ bolts (not
included) to attach the Hose Reel to the floor, ceiling, or wall.
5. Apply PTFE tape to the Swivel Valve (18) and
then thread it on to the Connector (15).
6. Apply PTFE tape to the fitting of the lead hose and thread it on
the Valve (18) and attach the other end to your compressor.
7. Apply PTFE tape to fitting of the extension hose (do not exceed
50’ of 1/2″ hose or 100’ of 3/8″ hose) and thread it on the
Connector (15). Turn the Handle (3) clockwise and coil the hose
onto the Hose Reel, making sure it covers the reel evenly.
Note: The air valves will rotate with the reel when you turn the handle, opening
and closing during rotation. If you are not receiving enough air, rotate the
reel 1/4 turn.
Note: Make sure the Swivel Valve (18) is secure. Tighten it with a wrench if
necessary.
8. Attach your tool of choice to the end of the extension hose and after
reading the tool manual, turn on your compressor and begin working.
9. When finished, turn the Handle (3) clockwise and coil the hose onto
the Hose Reel, making sure it covers the reel evenly. Caution:
Always be alert to pressure inside hose when rolling hose on or off
the reel; protect eyes and face from pressurized hose movement.