Electric Stapler/Nailer 93749 Set up and Operating Instructions Distributed exclusively by Harbor Freight Tools®. 3491 Mission Oaks Blvd., Camarillo, CA 93011 Visit our website at: http://www.harborfreight.com Read this material before using this product. Failure to do so can result in serious injury. Save this manual. Copyright© 2005 by Harbor Freight Tools®. All rights reserved.
NOTICE is used to address practices not related to personal injury. Save This Manual Keep this manual for the safety warnings and precautions, assembly, operating, inspection, maintenance and cleaning procedures. Write the product’s serial number in the back of the manual near the assembly diagram (or month and year of purchase if product has no number). Keep this manual and the receipt in a safe and dry place for future reference.
designed. It will do the job better and more safely at the rate for which it was intended. Do not modify this tool, and do not use this tool for a purpose for which it was not intended. 6. Dress properly. Do not wear loose clothing or jewelry as they can be caught in moving parts. Protective, electrically nonconductive clothes and nonskid footwear are recommended when working. Wear restrictive hair covering to contain long hair. 7. Do not overreach. Keep proper footing and balance at all times.
technician. When this product is serviced, only identical replacement parts should be used. Use of any other parts will void the warranty. Only use accessories intended for use with this tool. Approved accessories are available from Harbor Freight Tools. split the workpiece and fly free, causing personal injury. 21. Hold tool away from head and body. During operation the Nailer may kick back, causing injury. 22. Avoid working alone. If an accident happens, an assistant can bring help. 16.
that common sense and caution are factors which cannot be built into this product, but must be supplied by the operator. Grounding To prevent electric shock and death from incorrect grounding wire connection: Check with a qualified electrician if you are in doubt as to whether the outlet is properly grounded. Do not modify the power cord plug provided with the tool. Never remove the grounding prong from the plug. Do not use the tool if the power cord or plug is damaged.
. 7. 8. If you are using an extension cord outdoors, make sure it is marked with the suffix “W-A” (“W” in Canada) to indicate it is acceptable for outdoor use. Make sure the extension cord is properly wired and in good electrical condition. Always replace a damaged extension cord or have it repaired by a qualified electrician before using it. Protect the extension cords from sharp objects, excessive heat, and damp or wet areas.
area must also wear ANSIapproved impact safety goggles. SPECIFICATIONS Electrical Requirements 120 V~ / 60 Hz / 6A 1/4”, 5/16”, 1/2”, 9/16” Staple Type or Arrow T50® Nail Type 9/16” 3/8” Staples (Qty. 400) Accessories 9/16” Nails (Qty. 100) Note: Performance of the Stapler/Nailer may vary depending on variations in local line voltage. Extension cord usage may also affect the tool performance. 1. Note: To lock the Trigger (10), move the Trigger Lock (3) to the right.
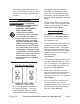
Operation To prevent Serious Injury: Wear ANSI-approved impact safety goggles during use. Other people in the work area must also wear ANSI-approved impact safety goggles. 6. Store the Stapler/Nailer in a clean, dry, safe location out of reach of children. Figure I TRIGGER LOCK TRIGGER 1. Lock the Trigger by moving the Trigger Lock to the right. Then, plug the tool’s Power Cord/Plug into the nearest 120 volt, grounded, electrical outlet. 2. Unlock the Trigger by moving the Trigger Lock to the left.
INSPECTION, MAINTENANCE, AND CLEANING WARNING! Lock the Trigger by moving the Trigger Lock to the right and unplug the tool before performing any service, maintenance, or cleaning of the Stapler/Nailer. All maintenance, service, or repairs not mentioned in this manual must only be performed by a qualified service technician. 1. Before each use, inspect the general condition of the Stapler/Nailer.
TROUBLESHOOTING Problem Possible Solution Tool will not fire Staples/Nails. 1. Unlock the Trigger by moving the Trigger Lock to the left. 2. Fully squeeze the Trigger. 3. Lock the Pusher Cover and Magazine Lock in place. 4. Load the tool with Staples or Nails. 5. Plug tool into a working, 120 volt, grounded, electrical outlet. 6. Check for and remove the tool for Staple/Nail jams. 7. Have the tool checked out by a qualified service technician.
PARTS LIST and Diagram Part Description 1 1-1 2 3 4 5 6 7 7-1 8 9 10 11 12 13 14 15 16 Qty. Outer Staple Slot Inner Staple Slot Pusher Cover Trigger Lock Pusher Spring Pad Spring Impact Plate Pin Shaft Stopper Trigger Trigger Spring Pusher Driver Guide Driver Bobbin Winding Part 1 1 1 1 1 1 1 1 1 1 1 1 1 1 1 1 1 1 Description 17-1 17-2 18 19 20 21 22 24 25 26 27 32 33 34 39 40 44 45 Qty.
LIMITED 90 DAY WARRANTY Harbor Freight Tools Co. makes every effort to assure that its products meet high quality and durability standards, and warrants to the original purchaser that this product is free from defects in materials and workmanship for the period of 90 days from the date of purchase.