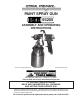
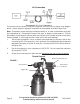
PAINT SPRAY GUN 93205 ASSEMBLY AND OPERATING INSTRUCTIONS Due to continuing improvements, actual product may differ slightly from the product described herein. ® 3491 Mission Oaks Blvd., Camarillo, CA 93011 Visit our Web site at http://www.harborfreight.com TO PREVENT SERIOUS INJURY, READ AND UNDERSTAND ALL WARNINGS AND INSTRUCTIONS BEFORE USE. Copyright© 2005 by Harbor Freight Tools® . All rights reserved.
Contents Unpacking ....................................................................................................... 2 Specifications ................................................................................................. 3 Safety Warnings and Precautions ................................................................. 3 Air Connection ................................................................................................ 6 Control Layout ...........................................
Specifications Inlet PSI Range 50-70 PSI, 70 PSI Max. Air Consumption 9.5 CFM @ 50 PSI Paint Capacity 1 Quar t Air Inlet 1/4” - 18 NPS Nozzle Size .071” Feed Type Siphon Material Types Thin to medium viscosity materials: Enamel, Lacquer, Polyurethane, Urethane, and Primer. Fan Spread 1.5" – 9.5" Save This Manual You will need the manual for the safety warnings and precautions, assembly instructions, operating and maintenance procedures, parts list and diagram.
7. Use eye and ear protection. Always wear ANSI approved impact safety goggles. Always wear an ANSI approved dust mask or respirator when using this Spray Gun. 8. Do not overreach. Keep proper footing and balance at all times. Do not reach over or across running machines or air hoses. 9. Maintain tools with care. Keep tools clean for better and safer performance. Follow instructions for lubricating and changing accessories.
19. Compressed air only. Never use combustible gas as a power source. Never exceed the recommended operating pressure of the any of the parts (i.e. hoses, fittings, gun) of the Sprayer system. 20. Do not spray near open flames, pilot lights, stoves, heaters, the air compressor, or any other heat source. Most solvents and coatings are highly flammable, particularly when sprayed. Maintain a distance of at least 25 feet from the air compressor. If possible, locate the air compressor in a separate room.
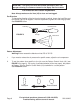
Air Connection For best service you should incorporate a regulator and inline filter, as shown in the diagram above. Hoses, couplers, regulators, and filters are all available at Harbor Freight Tools. Note: Compressor pumps discharge condensed water, oil, or other contaminants along with the compressed air. Condensation causes “fish eyes” to appear in paint patterns. To avoid this problem, install water/oil removal filters and controls (not included) as close to the Spray Gun as possible.
IMPORTANT: The Spray Gun must be cleaned immediately after use. Improper cleaning is a common reason for the Spray Gun not to work. A Comparison: Conventional versus HVLP Spray Guns Because conventional spray guns require a much higher air cap pressure to atomize the paint than HVLP Spray Guns, conventional guns have lower transfer efficiencies and more overspray. This translates to a significant paint/material savings for HVLP guns, in addition to making them more environmentally friendly.
IMPORTANT: The Spray Gun must be cleaned immediately after use. Improper cleaning is a common reason for the Spray Gun not to work. Fan Direction and Pattern Adjustment Note: Always make sure the Vent (45) is clear and unclogged. Fan Direction To change the direction of the fan from horizontal to vertical, loosen the Lock Ring and turn the Air Cap (5) 90 degrees. After the adjustment, tighten the Lock Ring by hand. See FIGURE 3 below.
IMPORTANT: The Spray Gun must be cleaned immediately after use. Improper cleaning is a common reason for the Spray Gun not to work. Fan Direction and Pattern Adjustment (continued) 3. Turn the Fluid Control Knob (23) clockwise until it is fully closed. See FIGURE 1 on page 6. 4. After setting up a piece of scrap material, squeeze the Trigger (36) in short bursts while turning the Fluid Control Knob (23) counterclockwise and observe the spray patterns until you see the pattern you want.
IMPORTANT: The Spray Gun must be cleaned immediately after use. Improper cleaning is a common reason for the Spray Gun not to work. Techniques Note: Before spraying, mask all objects you do not want sprayed and lay cloths (not included) on the floors. 1. Always keep the gun at right angles to the workpiece (See FIGURE 6). Pull the Trigger (36) slowly and move the Spray Gun in parallel strokes to the object being painted. Keep the distance from the object being painted at 6” to 9”.
IMPORTANT: The Spray Gun must be cleaned IMMEDIATELY after use. Improper cleaning is a common reason for the Spray Gun not to work properly. Materials dry quickly which will render the gun useless. It is extremely difficult to remove dry paint from small passages within the Gun. Maintenance SOLVENT SELECTION Always follow the paint manufacturer’s recommendations for cleaning, solvent type, and disposing of used solvent. This unit employs some plastic components.
Parts List Part No. 1 2 3 4 5 6 7 8 9 10 11 12 13 14 15 16 17 18 19 20 21 22 23 24 25 26 27 Description Fluid Nozzle Fixed Ring Sealed Ring Lock Ring Air Cap Brass Tip Gun Thread Gun Body Needle Seal Gasket Packing Nut Pattern Adj. Pin Pattern Adj. Level Washer 0-ring Pattern Adj. Seat Pattern Control Knob 0-ring Spring Sleeve Needle Needle Seat Rod Actuator Needle Spring Fluid Control Knob Gun Body Seal Air Inlet Air Switch Spring Air Valve Seat Part No.
Assembly Diagram 52 53 51 49 5 50 4 3 2 47 44 46 42 1 48 41 40 39 37 38 45 6 35 36 34 7 43 8 33 9 10 24 32 11 31 30 29 28 20 17 18 25 12 21 13 22 19 14 27 15 26 23 16 SKU 93205 For technical questions, please call 1-800-444-3353; Troubleshooting section at end of manual.
IMPORTANT: Improper cleaning is a common reason for the unit not to work properly. Most problems can be avoided or remedied with prompt, thorough cleaning. Troubleshooting Spray Pattern Diagnosis The Patterns below resemble symptoms of spray pattern problems. Please refer to the accompanying possible problems if you are experiencing similar difficulties. The solution to each problem follows the problem in parentheses. Problem 1: 1. The Pattern Control Knob (16) is partially closed.
Troubleshooting (continued) Problem Cause Sputtering Spray 1. 2. 3. 4. 5. 6. Will Not Spray 1. No pressure at gun 2. Fluid control not open enough 3. Fluid too thick 1. Check air hoses 2. Open fluid control 3. Thin fluid or increase pressure (within Maximum range) Overspray 1. Improper application speed 2. Improper distance from workpiece 3. Too much pressure 1. Move moderately and parallel 2. Adjust distance 3. Reduce air pressure Fluid Tip Leakage 1. 2. 3. 4.
90 Day Warranty Harbor Freight Tools Co. makes every effort to assure that its products meet high quality and durability standards, and warrants to the original purchaser that this product is free from defects in materials and workmanship for the period of 90 days from the date of purchase.