WARNING SYMBOLS AND DEFINITIONS This is the safety alert symbol. It is used to alert you to potential personal injury hazards. Obey all safety messages that follow this symbol to avoid possible injury or death. Indicates a hazardous situation which, if not avoided, will result in death or serious injury. Indicates a hazardous situation which, if not avoided, could result in death or serious injury. Indicates a hazardous situation which, if not avoided, could result in minor or moderate injury.
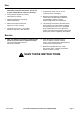
Use 1. Use only for water or water-based fertilizers, herbicides, pesticides and sealers. Do not use to spray combustible or corrosive chemicals. 2. Do not point the Sprayer at yourself, other people or animals. 3. Industrial applications must follow OSHA requirements. 4. Make sure the liquid used in the Sprayer is not dirty or sandy. 5. This product is not a toy. Do not allow children to play with or near this item. 6. Use as intended only. 7.
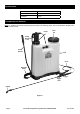
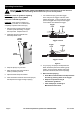
Specifications Tank Capacity 4 Gallons Empty Weight 6.4 lb Full Weight 40.4 lb Components and Controls Note: For additional information regarding the parts listed in the following pages, refer to the Assembly Diagram near the end of this manual. Pump Tank Lid Pump Handle Lock Pump Handle Tank Hose Shoulder Strap Trigger Trigger Lock Nozzle Figure A Page 4 For technical questions, please call 1-800-444-3353.
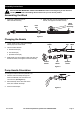
Assembly Instructions Read the entire Important Safety Information section at the beginning of this document including all text under subheadings therein before set up or use of this product. Assembling the Wand 1. Insert end of Wand into end of Wand Handle Assembly. Wand 2. Slide Hose Nut (27) over threaded end of Handle, then tighten Hose Nut securely. Wand Handle Assembly Hose Nut Figure B Changing the Nozzle 1. Loosen Hose Nut (27) and remove Single Nozzle (53) from end of Wand.
Operating Instructions Read the entire Important Safety Information section at the beginning of this document including all text under subheadings therein before set up or use of this product. WARNING! Follow all guidelines regarding chemicals sprayed, including MSDS instructions and EPA regulations. Caution! If the amount of weight you can lift safely is limited, do not fill the Tank completely to prevent strain and injury. 1.
Inspection, Maintenance, and Cleaning Procedures not specifically explained in this manual must be performed only by a qualified technician. TO PREVENT SERIOUS INJURY FROM PRODUCT FAILURE: Do not use damaged equipment. If abnormal noise, vibration, or leaking air occurs, have the problem corrected before further use. Follow all guidelines regarding chemicals sprayed, including MSDS instructions and EPA regulations. 1. BEFORE EACH USE, inspect the general condition of the Sprayer.
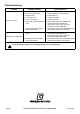
Troubleshooting Problem Unit does not spray Possible Causes Likely Solutions 1. Not enough liquid in tank. 2. Sprayer not pressurized. 3. Tank Lid loose. 4. Hose Nuts loose. 5. Pump Lid (12) loose. 6. Spray fluid contains particles or sand. 1. Add liquid to tank. 2. Pump Handle to pressurize Sprayer. 3. Tighten Tank Lid. 4. Tighten Hose Nuts. 5. Tighten Pump Lid. 6. Disassemble, clean, then reassemble Nozzle and/or Wand Handle and Tank Filters.
PLEASE READ THE FOLLOWING CAREFULLY The manufacturer and/or distributor has provided the parts list and assembly diagram in this document as a reference tool only. Neither the manufacturer or distributor makes any representation or warranty of any kind to the buyer that he or she is qualified to make any repairs to the product, or that he or she is qualified to replace any parts of the product.
Parts List and Diagram Parts List Part 1 2 3 4 5 6 7 8 9 10 11 12 13 14 15 16 17 18 19 20 21 22 23 25 26 27 28 29 30 Page 10 Description Pump Handle Clip Pump Handle Lock Pump Bowl Sealing Ball O-Ring (15.5 x 2.5) Sealing Ball Seat Pump Handle Cover Split Pin Connecting Rod Pump Handle Pump Lid Pump Sealing Washer Pump Cylinder O-Ring (57 x 3.
Assembly Diagram 55 51 49 48 54 52 47 40 39 30 29 27 38 37 36 50 32 53 56 31 41 29 28 27 26 47 27 44 27 35 34 28 23 22 21 33 19 25 18 18 16 12 13 15 14 17 11 9 10 8 4 5 6 7 3 1 2 20 46 45 43 42 Page 11 For technical questions, please call 1-800-444-3353.
Limited 90 Day Warranty Harbor Freight Tools Co. makes every effort to assure that its products meet high quality and durability standards, and warrants to the original purchaser that this product is free from defects in materials and workmanship for the period of 90 days from the date of purchase.