
Product manual


Page 11For technical questions, please call 1-800-444-3353.Item 69702
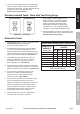
SAFETYOPERATIONMAINTENANCE SETUP
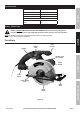
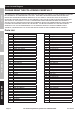
Adjusting the Rip Fence
1. Loosen the Rip Fence Lock Knob and slide
the Rip Fence to the desired width of cut.
Note: The ruler on the fence shows
the approximate width of cut.
2. If needed, remove the Fence entirely. Otherwise,
tighten the Rip Fence Lock Knob after adjustment.
WARNING! Tighten Rip Fence Lock Knob before use.
Rip
Fence
Rip Fence
Lock Knob
Figure D
Workpiece and Work Area Set Up
1. Designate a work area that is clean and well-lit.
The work area must not allow access by children
or pets to prevent distraction and injury.
2. Route the power cord along a safe route to reach
the work area without creating a tripping hazard or
exposing the power cord to possible damage. The
power cord must reach the work area with enough
extra length to allow free movement while working.
3. Secure loose workpieces using a vise or clamps
(not included) to prevent movement while working.
4. There must not be objects, such as utility lines,
nearby that will present a hazard while working.
This is especially critical for plunge cuts.
General Operating Instructions
1. Make all necessary adjustments for width and depth.
2. Make sure that the Trigger is in the
off-position, then plug in the tool.
3. Make sure that all guards are in place and in
proper working order and that all adjustment
knobs are tight before operation.
4. Before making the first cut, study the
procedure and practice with scrap metal.
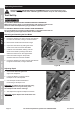
5. Position the Saw Blade about 1/2" from the beginning
of the marked cut line on the workpiece. Do not allow
the Saw Blade to come in contact with the workpiece.
6. Align the marked cut line with the notch
on the Base Plate. (See Figure E)
7. Firmly grip the Handles of the Saw with both
hands. Depress the Trigger Lock Button, and
squeeze the Trigger Switch to turn on the Saw.
8. Allow the Saw Blade to spin up to full speed before
feeding the Saw Blade into the workpiece.
9. Do not force the Saw to remove material faster
than it was designed to cut. Make sure to feed
the Saw Blade gradually into the workpiece.
10. Once the cutting job is completed, turn off the Saw
and wait until the Saw Blade has stopped rotating.
11. To prevent accidents, turn off the tool and
unplug it after use. Clean, then store the
tool indoors out of children’s reach.
Cut Line
Notch
Figure E