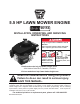
5.5 HP Lawn Mower ENGINE 96156 Installation, Operating, and Servicing Instructions Using an engine indoors CAN KILL YOU IN MINUTES. Engine exhaust contains carbon monoxide. This is a poison you cannot see or smell. NEVER use inside a home or garage, EVEN IF doors and windows are open. Only use OUTSIDE and far away from windows, doors, and vents. Distributed exclusively by Harbor Freight Tools®. 3491 Mission Oaks Blvd., Camarillo, CA 93011 Visit our website at: http://www.harborfreight.
Contents Parts List ��������������������������������������16 ASSEMBLY DIAGRAM ���������������������17 Important SAFETY Information ���������������������������������3 LIMITED 90 DAY WARRANTY ���������18 Specifications �������������������������������6 Emission Control System Unpacking ���������������������������������������6 Warranty �����������������������������������18 Installation �����������������������������������6 Operating Instructions �����������8 Engine Controls ������������������������������ 8 S
Save This Manual CAUTION, without the safety alert symbol, is used to address practices not related to personal injury. Keep this manual for the safety warnings and precautions, installation, operating, inspection, maintenance and cleaning procedures. Write the product’s serial number in the back of the manual near the assembly diagram (or month and year of purchase if product has no number). Keep this manual and the receipt in a safe and dry place for future reference. WARNING! Read all instructions.
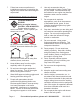
7. Follow lawn mower manufacturer’s installation procedures for attaching the engine to the mower and connecting the output shaft. Operating precautions 1. Carbon Monoxide Hazard Using an engine indoors CAN KILL YOU IN MINUTES. Engine exhaust contains carbon monoxide. This is a poison you cannot see or smell. NEVER use inside a home or garage, EVEN IF doors and windows are open. Only use OUTSIDE and far away from windows, doors, and vents. 2.
16. This product contains or, when used, produces a chemical known to the State of California to cause cancer and birth defects or other reproductive harm. (California Health & Safety Code § 25249.5, et seq.) 17. When spills of fuel or oil occur, they must be cleaned up immediately. Dispose of fluids and cleaning materials as per any local, state, or federal codes and regulations. Store oil rags in a bottomventilated, covered, metal container. 18. Keep hands and feet away from moving parts.
Specifications Engine Rating Type Fuel Capacity Engine Oil Installation Read the entire Important Safety Information section at the beginning of this manual including all text under subheadings therein before installation or use of this product. 5.5 Horsepower 89+ octane unleaded gasoline 0.45 Gallons 10W-30 Type (Detergent or non-detergent) Capacity 18.6 oz. Run Time @ 50% Load 3.
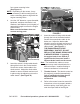
four mower mounting holes. (See Figure A.) Brake bracket NOTE: Depending on the mower, it may be necessary to drill mounting holes or make a mounting plate to align with the engine mounting holes. 4. Use four 3/8” diameter, coarse threaded, hardened, stainless steel Bolts, Lock Washers, and Washers (not included) of appropriate length to secure the Engine to the mower. Make sure the hardware does not contact moving parts.
Fuel Valve Operating Instructions Read the entire Important Safety Information section at the beginning of this manual including all text under subheadings therein before installation or use of this product. Engine Controls Fuel Tank Cap Starter Handle Choke Control Automatic Throttle Control (not adjustable) Fuel Valve - This controls the fuel supply to the engine. The horizontal position is closed (off). The vertical position is open (on).
1. Clean the top of the dipstick and the area around it. Remove the dipstick and wipe it off with a clean rag. 2. Reinsert the dipstick without threading it in and remove it to check the oil level. The oil level should be between the high and low marks on the dipstick. 3. If the oil level is below the low mark add SAE 10W-30 (detergent or nondetergent) oil until the oil level is between the high and the low marks. 4. Replace the Oil Dipstick. Start Procedure Before starting the engine: a.
slowly. Then, pull the starter handle with a rapid, full arm stroke. Once again while holding the handle, allow the rope to rewind slowly. Repeat as necessary, until the engine starts. 7. After the engine starts and warms up, slowly release the choke cable, allowing it to return to its open (run) position. 8. After each start-up, run the engine for five minutes with no load to allow it to stabilize. 9. Operate the lawn mower according to the manufacturer’s instructions. 10.
Servicing Engine Oil Change CAUTION! Oil is very hot during operation and can cause burns. Wait for engine to cool before changing oil. To prevent serious injury from accidental starting: Close the engine’s fuel valve, wait for the engine to cool, and disconnect the spark plug wire(s) before performing any inspection, maintenance, or cleaning procedures. To prevent serious injury from engine failure: Do not use damaged engine.
Spark Plug Maintenance 1. Disconnect spark plug wire from end of plug. Clean out debris from around spark plug. 2. Using a spark plug wrench, remove the spark plug. 3. Inspect the spark plug: If the electrode is oily, clean it using a clean, dry rag. If the electrode has deposits on it, polish it using emery paper. If the white insulator is cracked or chipped, the spark plug needs to be replaced. 4. 5. 6.
Storage 1. Wait for engine to cool, then clean engine with clean cloth. 2. When the engine is to remain idle for longer than 20 days, prepare the engine for storage as follows: a. Change engine oil and empty fuel tank. b. Either leave fuel tank empty or refill fuel tank with fresh unleaded gasoline mixed with a fuel stabilizer intended for long term engine storage (not included). After filling, run engine for about 5-10 minutes to circulate the treated gasoline through the carburetor.
Troubleshooting Engine will not start Mower ENGINE Specific: 1. Brake Handle not held or brake cable not connected properly. 2. Mower on top of grass. Mower ENGINE Specific: 1. Make sure brake handle is held down and brake cable is properly adjusted. 2. Start mower atop clear area free of loose objects and grass. Fuel Related: Fuel Related: 1. No fuel in tank or fuel valve closed. 1. Fill fuel tank and open fuel valve. 2. Choke not in start position, 2.
Problem Engine misfires Possible Causes 1. Spark plug wire loose. 2. Incorrect spark plug gap or damaged spark plug. 3. Defective spark plug wire. 4. Old or low quality gasoline. 5. Incorrect compression. Engine stops suddenly 1. Low oil shutdown. Engine knocks 2. Fuel tank empty or full of impure or low quality gasoline. 3. Defective fuel tank cap creating vacuum, preventing proper fuel flow. 4. Improper idle speed. 5. Brake cable broken. 6. Faulty magneto, incorrect timing, or clogged carburetor. 1.
Parts List Part 1 2 3 4 5 6 7 8 9 10 11 12 13 14 15 16 17 18 19 20 21 22 23 24 25 26 27 28 29 30 31 32 33 34 35 36 37 38 39 40 41 42 43 44 45 45a 46 47 Description Starting flange Fuel pipe Air duck Fuel cock Crankcase Set pin Ø9×14 Gasket, crankcase Sump, crankcase B Cylinder head asm Gasket, cylinder head Exhaust gasket Cylinder head cover Gasket, cylinder head cover Piston Piston ring set Carburetor C Stud Muffler Muffler hood Driven gear, regulator Clamp, regulating shaft Regulating arm asm Back sprin
ASSEMBLY DIAGRAM 45a REV 08b SKU 96156 For technical questions, please call 1-800-444-3353.
PLEASE READ THE FOLLOWING CAREFULLY The manufacturer and/or distributor has provided the parts list and assembly diagram in this manual as a reference tool only. Neither the manufacturer or distributor makes any representation or warranty of any kind to the buyer that he or she is qualified to make any repairs to the product, or that he or she is qualified to replace any parts of the product.
If any emission related part on your engine is defective, the part will be repaired or replaced by HFT. Owner’s Warranty Responsibilities • As the engine owner, you are responsible for the performance of the required maintenance listed in your Owner’s Manual. HFT recommends that you retain all receipts covering maintenance on your engine, but HFT cannot deny warranty solely for the lack of receipts or for your failure to ensure the performance of all scheduled maintenance.