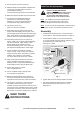
Safety Alert Symbol and Signal Words In this manual, on the labeling, and all other information provided with this product: This is the safety alert symbol. It is used to alert you to potential personal injury hazards. Obey all safety messages that follow this symbol to avoid possible injury or death.
Tool Use and Care a. Do not force the tool. Use the correct tool for the application. The correct tool will do the job better and safer at the rate for which the tool is designed. b. Do not use the tool if the switch does not turn the tool on or off. Any tool that cannot be controlled with the switch is dangerous and must be repaired. c. Disconnect the tool from the air source before making any adjustments, changing accessories, or storing the tool.
14. Do not exceed 145 PSI air pressure. 15. Maintain labels and nameplates on Bottle Jack. These carry important safety information. If unreadable or missing, contact Harbor Freight Tools for a replacement. 16. Bleed the hydraulic system before its initial use. Initial Tool Set Up/Assembly Read the ENTIRE IMPORTANT SAFETY INFORMATION section at the beginning of this manual including all text under subheadings therein before set up or use of this product. 17.
. Put the Handle Assembly into Handle Socket and secure with Set Screw. See Figure 2, below. Completed Handle Fig. 2 Set Screw (2.5) 2. Attach an air hose to the compressor’s air outlet. Connect the air hose to the Air Valve Assembly (5) of the Bottle Jack. Other components, such as a connector and quick coupler, will make operation more efficient, but are not mandatory. WARNING! TO PREVENT SERIOUS INJURY FROM ACCIDENTAL OPERATION: Do not install a female quick coupler on the tool.
Page 6 For technical questions, please call 1-800-444-3353.
SKU 66242 For technical questions, please call 1-800-444-3353.
Operation Read the ENTIRE IMPORTANT SAFETY INFORMATION section at the beginning of this manual including all text under subheadings therein before set up or use of this product. Inspect tool before use, looking for damaged, loose, and missing parts. If any problems are found, do not use tool until repaired. To Raise the Vehicle Manually Before use, park vehicle on a flat, level, solid, surface safely away from oncoming traffic. Turn off the vehicle’s engine.
2. Remove the Filler Plug (1.19), and fill the Cylinder Base (1.14) reservoir with hydraulic oil (not included). Inspection, Maintenance, & Cleaning Procedures not specifically explained in this manual must be performed only by a qualified technician. To prevent serious injury from tool failure: Do not use damaged equipment. If abnormal noise or vibration occurs, have the problem corrected before further use. 3. Rapidly pump Handle several times to purge air. 4. Turn Knob (6.
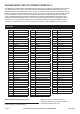
PLEASE READ THE FOLLOWING CAREFULLY THE MANUFACTURER AND/OR DISTRIBUTOR HAS PROVIDED THE PARTS DIAGRAM IN THIS MANUAL AS A REFERENCE TOOL ONLY. NEITHER THE MANUFACTURER NOR DISTRIBUTOR MAKES ANY REPRESENTATION OR WARRANTY OF ANY KIND TO THE BUYER THAT HE OR SHE IS QUALIFIED TO MAKE ANY REPAIRS TO THE PRODUCT OR THAT HE OR SHE IS QUALIFIED TO REPLACE ANY PARTS OF THE PRODUCT.
Assembly Diagram 6.8 6.11 6.10 6.56 .5B 6.6 6.7 6.15 6.9 1.1 5 12.9 2.17 12.3 12.1 12.4 5.2 6.1 2.14 6.3 4.36 1.2 12.8 1.4 12.7 12.6 4.35 1.15 12.5 1.6 1.5 1.8 6.2 3.1 1.7 3.2 1.3 3.3 1.3A 3.4 3.26 3.29 3.20 3.27 1.11 3.14 1.12 3.13 2.5 3.36 2.4 3.40 3.38 2.3 3.7 3.15 1.18 3.24 3.33 3.17 3.6 1.10 1.13 3.23 3.32 3.19 3.5 1.9 6.4 3.18 3.21 3.25 3.28 3.31 3.34 3.35 3.37 3.39 4 3.11 3.10 3.8 1.19 4.1 1.16 2.2 1.22 1.14 1.23 1.17 1.21 1.
90 Day Warranty Harbor Freight Tools Co. makes every effort to assure that its products meet high quality and durability standards, and warrants to the original purchaser that this product is free from defects in materials and workmanship for the period of 90 days from the date of purchase.