Table of Contents SAFETY Safety.......................................................... 2 Specifications.............................................. 8 Setup........................................................... 9 Operation..................................................... 9 Maintenance............................................... 12 Parts List and Diagram............................... 14 Warranty.....................................................
4. Do not abuse the cord. Never use the cord for carrying, pulling or unplugging the power tool. Keep cord away from heat, oil, sharp edges or moving parts. Damaged or entangled cords increase the risk of electric shock. 2. Avoid body contact with grounded surfaces such as pipes, radiators, ranges and refrigerators. There is an increased risk of electric shock if your body is grounded. 5. When operating a power tool outdoors, use an extension cord suitable for outdoor use.
Power Tool Use and Care SAFETY 1. Do not force the power tool. Use the correct power tool for your application. The correct power tool will do the job better and safer at the rate for which it was designed. 2. Do not use the power tool if the switch does not turn it on and off. Any power tool that cannot be controlled with the switch is dangerous and must be repaired. 3. Disconnect the plug from the power source before making any adjustments, changing accessories, or storing power tools.
12. The warnings, precautions, and instructions discussed in this instruction manual cannot cover all possible conditions and situations that may occur. It must be understood by the operator that common sense and caution are factors which cannot be built into this product, but must be supplied by the operator. Vibration Safety This tool vibrates during use. Repeated or long‑term exposure to vibration may cause temporary or permanent physical injury, particularly to the hands, arms and shoulders.
Grounding SAFETY TO PREVENT ELECTRIC SHOCK AND DEATH FROM INCORRECT GROUNDING WIRE CONNECTION: Check with a qualified electrician if you are in doubt as to whether the outlet is properly grounded. Do not modify the power cord plug provided with the tool. Never remove the grounding prong from the plug. Do not use the tool if the power cord or plug is damaged. If damaged, have it repaired by a service facility before use.
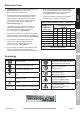
2. As the distance from the supply outlet increases, you must use a heavier gauge extension cord. Using extension cords with inadequately sized wire causes a serious drop in voltage, resulting in loss of power and possible tool damage. (See Table A on page 7.) 3. The smaller the gauge number of the wire, the greater the capacity of the cord. For example, a 14 gauge cord can carry a higher current than a 16 gauge cord. (See Table A.) 7.
Specifications SAFETY Electrical Rating 120V~ / 60Hz / 9A No Load Speed 0-2500 SPM Stroke Length 1-1/8" 4005982 Setup - Before Use: Read the ENTIRE IMPORTANT SAFETY INFORMATION section at the beginning of this manual including all text under subheadings therein before set up or use of this product.
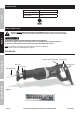
Operating Instructions Read the ENTIRE IMPORTANT SAFETY INFORMATION section at the beginning of this manual including all text under subheadings therein before set up or use of this product. SAFETY Tool Set Up Adjusting the Pivot Shoe TO PREVENT SERIOUS INJURY FROM ACCIDENTAL OPERATION: Release the Trigger, make sure the Trigger Lock is not engaged and unplug the tool from its electrical outlet before adjusting the tool or installing accessories. Hex Key Shoe Installing the Saw Blade 2.
Work Piece and Work Area Set Up 1. Designate a work area that is clean and welllit. The work area must not allow access by children or pets to prevent distraction and injury. SAFETY 2. Route the power cord along a safe route to reach the work area without creating a tripping hazard or exposing the power cord to possible damage. The power cord must reach the work area with enough extra length to allow free movement while working. 3.
General Operating Instructions General Cutting 1. Install the Blade and adjust the Shoe for the job. 2. Press and release the Trigger to ensure that the Trigger Lock is off. 3. Holding the Saw with the Trigger released, plug the Power Cord into a 120V electrical outlet. 4. To begin sawing, gripping the saw firmly with both hands, rest the front of the Shoe on your workpiece with the blade above the work. Plunge cut into plywood and thin board panels.
Maintenance and Servicing Procedures not specifically explained in this manual must be performed only by a qualified technician. SAFETY TO PREVENT SERIOUS INJURY FROM ACCIDENTAL OPERATION: Release the Trigger, make sure the Trigger Lock is not engaged and unplug the tool from its electrical outlet before performing any inspection, maintenance, or cleaning procedures. TO PREVENT SERIOUS INJURY FROM TOOL FAILURE: Do not use damaged equipment.
Troubleshooting 3. Tool’s thermal reset breaker tripped (if equipped). 4. Internal damage or wear. (Carbon brushes or switch, for example.) Tool operates slowly. Extension cord too long or cord diameter too small. Performance 1. Accessory dull or damaged. decreases over time. 2. Carbon brushes worn or damaged. Excessive noise Internal damage or wear. (Carbon or rattling. brushes or bearings, for example.) Overheating. 1. Forcing tool to work too fast. 2. Accessory misaligned. 3.
Parts List and Diagram PLEASE READ THE FOLLOWING CAREFULLY SAFETY THE MANUFACTURER AND/OR DISTRIBUTOR HAS PROVIDED THE PARTS LIST AND ASSEMBLY DIAGRAM IN THIS MANUAL AS A REFERENCE TOOL ONLY. NEITHER THE MANUFACTURER OR DISTRIBUTOR MAKES ANY REPRESENTATION OR WARRANTY OF ANY KIND TO THE BUYER THAT HE OR SHE IS QUALIFIED TO MAKE ANY REPAIRS TO THE PRODUCT, OR THAT HE OR SHE IS QUALIFIED TO REPLACE ANY PARTS OF THE PRODUCT.
Assembly Diagram 13 14 15 16 14 SAFETY 17 18 19 20 21 1 2 3 4 5 6 7 8 22 23 24 25 12 9 10 11 26 27 28 29 32 34 36 41 39 40 37 38 27 74 19 73 47 43 44 45 72 59 71 19 48 70 69 68 67 49 50 51 52 53 54 55 56 57 58 66 65 64 59 60 OPERATION 31 33 35 46 42 SETUP 30 63 61 MAINTENANCE 62 Item 69066 For technical questions, please call 1-800-444-3353.
Limited 90 Day Warranty Harbor Freight Tools Co. makes every effort to assure that its products meet high quality and durability standards, and warrants to the original purchaser that this product is free from defects in materials and workmanship for the period of 90 days from the date of purchase.