
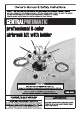
Owner's Manual


NOTICE
Clean the Airbrush IMMEDIATELY after use.
Delayed or inadequate cleaning will permanently clog the Airbrush.
Page 7For technical questions, please call 1-800-444-3353.Item 69861
SAFETYOPERATIONMAINTENANCE SETUP
Initial Set Up
Read the ENTIRE IMPORTANT SAFETY INFORMATION section at the beginning of this
manual including all text under subheadings therein before set up or use of
this product.
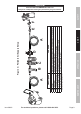
Note: For additional information regarding the parts listed in the following
pages, refer to the Assembly Diagram near the end of this manual.
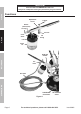
Before Setup
1. This air tool may be shipped with
protective plugs covering the air inlets.
Remove these plugs before set up.
2. The Metal Cup (28) may be used for excess
correctly thinned paint, and also for solvent
when it is time to clean the Airbrush.
3. The Metal Hanger (30) can be attached to a
secure surface and used to hang the Airbrush
for drying, or when it is not being used.
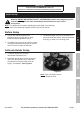
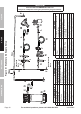
Airbrush Holder Setup
1. Thread Air Hoses (52) onto the
Inlet/Outlet Connectors (43).
2. Designate one Air Hose for the Air Supply
Inlet. Use the Adapter (54) to make the
connection from the Air Hose to the Air
Supply, if necessary. See Figure B.
Air Supply
Inlet
Figure B
Note: Each connection has its
own Air Pressure Valve.