® FRAMING NAILER 34 DEGREE & 28 DEGREE MAGAZINE ANGLES Models 91053, 91054, 92147, & 92185 ASSEMBLY AND OPERATING INSTRUCTIONS ® 3491 Mission Oaks Blvd., Camarillo, CA 93011 Visit our Web site at: http://www.harborfreight.com TO PREVENT SERIOUS INJURY, READ AND UNDERSTAND ALL WARNINGS AND INSTRUCTIONS BEFORE USE. Copyright© 2004 by Harbor Freight Tools®. All rights reserved.
Specifications Item Magazine Angle Nail Size Nail Capacity (Quantity) Operating PSI SCFM Required Trigger Type Accessories Construction Description Models 91054 & 92147: 34 Degrees Models 91053 & 92185: 28 All Models: .113” to .
5. Use the right tool for the job. Do not attempt to force a small tool or attachment to do the work of a larger industrial tool. There are certain applications for which this tool was designed. It will do the job better and more safely at the rate for which it was intended. Do not modify this tool and do not use this tool for a purpose for which it was not intended. 6. Dress properly. Do not wear loose clothing or jewelry as they can be caught in moving parts.
perform its intended function. Check for alignment and binding of moving parts; any broken parts or mounting fixtures; and any other condition that may affect proper operation. Any part that is damaged should be properly repaired or replaced by a qualified technician. Do not use the tool if the trigger does not operate properly. 15. Guard against electric shock. Prevent body contact with grounded surfaces such as pipes, radiators, ranges, and refrigerator enclosures. 16.
person. Always wear ANSI approved safety goggles during use, maintenance, and reloading. 24. Do not fire fasteners too close to the edge of a workpiece. They may split the workpiece and fly free, causing personal injury. 25. Take caution, as some woods contain preservatives such as copper chromium arsenate (CCA) which can be toxic. When working with these materials extra care should be taken to avoid inhalation and minimize skin contact. 26.
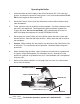
Operation For best service, you should incorporate an oiler, regulator, and inline filter, as shown in the diagram below. Hoses, couplers, oilers, regulators, and filters are all available at Harbor Freight Tools. TO ROOFING NAILER 1. To connect this tool, we recommend you use the included quick connector. Note: If you are not using an automatic oiler system, before operation, add a few drops of Pneumatic Tool Oil to the airline connection. Add a few drops more after each hour of continual use. 2.
4. Make sure the Trigger (48) and Lower Safety (32) move freely, without sticking see the illustration below. 5. Connect the air supply to the tool at the Quick Connector (87). Set the regulator at the recommended 75 to 125 PSI. 6. Test the tool by depressing the Lower Safety (32) against the workpiece without pulling the Trigger (48). The Tool must not cycle (fire). If it cycles (fires), stop immediately and have it repaired by a qualified service technician. 7.
Loading Nails ALWAYS WEAR ANSI APPROVED IMPACT SAFETY GOGGLES WHEN RELOADING OR DOING ANY OTHER MAINTENANCE ON THIS TOOL. Other people in the work area must also wear ANSI approved impact safety goggles. Warning! Make sure the Nailer is not attached to the air hose whenever loading the tool. 1. Slide the Tab (64) back and the Latch (78) will hold it in place. 2. Holding the nailer with the nose pointing slightly down, load a stick of nails into the top slot. 3.
Operating the Nailer 1. Attach the Nailer to the air supply at the Quick Connector (87). Start your compressor, and check the pressure making sure it is set at the recommended 75-125 PSI and not to go over the maximum PSI. 2. Rotate the Exhaust Cover (3) so that the exhaust air blast will be directed away from the operator. 3. To fire, place the nose of the Nailer on the workpiece. The Nailer should not fire if the nose is not depressed. Once depressed, gently and briefly squeeze the Trigger (48) once.
Anytime any maintenance or repairs are done (including clearing jams), FIRST: 1. 2. 3. Disconnect the Nailer from the air hose. Empty the Magazine (74) completely. Attempt to fire the Nailer into a piece of scrap wood to ensure that it is disconnected and is incapable of firing any nails. Clearing Jams 1. Occasionally a Nail may become jammed in the firing mechanism of the Nailer, making the tool inoperative. 2. To remove a jammed nail, disconnect the Nailer from its compressed air supply.
Anytime any maintenance or repairs are done, FIRST: 1. 2. 3. Disconnect the Nailer from the air hose. Empty the Magazine (74) completely. Attempt to fire the Nailer into a piece of scrap wood to ensure that it is disconnected and is incapable of firing any nails. Inspection, Maintenance, and Cleaning 1. Inspect the Nailer frequently and lubricate periodically with Pneumatic tool oil, then wipe dry.
Parts List Part Description Part Description Part Description Part Description 1 Set Screw 25 O-Ring 48 Trigger 71 Internal Hex Bolt 2 Shim 26 Gasket 49 O-Ring 72 Suppor t 3 Exhaust Cover 27 Body 50 Trigger Plate 73 Bushing 4 Internal Hex Bolt 28 Safety A 51 Spring Pin 74 Magazine 5 Shim 29 Safety Spring 52 O-Ring 75 Set Screw 6 Spring Washer 30 Lock Nut 53 Trigger Valve Body 76 Spring Pin 7 Flat Washer 31 Internal Hex Bolt 54 Pin 77 Internal He