
Chipper Assembly and Operating Instructions
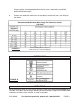

SKU 95091 For technical questions, please call 1-800-444-3353 PAGE 11
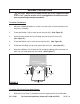
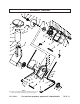
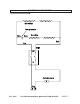
Housing (11), making sure to align the two mounting holes in the Chute Cover
(7) with the two
threaded
mounting holes in the Shredder Housing.
(See Figure F.)
2. Insert the Hopper (1) into the Chute Cover (7), making sure to align the two
mounting holes in the Hopper with the two mounting holes in the Chute Cover
(7). (See Figure F.)
3. Place a Washer (3) on two Philip’s Head Screws (8). Then secure the Chute
Cover (7) and Hopper (1) to the upper portion of the Shredder Housing (11) with
the two Philip’s Screws. (See Figure F.)
HOPPER
(1)
CHUTE COVER
(7)
PHILIP’S HEAD SCREW (8)
WASHER (3)
SHREDDER HOUSING
(11)
FIGURE F
OPERATING INSTRUCTIONS
1. Use safety equipment. Always wear eye protection. Always wear
ANSI approved safety impact goggles, heavy duty work gloves, and a dust
mask or respirator when using this product. ANSI approved hearing
protection must also be used.
2. Make sure the Chipper/Shredder is located on a flat, level, sturdy surface
capable of supporting the weight of the Chipper/Shredder and any additional
tools and equipment.
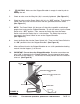
3. IMPORTANT: The Chipper/Shredder feautures a Safety Switch (48) and can only
be started when the Shredder Housing (11) is correctly closed. The Wing Nut (36)
is used to fasten the Shredder Housing and Lower Housing (62) together. The
Wing Nut MUST be tightened securely prior to and during each use of the
Chipper/Shredder. Should the Wing Nut become loose, the Chipper/Shredder will
not
start and/or will automatically turn itself off. (See Figure G, next page.)