
Chipper Assembly and Operating Instructions

SKU 95091 For technical questions, please call 1-800-444-3353 PAGE 12
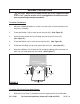
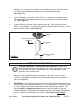
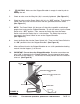
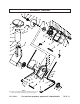
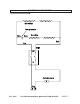
6. Check to make sure the Power Switch (42) is in its “OFF” position. Then plug the
Power Cord of the unit into the nearest 120 volt, grounded, electrical outlet.
(See Figure G.)
7. NOTE: The Power Switch (42) features a Safety Key to prohibit unauthorized
people from turning on the Chipper/Shredder. To use this feature, turn the Power
Switch to its “OFF” position. Then, remove the Safety Key from the Power
Switch and store the Safety Key in a safe location. The Safety Key must be
reinserted in the Power Switch to turn on the Chipper/Shredder.
(See Figure G.)
8. Insert the Safety Key into the Power Switch (42). Then turn the Power Switch to
its “ON” position to start the Chipper/Shredder. (See Figure G.)
9. Allow sufficient time for the Chipper/Shredder to run at full speed before feeding
material into the Hopper (1) of the unit.
10. IMPORTANT: Do not force the Chipper/Shredder. Branches cannot be more
than 1-1/4” in diameter for the Chipper/Shredder. Do not attempt to force larger
branches into the Hopper (1). Let the natural suction process take in the material
to be cut. (See Figure G.)
4. CAUTION! Make sure the Chipper/Shredder is empty of material prior to
starting the unit.
5. Check to make sure the Wing Nut (36) is securely tightened. (See Figure G.)
HOPPER
(1)
WING NUT
(36)
POWER SWITCH WITH SAFETY KEY
(42)
POWER CORD
FIGURE G
DISCHARGE CHUTE
OVERLOAD PROTECTOR
(45)