
Product manual


Page 6SKU 95803
For technical questions, please call 1-800-444-3353.
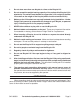
Figure 4
5
4
6
Using the final two Wood Screws (6), attach the Rope Cleat (4) to a stud or other
secure surface located on the side wall. If no stud is available, you can use wall
anchors (not included). Do not cut the Rope (5). Use the Rope Cleat to wrap the
excess. See Figure 4
OPERATION INSTRUCTIONS
RAISING THE BIKE FOR STORAGE
Before first use, test the Bicycle Lift by using small sandbags (or similar items) that
weigh no more than 50 lb. and are evenly distributed between the front and back
pulleys. This will show if the Bicycle Lift is installed properly.
Lower Front and Rear Hook Pulleys (3A & 3B) as evenly as possible and to a height
where you can comfortably lift the Handlebars and Seat onto the Front and Rear
Hook Pulleys (3B & 3A). Tie off the Rope (5) on the Rope Cleat (4) to prevent slip-
page of the Pulleys as you lift the Bike onto the Hook Pulleys.
Once the Handlebars and Seat are securely hanging on their respective Hook Pul-
leys, unfasten the Rope (5) from the Rope Cleat (4) and slowly and evenly pull the
Bicycle to the height needed. Anytime you release pressure on the Rope you will
engage the Rope Lock located on the Front Lift Bracket (2) and the Bike will stay
where it is suspended at the time.
After you have raised the Bicycle to the height you where you want it to be, wrap
the Rope (5) around the Rope Cleat (4) using a figure eight motion. NEVER cut off
excess rope.
7.
1.
2.
3.
4.