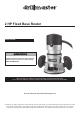
2 HP Fixed Base Router 68341 Router Read this material before using this product. Failure to do so can result in serious injury. Save this manual. When unpacking, make sure that the product is intact and undamaged. If any parts are missing or broken, please call 1-800-444-3353 as soon as possible. Visit our website at: http://www.harborfreight.com Copyright© 2011 by Harbor Freight Tools®. All rights reserved.
Specifications NOTICE is used to address practices not related to personal injury.
. Personal safety a. Stay alert, watch what you are doing and use common sense when operating a power tool. Do not use a power tool while you are tired or under the influence of drugs, alcohol or medication. A moment of inattention while operating power tools may result in serious personal injury. b. Use personal protective equipment. Always wear eye protection.
11. Do not lay the Router down until it has stopped rotating completely. 12. Hold the Router firmly when starting, as startup rotation creates significant torque. 13. Hold the Router firmly while cutting. The action of the bit against the workpiece can cause it to “kick out”, jumping rapidly away from the workpiece. This can be caused by an improper type of bit, or a dull bit. 14. Do not handle the Router bit immediately after cutting. It may be very hot, potentially causing burns or injury. 15.
2. Do not smoke during use. Nicotine reduces the blood supply to the hands and fingers, increasing the risk of vibration-related injury. 3. Wear suitable gloves to reduce the vibration effects on the user. 4. Use tools with the lowest vibration when there is a choice. 5. Include vibration-free periods each day of work. 6. Grip tool as lightly as possible (while still keeping safe control of it). Let the tool do the work. 7. To reduce vibration, maintain the tool as explained in this manual.
4. When using more than one extension cord to make up the total length, make sure each cord contains at least the minimum wire size required. (See Table A.) Symbology Double Insulated 5. If you are using one extension cord for more than one tool, add the nameplate amperes and use the sum to determine the required minimum cord size. (See Table A.) Canadian Standards Association 6.
Instructions for Putting into Use Read the entire Important Safety Information section at the beginning of this manual including all text under subheadings therein before set up or use of this product. Note: To prevent serious injury from accidental operation: Turn the Power Switch off and unplug the Router before adjusting or installing accessories. For additional information regarding the parts listed in the following pages, refer to Parts List on page 12.
Operating Instructions Read the entire Important Safety Information section at the beginning of this manual including all text under subheadings therein before set up or use of this product. To prevent serious injury from accidental operation: Turn the Power Switch off and unplug the Router before adjusting or installing accessories. Tool Set Up Installing Bits 1 2 Unlock the Lock Lever (30).
Adjusting the Cutting Depth 1 Place the router on a flat wood surface. Unlock the Lock Lever (30). 2 Rotate the Main Housing until the tip of the bit touches the workpiece surface. Lock the Lock Lever. Main Housing (5) Lock Lever (30) Spindle 3 Slide the Scale Ring until the “0” aligns with the index line (vertical mark) on the Main Housing. Unlock the Lock Lever. Each line on the scale raises or lowers the bit by 1/64".
Work Piece and Work Area Set Up 1. Designate a work area that is clean and well‑lit. The work area must not allow access by children or pets to prevent distraction and injury. Note: Make practice cuts at different speeds in scrap material until you are able to produce a smooth cut with no burnishing or burn marks. Burn marks are caused by moving too slowly through the wood. Feeding the Router too quickly, or trying to remove too much material in a single pass creates a rough cut and can overload the motor.
Maintenance and Servicing Procedures not specifically explained in this manual must be performed only by a qualified technician. To prevent serious injury from accidental operation: Turn the Power Switch off and unplug the Router before performing any inspection, maintenance, or cleaning procedures. Cleaning, Maintenance, and Lubrication 1. BEFORE EACH USE, inspect the general condition of the tool.
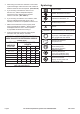
Parts List Part Description 1 2 3 4 5 6 7 8 9 10 11 12 13 14 15 16 17 18 18a 19 20 21 22 23 24 25 Collet Nut Bolt Bearing Support Bearing Main Housing Screw Cover Stator Rotor Washer Bearing Motor Housing Power Cord Cable Guard Brush Cap Brush Holder Spring Carbon Brush (installed) Carbon Brush (replacement) Cable Clamp Screw Rear Housing Screw Power Switch Guide Nut Qty 1 2 1 1 1 2 1 1 1 1 1 1 1 1 2 2 2 2 2 1 2 1 4 1 1 2 Part 26 27 28 29 30 31 32 33 34 35 36 37 38 39 40 41 42 43 44 45 46 47 48 50 51
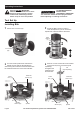
Assembly Diagram SKU 68341 For technical questions, please call 1-800-444-3353.
Limited 90 Day Warranty Harbor Freight Tools Co. makes every effort to assure that its products meet high quality and durability standards, and warrants to the original purchaser that this product is free from defects in materials and workmanship for the period of 90 days from the date of purchase.