Power TOOL set Model 66755 Set up and Operating Instructions Distributed exclusively by Harbor Freight Tools®. 3491 Mission Oaks Blvd., Camarillo, CA 93011 Visit our website at: http://www.harborfreight.com Read this material before using this product. Failure to do so can result in serious injury. Save this manual. Copyright© 2009 by Harbor Freight Tools®. All rights reserved.
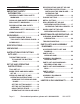
Contents Important SAFETY Information ���������������������������������3 General Power Tool Safety Warnings ������������������������������������������� 3 Reciprocating Saw Set Up and Operating Instructions ����������� 16 Installing the Saw Blade ������ 16 Operating the Reciprocating Saw ���������������� 16 Plunge Cutting ������������������������������� 17 Circular Saw Safety Warnings � 5 Metal Cutting ���������������������������������� 17 Drill Safety Warnings ������������������� 7 Drill/Driver Set Up
NOTICE is used to address practices not related to personal injury. Save This Manual Keep this manual for the safety warnings and precautions, assembly, operating, inspection, maintenance and cleaning procedures. Write the serial number of the products in the back of the manual near the assembly diagram (or month and year of purchase if product has no number). Keep this manual and the receipt in a safe and dry place for future reference.
influence of drugs, alcohol or medication. A moment of inattention while operating power tools may result in serious personal injury. b. Use safety equipment. Always wear eye protection. Safety equipment such as a )dust mask, non-skid safety shoes, hard hat, or hearing protection used for appropriate conditions will reduce personal injuries. c. Prevent unintentional starting. Ensure the switch is in the off-position before connecting to power source and/or battery pack, picking up or carrying the tool.
operations different from those intended could result in a hazardous situation. 5. Battery tool use and care a. Recharge only with the charger specified by the manufacturer. A charger that is suitable for one type of battery pack may create a risk of fire when used with another battery pack. b. Use power tools only with specifically designated battery packs. Use of any other battery packs may create a risk of injury and fire. c.
ty of operation. Observe thread direction of the bolt. 9.
be serviced before use. Lower Guard may operate sluggishly due to damaged parts, gummy deposits, or a build-up of debris. 12. Lower Guard (A7) on the Circular Saw should be retracted manually only for special cuts such as ″plunge cuts″ and ″compound cuts.″ Raise Lower Guard by retracting handle and as soon as blade enters the material, the Lower Guard must be released. For all other sawing, the Lower Guard should operate automatically. 13.
Additional Safety Warnings 1. Maintain labels and nameplates on the tool. These carry important safety information. If unreadable or missing, contact Harbor Freight Tools for a replacement. 2. Avoid unintentional starting. Prepare to begin work before turning on the tool. 3. When using a handheld power tool, maintain a firm grip on the tool with both hands to resist starting torque. 5. Do not leave the Charger unattended when it is plugged into an electrical outlet.
understood by the operator that common sense and caution are factors which cannot be built into this product, but must be supplied by the operator. 7. Save these instructions. Vibration Safety This tool vibrates during use. Repeated or long-term exposure to vibration may cause temporary or permanent physical injury, particularly to the hands, arms and shoulders. To reduce the risk of vibration-related injury: 1.
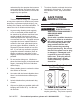
double insulation system which satisfies OSHA requirements and complies with the applicable standards of Underwriters Laboratories, Inc., the Canadian Standard Association, and the National Electrical Code. (See Outlets for 2-Prong Plug.) 2. Double insulated tools may be used in either of the 120 volt outlets shown in the preceding illustration. (See Outlets for 2-Prong Plug.) Extension Cords Note: Extension cords must not be used with this item’s charger.
Specifications Unpacking Battery Specifications When unpacking, check to make sure that the item is intact and undamaged. If any parts are missing or broken, please call Harbor Freight Tools at the number shown on the cover of this manual as soon as possible. Type 18VDC, NiCd, 1.3Ah Circular Saw Specifications Max. RPM 4000 RPM Blade 5-1/2” Dia.
moved from the Battery Socket/Charger assembly. The Battery Packs • Two Battery Packs (1) are included with this tool kit. They can be used in combination with the Work Light and any of the other tools at the same time, or you can have an extra fully charged stand-by Battery Pack available for use when needed. • Charge both Battery Packs before using the tools. • Charge the Battery Pack (1) only with the 18V Charger (3) provided. • Charge indoors only.
Set Up and Operating Instructions Read the entire Important Safety Information section at the beginning of this manual including all text under subheadings therein before set up or use of this product. ciprocating Saw or the Circular Saw. Ensure you will not be cutting through any electrical wires, pipes, or your workbench.
Circular Saw Set Up and Operating Instructions To prevent serious injury from flying shrapnel: Do not use any abrasive wheels on the circular saw. The saw and its guards are not designed to accommodate abrasive wheels. Changing the Circular Saw Blade The Blade comes installed on the Circular Saw, but replacement Blades will need to be installed when the blade gets dull or is damaged. To replace the Blade: 1. Place the unit on a flat, hard horizontal bench or table. 2.
Set the Cutting Depth The cutting depth of the Saw Blade (A3) can be adjusted up to a 1-1/2” depth when the cutting angle is set to 90°, or up to 1-1/16” when the cutting angle is set to 45°. 6. To prevent accidents, turn off the tool and disconnect its power supply after use. Clean, then store the tool indoors out of children’s reach. Operating the Circular Saw 1. Mark the line to be cut on the workpiece. 2. Adjust the depth and angle of the cut as needed. 3.
Reciprocating Saw Set Up and Operating Instructions 5. Slide a fully charged Battery Pack (1) into the bottom of the Handle of the Reciprocating Saw, making sure that it clicks into place securely. Be sure the Battery Pack (1) is securely seated into the Saw Handle so it will not fall off during use. 6. Firmly hold the Reciprocating Saw with both hands. Position the Blade near the work piece, depress the Safety Button (B18) and hold the Trigger down. Release the Safety Button once the tool has power.
Plunge Cutting Drill/Driver Set Up and Operating Instructions Note: Before Plunge Cutting, drill a hole or opening for inserting the saw blade. Never allow the tip of the saw blade to contact the workpiece. 1. Clearly mark the line of cut on the work piece. 2. From a convenient starting point within the cut out area, place the blade tip into the hole or opening. The saw should be positioned vertically at a 90° angle to the workpiece. 3.
Clutch Cap Set to Drill Be sure the Battery Pack (1) is securely seated into the Drill/Driver Handle so it does not fall off during use. 2. Slide the Forward/Lock/Reverse Button (C10) (which should initially be centered in the “lock” position) to either Forward or Reverse as required. 3. If using the Drill to insert or remove screws, position the driver tip in the item to insert or remove. 4. If drilling a hole, hold the Drill Driver above the area to drill.
Work Light Set Up and Operating Instructions 1. Insert the fully charged Battery Pack (1) into the base of the Work Light, making sure that it clicks into place securely. Seven Position Rotation Power Switch (D17) Battery Pack (1) Figure D1 2. Adjust the Head position of the Work Light by rotating it to click in place at any of the seven locking positions. 3. Press the Power Switch (D17) to turn the light on. 4. When finished using the Work Light, press the Power Button again to turn the light off.
Maintenance And Servicing Procedures not specifically explained in this manual must be performed only by a qualified technician. To prevent serious injury from accidental operation: Turn the Power Switch of the tool to its “OFF” position and unplug the tool from its Battery Pack (1) before performing any inspection, maintenance, or cleaning procedures. To prevent serious injury from tool failure: Do not use damaged equipment.
Troubleshooting Problem Charger will not turn on. Battery Pack will not charge. Tool will not start Tool does not run at full power. Power Switch will not turn off tool. When using Circular Saw, cut quality is poor. When using Reciprocating Saw, cut line is irregular. When using Reciprocating Saw, undesirable cutting action.
PLEASE READ THE FOLLOWING CAREFULLY The manufacturer and/or distributor has provided the parts list and assembly diagram in this manual as a reference tool only. Neither the manufacturer or distributor makes any representation or warranty of any kind to the buyer that he or she is qualified to make any repairs to the product, or that he or she is qualified to replace any parts of the product.
Parts Lists and Assembly Diagrams Accessory Parts List and Diagram Part 1 2 3 Description Battery Pack Charger Battery Socket Qty 2 1 1 2 3 1 SKU 66755 For technical questions, please call 1-800-444-3353.
Parts List A - Circular Saw Part A1 A2 A3 A4 A5 A6 A7 A8 A9 A10 A11 A12 A13 A14 A15 A16 A17 A18 A19 A19-1 A19-2 A19-3 A19-4 A19-5 A19-6 A20 A21 A22 A23 A24 A25 A25-1 Page 24 Description Bolt Washer Saw Blade Inside Clamping Plate Screw Clamping Board Lower Guard Bolt Spring Screw Label Upper Safety Cover Left Motor Housing Label Safety Button Compression Spring Phillips Head Screw Spring Shim Trigger Module Trigger Connecting Wire 1 Connecting Wire 2 Contact Plate Contact Plate Socket Connecting Wire 3
Assembly Diagram A - Circular Saw Note: Some parts are listed and shown for illustration purposes only, and are not available individually as replacement parts. SKU 66755 For technical questions, please call 1-800-444-3353.
Parts List and Diagram B - Reciprocating Saw Part B1 B2 B3 B4 B5 B6 B7 B8 B9 B10 B11 B12 Description Phillips Head Screw Phillips Head Screw Label Right Housing Cover Phillips Head Screw Right Motor Housing Hacked-Type Rubber Square Rubber Motor Module Impacting Spring Left Motor Housing Left Motor Housing Qty 4 2 1 1 7 1 1 1 1 1 1 1 Part B14 B15 B16 B17 B18 B19 B19-1 B19-2 B19-3 B19-4 B19-5 Description Label Saw Blade 1 Saw Blade 2 Rubber Molded Cover Safety Button Trigger Module Trigger Contact Pla
Parts List and Diagram C - Drill Part C1 C2 C3 C4 C5 C6 C7 C8 C9 C10 C11 Description Screw Chuck Motor and Gear Box Module Trigger Switch Contact Plate Socket Contact Plate Left Motor Housing Left Rear Cover Left Front Cover Forward/Lock/Reverse Button Light Switch Qty 1 1 1 1 1 1 1 1 1 1 1 Part C12 C13 C14 C15 C16 C17 C18 C20 C21 C22 C23 Description LED Light Right Motor Housing Screw Right Rear Cover Right Front Cover Screw Screw Connecting Wire 2 Connecting Wire 1 Connecting Wire 3 Connecting Wire
Parts List D - Flashlight Part D4 D5 D6 D7 D8 D9 D10 D11 D12 D13 D14 D15 D16 D17 D18 D19 D20 D21 D22 D23 D24 D25 D26 D27 Page 28 Description Screw Screw Screw Contact Plate Socket Contact Plate Connecting Wire Switch Left Housing Right Front Cover Right Lamp Holder O-Ring Right Housing PCB Power Switch Spring Screw Lamp Holder Orientation Orientation Pin Spring Lamp Shade Lens Reflector Left Lamp Holder Left Front Cover Qty 1 4 2 1 1 1 1 1 1 1 1 1 1 1 1 1 1 1 1 1 1 1 1 1 For technical questions, please
Assembly Diagram D - Flashlight Record Product’s Serial Number Here: Note: If product has no serial number, record month and year of purchase instead. Note: Some parts are listed and shown for illustration purposes only, and are not available individually as replacement parts. SKU 66755 For technical questions, please call 1-800-444-3353.
LIMITED 90 DAY WARRANTY Harbor Freight Tools Co. makes every effort to assure that its products meet high quality and durability standards, and warrants to the original purchaser that this product is free from defects in materials and workmanship for the period of 90 days from the date of purchase.