402 Boyer Circle • Williston, VT 05495 1-888-468-1417 • www.abtco.com ABTCO and all other company names and product names are trademarks or registered trademarks of KP Building Products. ©2006 KP Building Products. All rights reserved.
Vinyl Siding Estimating & Installation Guide
Understanding the Basics Contractors and homeowners alike have depended on the low maintenance sidings from ABTCO for the best product designs and engineering that will give them a professional installation every time. Whether you do it yourself, or have a contractor do it for you, your home is going to go through an amazing transformation and you’re going to love it. At ABTCO there’s a complete system to cover your entire home in low-maintenance vinyl. Around doors and windows.
Table of Contents The installation manual was designed to walk you through the job, so follow the steps as they are laid out. It is best to read ahead as you work, so you will have a better understanding of the directions and the order in which to proceed. This is the best path to that completed job that will have the neighbors and friends asking you how you did it. Good luck. Understanding the basics . . . . . . . . . . . . . . . . . . . . . . . . . . . . . . . . . . . .
general estimating tips Most homes’ surface areas are made up of a series of rectangles or triangles. When estimating vinyl siding, estimate each rectangular or triangular section separately and add the totals together. Rather than trying to multiply feet and inches together, simply round to the next highest three-inch increment and use the decimal equivalent. For example: 10' 1" would become 10' 3" or 10.25' 10' 5" would become 10' 6" or 10.50' 10' 7" would become 10' 9" or 10.
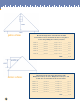
estimating for soffit Soffit material will be used on the front and rear eaves, the gable overhangs, the dormer overhangs and any porch ceilings. Calculating the Eaves For the front and rear eaves, add the total length of each section and multiply by the width. The width is a straightline distance from the wall to the tails of the rafters. This would also be done on the ends of the home on a hip roof. Our sample home in GENERAL ESTIMATING TIPS was 40' long with a 12" overhang on each of its two gables.
gable surfaces Measure the height at the center. Measure the width. Do not deduct for doors and windows. Do this for each gable to receive siding. Multiply the results by .75 (75%). Gable 1: ________(width) x ________(height) x .75 = ________sq. ft. Gable 2: ________(width) x ________(height) x .75 = ________sq. ft. Gable 3: ________(width) x ________(height) x .75 = ________sq. ft. Gable 4: ________(width) x ________(height) x .75 = ________sq. ft.
Measure the height (excluding gables). Measure the width. Do not deduct for doors and windows. Do this for each wall section, including any surface to receive siding. Wall Wall Wall Wall Wall Wall Wall Wall Wall Wall 1: _________________(h x w) = __________________sq. 2: _________________(h x w) = __________________sq. 3: _________________(h x w) = __________________sq. 4: _________________(h x w) = __________________sq. 5: _________________(h x w) = __________________sq.
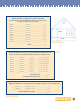
How to Determine the Number of Pieces Required Accessories Starter Base 10' Window/Door Cap 10' Undersill Trim 10' Measure tops of all window and door cap openings. Convert to decimal, divide by 10 and round up. # of pieces needed: _______ Measure bottom of all areas where siding must be cut horizontally (at the top of wall and under all door and window openings). Convert to decimal, divide by 10 and round up. # of pieces needed: _______ F-channel 12' 6" Measure span where all soffits return to wall.
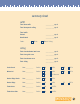
summary sheet soffit Total from soffit ___________sq. ft. Total from porch ceiling ___________sq. ft. Total soffit: Vented ___________sq. ft. Non-Vented ___________sq. ft. Color: White Match Siding siding Total from horizontal wall area ___________sq. ft. Total from gable area ___________sq. ft. Total from dormer area ___________sq. ft. Total siding ___________sq. ft.
general installation tips Before you begin: This instruction sheet has been specially written to provide you with a simple, straightforward, step-by-step guide for installing your ABTCO™ vinyl siding. In fact, the best installation advice we can give is that you read through these instructions carefully before beginning your project. Because proper preparation is the key to a smooth installation job. For installation questions, call 1-800-265-9829.
preparing your home Proper surface preparation is one of the most important parts of your siding installation job. All exterior wall surfaces must be even, so that your new vinyl siding will be straight, and look sharp. 1. Remove all shutters, downspouts and fixtures. On older homes, replace any rotten wood and securely nail all loose boards, siding and wood trim. Tie back all shrubbery and trees when plantings are close to the house. Remove any old caulking around windows and doors. 2.
important installation tips The following are absolute “must-do’s” for every siding installation: 1. Don’t nail too tightly. Always allow a minimum of 1/16" space between the back of the head and the nailing hem. Space fasteners 12" - 16" apart on center. 3. Perforate the cut edge using snap-lock punch approximately every 8", ensuring the “tabs” face outward. 2. Leave 1/4" clearance at all openings and accessory channel stops. This allows for normal expansion and contraction.
installing TimberCrest® i/s insulated siding Snapping A Chalk Line Start at the lowest corner of siding or sheathing on the house. Drive a nail partway into the sheathing at a point 3" higher than the lowest corner. (Note: This will place the siding 3/8" below the lowest point.) Stretch a chalk line from this nail to a similar nail at the next corner of the house, being careful to make sure that the line is level. Continue this process around the entire house.
Installing The Insulated Siding Panels Lock the insulated panel into the EasyStart strip and slide the vinyl panel into the pocket of the corner post. The factory panel has a 3/4" foam setback so that only the vinyl will go into the pocket when using a factory cut end.
installing soffit and fascia (If you are installing both siding and soffit, install soffit first.) Installing Trim - Option A (When fascia is applied without exposed nailing.) With open eave: Secure F-channel to the exterior of the fascia with the top leg resting against the bottom of the board. Secure F-channel on wall, level with the F-channel on the fascia. With closed eave: Use a J-channel in place of the F-channel at the wall. Secure all channels every 12" on center, in center of nail slots.
3. Perforate the cut edge using snap-lock punch approximately every 8", ensuring the “tabs” face outward. 4. Hook the leg of the fascia panel over the F-channel, and snap the “tabs” into the undersill trim. If soffit is not being installed, hook the fascia directly over the fascia board. An alternative to snap-lock punch attachment is to slide the top of the fascia behind metal drip-edge.
installing vertical siding 1. Using a level and chalk line, pull a line around the bottom of the wall where you want the siding to start, allowing for type of starting channel being used (either vertical base flashing or J-channel). 2. If using a 10" panel (i.e. Double 5), measure width of the wall and divide by 10". Calculate the width of the starting and finishing panels, which should be the same size. This will provide a centered appearance. 3.
installing siding around windows, doors and gable ends Cut siding to fit around windows, doors and gable ends using similar techniques as described above for openings, and as detailed in the horizontal siding section. Installing Horizontal Siding 1. Start at the lowest corner of siding or sheathing on the house. Stretch a chalk line from a point 1 1/2" higher than the lowest corner being careful to make sure the line is level. Continue process around the entire house.
finishing the top of the wall Undersill trim is used to finish siding under the eaves. The procedure is the same as that used under the window. For ease of installation, and to retain proper angle of inclination, the trim can be shimmed. finishing a gable end A J-channel is used as the finishing trim in the gable ends. Cut siding to fit gable angle as illustrated, leaving space for expansion within the channel. The last piece of siding may have to be furred out to maintain proper angle of siding panel.
ABTCOTM PREMIUM VINYL SIDING LIFETIME LIMITED WARRANTY 1. WARRANTY COVERAGE A. COVERAGE. This warranty applies to the original retail purchaser (“Purchaser”) of ABTCO vinyl siding, soffit and accessories (“Product(s)”) and to any owner (“Owner”) of a building on which the Product(s) is originally installed.
IT DEEMS TO BE EQUIVALENT IN VALUE AND QUALITY. Any dispute concerning this warranty shall be submitted to binding arbitration to a mutually agreed arbitrator; or, if the parties fail to agree, to the American Arbitration Association to be resolved using its Commercial Arbitration Rules. The jurisdiction of the arbitrator over the dispute shall be exclusive and the decision of the arbitrator shall be binding on the parties and nonappealable. 6.
TIMBERCREST ® I/S VINYL SIDING LIFETIME LIMITED WARRANTY 1. Warranty Coverage A. Coverage. This warranty applies to the original retail purchaser (“Purchaser”) of TimberCrest i/s vinyl siding, and accessories (the “Product (s)”) and to any owner of a building on which the Product(s) is originally installed (“Owner”). B. Warranty.
ANY NONCONFORMITY IN THE PRODUCT(S). In the event of any Nonconformity covered by this or any implied warranty not disclaimed in Section 4, Manufacturer will, at its sole option and at its expense, either repair or replace defective or damaged Product(s) including all labor and materials necessary to perform the work. MANUFACTURER MAY DISCONTINUE, MODIFY OR CHANGE THE COLOR OF ANY PRODUCT(S) WITHOUT NOTICE AND SHALL BEAR NO LIABILITY FOR ANY SUCH COLOR CHANGE.