
Manual


DC Power Input (-DC)
WARNING: DO NOT OPERATE WITH INCORRECT LINE VOLT-
AGE. TO DO SO WILL RESULT IN PROPERTY DAMAGE AND/OR
PERSONAL INJURY. MAKE SURE THAT THE POWER SOURCE
DOES NOT EXCEED 24 VDC.
CAUTION: Y
OU MUST USE A POWER LIMITED DC POWER
SUPPLY (CLASS 2) ON THE DC INPUT WIRING.
• The DC power should be supplied by a “clean” primary line,
directly from the DC power source.
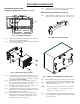
Step 1. Make sure the VDC power is shut off before installing the
wires to the connector.
Step 2. Connect the 24 VDC Voltage wire, Ground wire and Shield
wire to the connector that plugs into the DC voltage header at
the rear panel. Make sure that the shield is connected to the
local Earth Ground connection.
Step 3. Plug the connector into the header at the rear panel. (See Fig.
7)
Step 4. Apply VDC power to the unit.
STARTING THE HI 4060
Step 1. Connect the power connector (AC or DC) to the HI 4060.
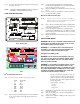
Step 2. The Instrument boots up to the Summary Display. (See Fig. 9)
FIG. 7 SUMMARY DISPLAY
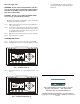
Step 3. Press the Enter button to go to the Configuration menus. (See
Fig. 8)
FIG. 8 CONFIGURATION DISPLAY
• Use the HI 4060 Rate Controller User Guide for
Configuration, Operation and Troubleshooting
instructions.
9440 Carroll Park Drive Suite 150, San Diego, CA 92121
Telephone: 1-800-821-5831 FAX: (858) 278-6700
Web Address: http://www.hardyinstruments.com
Hardy Instruments Document Number: 0596-0308-01 Rev. B
Copyright June 2008, Dynamic Instruments, All Rights Reserved. Printed in
the U.S.A.
Ra t e
Ra t e