SB 16 Active speaker soundbar Owner’s Manual 0243CSK - HK SB16 120V OM v2.
SB 16 Table of Contents Introduction 3 Description and Features 3 Included Items 3 Soundbar Top-Panel Controls 4 Soundbar Rear-Panel Controls and Connections 4 Subwoofer Rear-Panel Controls 5 Speaker Placement 6 Placing the Soundbar on a Table 6 Wall-Mounting the Soundbar 6 Placing the Subwoofer 6 Connections 7 Source Connections 7 Power Connections 8 Operation 9 Turning the Soundbar On and Off 9 Turning the Subwoofer On and Off 9 Adjusting the System’s Volu
Introduction, Description and Features, Included Items Introduction ENGLISH SB 16 Included Items One SB 16 CTR soundbar speaker Please register your product on our Web site at www.harmankardon.com. Note: You’ll need the product’s serial number. At the same time, you can choose to be notified about our new products and/or special promotions.
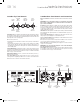
Soundbar Top-Panel Controls and Soundbar Rear-Panel Controls and Connections SB 16 Soundbar Top-Panel Controls Power Button Surround Mode Button Power Surround Indicator Mode Indicator Volume Up/Down Buttons Soundbar Rear-Panel Controls and Connections Source Selector Button Wireless Code Switch: Selects between four different channels for the wireless subwoofer signal. IMPORTANT: Be sure to set the subwoofer’s Wireless Code switch to the same channel that you set the soundbar’s Wireless Code switch.
Subwoofer Rear-Panel Connections ENGLISH SB 16 Subwoofer Rear-Panel Controls Crossover Knob Volume Knob Phase Switch AC Fuse Wireless Code Switch Power Cord Power Switch Crossover Knob: This knob adjusts the subwoofer’s crossover between 50Hz and 150Hz. The higher you set the Crossover knob, the higher in frequency the subwoofer will operate and the more its bass will “overlap” that of the soundbar.
SB 16 Speaker Placement Speaker Placement 4. Attach the two wall-mount brackets to the wall at the locations you marked, using hardware that is appropriate for the wall’s construction and materials. Note that the soundbar weighs 3.6kg (8 lb). Be sure to use hardware that can support this weight. Placing the Soundbar on a Table If your TV is placed on a table, you can place the soundbar on the table directly in front of the TV stand, centered with the TV screen.
Connections ENGLISH SB 16 Connections Source Connections Analog: Use the supplied stereo audio cable to connect the soundbar’s Source 1 (analog) input to your TV’s stereo audio output. If your TV has two sets of audio output jacks, use the set that has a fixed (not variable) output level. This will let you turn your TV’s speakers all the way off while the TV still supplies a constant audio signal to the soundbar.
SB 16 Connections Power Connections After you have made and verified all of the source connections above: 1. Connect the DC power supply to the soundbar’s power connection. Then plug the supplied AC cord into the DC power supply and into an active, unswitched AC outlet. DO NOT plug this cord into the accessory outlets found on some audio components. 2. Plug the subwoofer’s power cord into an active, unswitched AC outlet. DO NOT plug this cord into the accessory outlets found on some audio components.
Operation Operation Adjusting the System’s Volume Set the soundbar’s and subwoofer’s Power switches in their On positions. Press the soundbar’s Volume Up and Down buttons to raise and lower the system’s volume one step at a time. Hold down the buttons to raise or lower the volume continuously. NOTE: The lowest setting of the Volume Down button will mute the system.
SB 16 Operation Subwoofer Volume Knob Subwoofer Crossover Knob Use the subwoofer’s Volume knob to balance the bass with the rest of the sound. Play music or movies that you are familiar with and adjust the subwoofer’s Volume knob so the bass sounds balanced on both music and films. Listen to several different music recordings and film soundtracks that contain strong bass passages, and find a setting for the Volume knob that doesn’t over-emphasize the bass or make it sound weak.
SB 16 Programming the Soundbar to Respond to Your TV Remote To program the Mute command: Repeat steps 1 and 2. At step 3, press and hold the soundbar’s Power button until the Surround and Source buttons switch to constant illumination. Then proceed to step 4. You can program the soundbar so it will respond to your TV remote’s power off, mute, volume up, volume down and source commands. This programming lets you control your whole home theater system with a single remote.
SB 16 Troubleshooting Troubleshooting If your SB 16 system isn’t performing the way you think it should, check to see if the problem is covered in this section before calling your dealer or contacting a harman kardon representative. Problem Solution If the soundbar does not turn on: •• Check that the soundbar power supply’s AC cord is plugged into a working AC outlet and that the power supply is plugged into the soundbar. •• Check that the soundbar’s Power switch is in the On position.
Specifications ENGLISH SB 16 Specifications SB 16 System Frequency response 50Hz – 20kHz SB 16 CTR Soundbar Midrange transducers Two x 3" (75mm) cones per channel, video-shielded High-frequency transducer One x 3/4" dome per channel, video-shielded Amplifier power 25 watts x 2 Power requirement 24V DC, 2.5A – 2.7A Dimensions (H x W x D) 110mm x 920mm x 89mm (4-5/16" x 36-1/4" x 3-1/2") Weight 3.
HARMAN Consumer, Inc. 8500 Balboa Boulevard, Northridge, CA 91329 USA 516.255.4545 (USA only) Made in P.R.C. © 2010 HARMAN International Industries, Incorporated. All rights reserved. harman kardon is a trademark of HARMAN International Industries, Incorporated, registered in the United States and/or other countries. Features, specifications and appearance are subject to change without notice. Part No. 406-000-06266-E 0243CSK - HK SB16 120V OM v2.indd 14 www.harmankardon.
Federal Communication Commission Interference Statement This equipment has been tested and found to comply with the limits for a Class B digital device, pursuant to Part 15 of the FCC Rules. These limits are designed to provide reasonable protection against harmful interference in a residential installation. This equipment generates, uses and can radiate radio frequency energy and, if not installed and used in accordance with the instructions, may cause harmful interference to radio communications.