AVR 1510S, AVR 151S, AVR 151S/230C Audio/video-receiver ® Gebruikershandleiding
AVR Inhoudsopgave INLEIDING 3 DE AVR CONFIGUREREN VOOR UW LUIDSPREKERS 20 MEEGELEVERDE TOEBEHOREN 3 UW BRONNEN INSTELLEN 22 BELANGRIJKE VEILIGHEIDSINFORMATIE 3 HET NETWERK INSTELLEN 23 DE AVR OPSTELLEN 3 BEDIENINGSELEMENTEN VOORPANEEL 4 HARMAN REMOTE APP 23 AANSLUITINGEN ACHTERPANEEL 6 HET VOLUME REGELEN 24 8 23 HET GELUID DEMPEN 24 10 LUISTEREN DOOR EEN HOOFDTELEFOON 24 STANDAARD THUISTHEATERSYSTEEM 10 EEN BRON SELECTEREN 24 MULTIKANAALS AUDIO 10 EEN SURROUND FUNCTIE SE
Inleiding BELANGRIJKE VEILIGHEIDSINFORMATIE Hartelijk dank dat u voor dit product van Harman Kardon hebt gekozen! Controleer lijnvoltage vóór gebruik Al meer dan vijftig jaar lang is het de missie van Harman Kardon om de eigen passie voor muziek en entertainment met anderen te delen, door middel van toonaangevende technologie, om topprestaties te realiseren. Sidney Harman en Bernard Kardon vonden de receiver uit.
AVR Bedieningselementen voorpaneel Bedieningselementen voorpaneel Tuning Mode (Afstemmingsmodus) toets (AVR 1510S)/ RDS-toets (AVR 151S) Toets voor kanaalvolumeregeling Aan/uittoets IR sensor Power controlelampje Set toets Voorpaneel display Volume regelaar 1510S Hoofdtelefooningang USB poort Links/Rechts toetsen Audio ingangstoets 4 Toetsen Omhoog/ Omlaag/ Afstemmingstoetsen Surround Modes (Surround functies) keuzetoetsen Toets voor surroundmoduscategorie Bronselectietoetsen
Bedieningselementen voorpaneel, vervolg Voedingslampje/Aan/uit-toets: De AVR heeft drie verschillende voedingsmodi: • Off (Uit) (voedingslampje brandt oranje): In de Uit-stand wordt het energieverbruik tot een minimum beperkt als u de AVR niet gebruikt. Wanneer de AVR uitgeschakeld is, zal het niet automatisch inschakelen of audio afspelen in reactie op een DLNA DMR stream van een netwerkapparaat. Wanneer de AVR is uitgeschakeld, drukt u op de aan/uit-toets om het toestel aan te zetten.
AVR Aansluitingen achterpaneel Aansluitingen achterpaneel Digitale audio aansluitingen Radioantenne aansluitingen Analoge audio aansluitingen 6 Netwerk aansluiting HDMI ingangaansluitingen Subwoofer Pre-Out aansluiting HDMI-uitgangaansluitingen Luidspreker aansluitingen IR-ingang en activeringsuitgang Analoge video ingangen Netvoeding-aansluiting (alleen de AVR 151S) Netsnoer (alleen de AVR 1510S)
Aansluitingen op achterpaneel, vervolg Digitale audio-aansluiting: Als uw niet-HDMI-bronapparaten digitale uitgangen hebben, kunt u deze vaak aansluiten op de digitale audio-aansluitingen van de AVR. OPMERKING: Sluit elk apparaat uitsluitend aan via één type digitale aansluiting (HDMI, optisch of coaxiaal). Zie Uw audio- en videobronapparaten aansluiten op pagina 15 voor meer informatie.
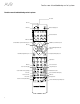
AVR Functies voor afstandsbediening van het systeem Functies voor afstandsbediening van het systeem IR-zender Uit-toets Mute (Demping) toets Aan-toets Server Bronselectietoetsen AVR-toets Surround Modes (Surround functies) toets OSD/Menu (Schermmenu) toets: OK-toets Omhoog/Omlaag/Links/Rechts toetsen: Info/Option (Info/Opties) toets Back/Exit (Terug/Sluiten) toets Info/Option Cijfertoetsen Wistoets Toets voor testtoon Toets voor vertraging Sleep (Timer) toets Kanaal/Tuner toetsen Toetsen
Functies voor afstandsbediening van het systeem, vervolg Behalve voor het bedienen van de AVR kan de afstandsbediening van de AVR ook worden gebruikt voor het bedienen van acht andere apparaten, waaronder een iPod/iPhone aangesloten op de USB-poort op het voorpaneel van de AVR. Tijdens het installatieproces kunt u de codes voor elk van uw broncomponenten in de afstandsbediening programmeren.
AVR Inleiding tot thuistheater en Uw luidsprekers opstellen Inleiding tot thuistheater Uw luidsprekers opstellen Dit inleidende gedeelte helpt u vertrouwd te raken met enkele basisconcepten die uniek zijn voor meerkanaals receivers met surround-geluid. Dit zal het u gemakkelijker maken om uw AVR op te stellen en te bedienen. Bepaal de locaties voor de luidsprekers van uw systeem op basis van de aanwijzingen van de fabrikant en de indeling van uw luisterruimte.
Type aansluitingen voor thuistheatersysteem Type aansluitingen voor thuistheatersysteem Er zijn verschillende type audio- en videoaansluitingen die worden gebruikt voor het aansluiten van de AVR op uw luidsprekers, televisie of beeldscherm, en uw bronapparaten. De Consumer Electronics Association heeft de CEA® kleurcoderingsstandaard ontwikkeld.
AVR Type aansluitingen voor thuistheatersysteem Digitale audio-aansluitingen – Coaxiaal Radio aansluitingen Coaxiale digitale audio-aansluitingen zijn gewoonlijk oranje gekleurd. Hoewel zij eruitzien als standaard analoge aansluitingen van het RCA-type, moet u geen coaxiale digitale audio-ingangen aansluiten op analoge ingangen, of omgekeerd. Uw AVR gebruikt aparte aansluitingen voor de meegeleverde FM- en AM-antenne. De FM-antenne maakt gebruik van een 75-ohm F-aansluiting.
Aansluitingen maken VOORZICHTIG: Controleer, voordat u aansluitingen met de audio/video-receiver tot stand brengt, of het netsnoer van de AVR is losgekoppeld van het stopcontact. Als u aansluitingen tot stand brengt terwijl de receiver op het stopcontact is aangesloten en is ingeschakeld, kan dat leiden tot beschadiging van uw luidsprekers.
AVR Aansluitingen maken Uw tv of beeldscherm aansluiten Als uw tv voorzien is van een HDMI-aansluiting en u over een HDMI-apparaat beschikt: Gebruik een HDMI-kabel (niet meegeleverd) om deze aan te sluiten op de HDMI Out-aansluiting van de AVR. Dit levert de best mogelijke beeldkwaliteit op.
Aansluitingen maken Uw audio- en videobronapparaten aansluiten Bronapparaten zijn componenten die een weergavesignaal uitzenden, zoals een Bluray disc™ of dvd-speler, een kabel-, satelliet- of HDTV-tuner; enzovoort. Uw AVR heeft verschillende typen invoeraansluitingen voor uw audio- en videobronapparaten: HDMI, composiet video, optische digitale audio, coaxiale digitale audio en analoge audio.
AVR Aansluitingen maken Uw HDMI-apparaten aansluiten Uw optische digitale audio-apparaten aansluiten Als uw bronapparaten HDMI-aansluitingen hebben, kunt u die aansluitingen gebruiken om de best mogelijke video- en audiokwaliteit te verkrijgen. Aangezien de HDMI-kabel zowel digitale video- als digitale audiosignalen biedt, hoeft u geen extra audio-aansluitingen tot stand te brengen voor apparaten die u aansluit via een HDMI-kabel.
Aansluitingen maken De radioantennes aansluiten Uw analoge audio-apparaten aansluiten Gebruik de analoge audio-aansluitingen van de AVR voor bronapparaten die geen HDMIof digitale audio-aansluitingen hebben.  • Sluit de meegeleverde FM-antenne aan op de 75Ω FM-antenne-aansluiting van de AVR. Schuif de FM-antenne zo ver mogelijk uit om een zo goed mogelijke ontvangst te krijgen.
AVR Aansluitingen maken De activeringsuitgang aansluiten Als uw systeem apparatuur bevat die kan worden bediend door een gelijkstroomactiveringssignaal, verbindt u deze met de activeringsuitgang (Trigger Out) van de AVR via een mono aansluitkabel met 3,5 mm (1/8 inch) ministekker. De AVR levert een 12 V gelijkstroomactiveringssignaal (100 mA) aan deze verbinding als het apparaat is ingeschakeld.
De afstandsbediening instellen De afstandsbediening instellen De batterijen in de afstandsbediening plaatsen Verwijder het klepje van het batterijvak van de afstandsbediening, plaats de twee meegeleverde AAA-batterijen zoals aangegeven in de illustratie en plaats het klepje van het batterijvak terug.  1. Verwijder kapje 2. Plaats batterijen 3.
AVR De AVR instellen De AVR instellen schakelen en het hoofdmenu te bekijken wanneer u op de AVR-toets drukt. Lees zo nodig Aansluitingen maken en De afstandsbediening instellen opnieuw voordat u verder gaat. Het onderstaande beschrijft hoe u de AVR configureert voor de feitelijke opstelling van uw systeem. Hoewel het mogelijk is de AVR te programmeren met alleen de afstandsbediening en het berichtdisplay op het voorpaneel van de AVR, is het gemakkelijker om gebruik te maken van het schermmenusysteem.
Luidspreker Met deze functie kunt u de juiste instelling voor elke luidsprekergroep programmeren. De instellingen in dit menu zijn van invloed op de rest van het instellingsproces voor de luidsprekers en op de beschikbaarheid van verschillende surround functies op enig moment. Selecteer “ON” (Aan) wanneer de luidsprekers aanwezig zijn in het systeem; selecteer “OFF” (Uit) voor posities waar geen luidsprekers zijn geïnstalleerd.
AVR Tijdens het uitvoeren van aanpassingen kunt u de kanaalniveaus op de volgende manieren meten: • Gebruik bij voorkeur een SPL-handmeterset voor C-meting, trage schaal. Pas elke luidspreker zodanig aan dat de meter een waarde van 75 dB aangeeft als de ingebouwde testtoon van de AVR wordt afgespeeld. • Op het gehoor. Pas de niveaus zodanig aan dat de testtoon even luid klinkt door elke luidspreker.
6. Als u geen HDMI-aansluiting voor Video In hebt geselecteerd, selecteert u “Audio In” (Audio invoer) en selecteer de audio-ingangaansluiting die u aan de brontoets wilt toewijzen. Druk op de toets OK. 7. Druk op de toets Back/Exit (Terug/Sluiten) van de afstandsbediening en herhaal stappen 3 – 6 voor de andere brontoetsen met aansluitingen die u opnieuw wilt toewijzen. Title (Titel): Dit gedeelte legt uit hoe u de weergegeven naam voor de bron kunt veranderen.
AVR Uw AVR bedienen Het volume regelen Een surround functie selecteren Pas het volume aan door aan de volumeknop op het voorpaneel te draaien (rechtsom om het volume te verhogen of linksom om het volume te verlagen) of door op de toets Volume omhoog/omlaag op de afstandsbediening te drukken. Het volume wordt weergegeven als een negatief aantal decibellen (dB) onder het referentiepunt van 0dB (-80dB – +10dB). 0 dB is het maximale aanbevolen volume voor uw AVR.
Luisteren naar FM- en AM-radio Selecteer Radio als bron. Een scherm zoals in onderstaande afbeelding wordt weergegeven. Uw AVR bedienen Compatibiliteit met WMA: Ver. 9.2, stereo CBR met 32 kHz – 48 kHz samplingfrequentie en 40 kbps – 192 kbps bitsnelheid, mono CBR met 8 kHz – 16 kHz samplingfrequentie en 5 kbps – 16 kbps bitsnelheid, VBR Pass Encoding en Quality Encoding 10 – 98, 44 kHz en 48 kHz samplingfrequentie. Andere typen media worden niet ondersteund. Bestanden afspelen op een USB-apparaat 1.
AVR Uw AVR bedienen Luisteren naar een iPod/iPhone/iPad-apparaat Luisteren naar vTuner (Internet Radio) Wanneer een iPod, iPhone of iPad is aangesloten op de USB-poort van het voorpaneel van de AVR, kunt u audiobestanden afspelen via uw hoge kwaliteit audio-systeem, uw iPod, iPhone of iPad of bedienen met de afstandsbediening van de AVR of de bedieningstoetsen op het voorpaneel van de AVR, en de iPod, iPhone of iPad opladen. Actuale informatie over compatibiliteit vindt u op onze website: www.
Voordat u via het netwerk toegang kunt krijgen tot bestanden die zich op andere apparaten bevinden, moet elk apparaat eerst toestemming geven voor het delen van bestanden met de AVR: Media delen op pc's: 1. O pen Windows Media Player. 2. Open het menu Library (Bibliotheek) en selecteer “Media Sharing” (Media delen). Het venster Media Sharing (Media delen) wordt weergegeven. 3. Schakel het selectievakje “Share My Media” (Mijn media delen) in. Er wordt een pictogram voor de AVR weergegeven in het venster.
AVR aantal kanalen gedetecteerd. Dit wordt vervolgens kort weergegeven als drie getallen, gescheiden door slashes (bijvoorbeeld “3/2/.1”). Het eerste getal geeft het aantal voorste kanalen in het signaal aan: “1” geeft een monofone opname aan (meestal een ouder programma dat digitaal geremasterd is of, minder vaak, een modern programma waarbij de regisseur voor mono heeft gekozen als speciaal effect). “2” geeft aan dat het linker- en rechterkanaal aanwezig zijn, maar dat het middenkanaal ontbreekt.
Systeeminstellingen Met het menu System Setup (Systeem setup) van de AVR kunt u de manier aanpassen waarop veel van de functies van de AVR werken. Druk op de toets OSD/Menu en navigeer naar de regel System (Systeem). Druk op de toets OK om het menu System setup (Systeem setup) te openen. Systeeminstellingen Uitschakeltimer Met de uitschakeltimer wordt de AVR ingesteld op afspelen gedurende maximaal 90 minuten. Vervolgens wordt het apparaat automatisch uitgeschakeld.
Problemen oplossen AVR Symptoom Het apparaat werkt niet Problemen oplossen Oorzaak • Geen netspanning Oplossing • Controleer of het netsnoer is aangesloten op een werkend stopcontact • Controleer of het stopcontact wordt bediend met een schakelaar Het berichtdisplay op het voorpaneel licht op, maar er is geen geluid of beeld Geen geluid van de luidsprekers Geen geluid uit middelste of surround-luidsprekers • Met tussenpozen werkende ingangaansluiting • Controleer alle ingangen en luidsprekeraa
Specificaties Specificaties AM-tunergedeelte Audiogedeelte Stereovermogen: 75W per kanaal, twee kanalen aangedreven @ 6/8 ohm, 1kHz – <0,9% THD Multikanaals vermogen: 75W per kanaal, twee kanalen aangedreven @ 6/8 ohm, 1kHz – <0,9% THD Ingangsgevoeligheid/impedantie: 250 mV/27 k ohm Signaal/ruis-verhouding (IHF-A): 100dB Scheiding naastliggend kanaal surround-systeem: Dolby Pro Logic/DPLII: 40dB Dolby Digital: 55dB DTS: 55dB Frequentierespons (@ 1W): 10Hz – 130kHz (+0dB/–3dB) Hoge stroombelas
Bijlage AVR Bijlage Bijlage – Standaardinstellingen, werkbladen externe productcodes Tabel A1 – Aanbevolen aansluitingen broncomponenten Apparaattype AVR-bron Audioaansluiting Videoaansluitingen Mediaserver Server HDMI 1 HDMI 1 DVD Audio/Video, SACD, Blu-ray Disc, HD-DVD speler Disc HDMI 2 HDMI 2 Kabel-tv, satelliet-tv, HDTV of ander apparaat dat televisieprogramma's levert Cable/Sat (Kabel/Sat) HDMI 3 HDMI 3 DVR of settopbox STB HDMI 4 HDMI 4 Videogame consoles Game (Spel) Analoog
Bijlage Tabel A2 – Standaard luidspreker-/kanaalinstellingen Standaardinstellingen Luidsprekers links-/rechtsvoor AAN Middelste luidspreker AAN Linker-/rechter surround-luidsprekers AAN Subwoofer AAN Crossover frequentie linker-/rechterluidspreker voor 100 Hz Crossover frequentie middelste luidspreker 100 Hz Crossover frequentie linker/rechter surround luidsprekers 100 Hz Subwoofer Crossover Frequentie 100 Hz Subwoofer Modus (als voorste luidsprekers op Groot zijn ingesteld) Uw instellings
AVR Bijlage Tabel A4 – Broninstellingen Kabel/ Sat Disc Server iPod/USB Netwerk/ vTuner Radio TV Video-ingang N.v.t. N.v.t. N.v.t. N.v.t. Audio-ingang Radio HDMI ARC/ Optisch USB Netwerk Nachtmodus N.v.t. N.v.t. N.v.t. Lipsynch aanpassen N.v.t. N.v.t. N.v.t. Naam wijzigen N.v.t. N.v.t. N.v.t. Spel AUX STB Aangesloten apparaat Surround functies N.v.t.
Bijlage Tabel A6 – Codes voor afstandsbedieningen Broninvoer Apparaattype (indien gewijzigd) Merk van product en codenummer Cable/Sat (Kabel/Sat) Disc DVR Media Server (Mediaserver) TV Game (Spel) AUX Tabel A7 – Systeeminstellingen Functie Panel Time-out Automatische uitschakelen Standaard Uit 8 uren Menu time-out Uit Statusbericht 5 seconden Standaardvolume Standaard volume-instelling Uw instellingen Uit –25dB HDMI-audio naar tv Uit HDMI-koppeling Uit 35 NEDERLANDS AVR
AVR Bijlage Tabel A8 – Surround-functies Surround functies Dolby Digital Omschrijving Biedt tot vijf aparte audio hoofdkanalen en een speciaal LFE-kanaal (Low-Frequency Effects). Binnenkomend bitstream of signaal • Dolby Digital 1/0/.0 of .1, 2/0/.0 of .1, 3/0/.0 of .1, 2/1/.0 of .1, 2/2/.0 of .1, 3/2/.0 of .1 • Dolby Digital EX (afgespeeld als 5.1) • Dolby Digital Plus gedecodeerd en afgeleverd via coaxiale of optische aansluiting Dolby Digital EX Een uitbreiding van Dolby Digital 5.
Bijlage Tabel A8 – Surround-functies - vervolg Surround functies Virtuele luidspreker Omschrijving Simuleert 5.1-kanalen als slechts twee luidsprekers aanwezig zijn of als een alomringend geluidsveld is gewenst. Binnenkomend bitstream of signaal • Dolby Digital • Analoog (tweekanaals) • Tuner • PCM (32 kHz, 44,1 kHz of 48 kHz) DTS Digital Met behulp van een andere methode voor codering/decodering dan Dolby Digital, biedt DTS Digital eveneens tot vijf afzonderlijke hoofdkanalen, plus een LFE-kanaal.
AVR Bijlage Tabel A8 – Surround-functies - vervolg Surround functies Omschrijving Binnenkomend bitstream of signaal DTS Neo:6 Mode Group DTS Neo:6 analoge processing is beschikbaar met DTS en DTS 96/24 signalen en tweekanalen analoge of PCM signalen voor een 3-, 5- of 6-kanalen presentatie. Zie onder DTS Neo:6 Cinema Afhankelijk van het aantal luidsprekers in uw systeem, kiest u 3-, 5- of 6-kanalen functies aangepast aan film of video presentaties. • DTS 2/2/.0 of .1, 3/2/.0 of .
Bijlage Server Info/Option Raadpleeg de genummerde toetsen bij het gebruik van de Functielijst in tabel A9.
AVR Bijlage Tabel A9 – Lijst met functies op de afstandsbediening Radio Nr.
Bijlage Tabel A9 – Lijst met functies afstandsbediening - vervolg DVR AUX Nr.
AVR Bijlage Raadpleeg de Tabellen A10 t/m A20 voor het programmeren van de codes van uw apparatuur in de afstandsbediening.
Bijlage Tabel A11 – Productcodes voor afstandsbedieningen: AUX-HDTV VCR-fabrikant/-merk Setup codenummer Tv-fabrikant/-merk Setup codenummer NAD 439 APEX 614 616 NATIONAL 440 DISH NETWORK 612 NEC 318 348 LG 604 NORDMENDE 348 MAGNAVOX 607 608 609 610 611 OPTIMUS 459 MOTOROLA 605 ORION 447 RCA 601 612 PANASONIC 425 450 467 472 SAMSUNG 603 PHILCO 340 TATUNG 618 PHILIPS 340 375 TiVo Zie Tabel A20 PORTLAND 394 ZENITH 602 606 619 PULSAR 376 QUASAR 301 425 RADIO SH
AVR Bijlage Tabel A13 – Productcodes voor afstandsbedieningen: AUX-CD CD-fabrikant/-merk Setup codenummer CD-fabrikant/-merk Setup codenummer RCA 024 081 093 150 ADCOM 063 069 REALISTIC 058 093 095 104 105 108 164 166 AIWA 072 111 118 156 170 SANSUI 047 081 134 157 172 AKAI 050 177 184 SANYO 033 082 095 AUDIO TECHNICA 053 SCOTT 108 AUDIOACCESS 125 SHARP 058 105 114 151 159 167 180 181 AUDIOFILE 211 SHERWOOD 003 041 058 105 133 BSR 044 SONY 103 115 116 118 132 139 163 205
Bijlage Tabel A15 – Productcodes voor afstandsbedieningen: SAT Tabel A16 – Productcodes voor afstandsbedieningen: Spel SAT-fabrikant/-merk Setup codenummer GAME fabrikant/-merk Setup codenummer BIRDVIEW 425 Microsoft (XBOX, XBOX 360) 001 003 CHANNEL MASTER 320 321 325 361 NYKO (PS3) 005 CHAPARRAL 315 316 451 SONY (PS2, PS3) 002 004 CITOH 360 DIRECTV 309 310 314 DISH NETWORK 364 DRAKE 313 317 318 413 481 Kabelfabrikant/-merk Setup codenummer DX ANTENNA 331 352 379 483 ABC 001
AVR Bijlage Tabel A17 – Productcodes voor afstandsbedieningen: Kabel – vervolg Kabelfabrikant/-merk Setup codenummer SPRUCER 053 081 177 189 STARCOM 002 011 163 STARGATE 120 TANDY 024 TELECAPATION 028 TEXSCAN 036 TFC 122 TiVo 029 030 en Zie Tabel A20 TOCOM 170 205 UNITED CABLE 011 UNIVERSAL 033 034 039 042 113 VIDEOWAY 124 211 VIEWSTAR 019 025 053 086 089 190 ZENITH 065 125 211 219 Tabel A18 – Productcodes voor afstandsbedieningen: Mediaserver fabrikant/-merk Setup codenumme
HARMAN International Industries, Incorporated 8500 Balboa Boulevard, Northridge, CA 91329 VS © 2015 HARMAN International Industries, Incorporated. Alle rechten voorbehouden. Harman Kardon is een handelsmerk van HARMAN International Industries, Incorporated, gedeponeerd in de Verenigde Staten en/of andere landen. Andere handelsmerken en handelsnamen zijn van hun respectievelijke eigenaars. Apple, iPhone, iPod, en iTunes zijn handelsmerken van Apple Inc., gedeponeerde in de V.S. en andere landen.