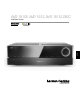
AVR 1510S, AVR 151S, AVR 151S/230C Audio/Video-Receiver Bedienungsanleitung DEUTSCH ®
AVR Inhaltsverzeichnis EINFÜHRUNG 3 VERWENDEN DES BILDSCHIRM-MENÜSYSTEMS 20 LIEFERUMFANG 3 KONFIGURIEREN DES AVRS FÜR DIE LAUTSPRECHER 20 WICHTIGE SICHERHEITSINFORMATIONEN 3 EINRICHTEN DER QUELLEN 22 AUFSTELLEN DES AVRS 3 EINRICHTEN DES NETZWERKS 23 BEDIENELEMENTE AN DER FRONTSEITE 4 ANSCHLÜSSE AUF DER RÜCKSEITE 6 HARMAN REMOTE APP 23 8 BETRIEB DES AVRS 23 LAUTSTÄRKEREGELUNG 24 EINFÜHRUNG ZUM HEIMKINOSYSTEM 10 STUMMSCHALTUNG 24 TYPISCHES HEIMKINOSYSTEM 10 VERWENDEN VON KOP
Einführung WICHTIGE SICHERHEITSINFORMATIONEN Vielen Dank, dass Sie sich für dieses Produkt von Harman Kardon entschieden haben! Überprüfen Sie vor der Inbetriebnahme die Versorgungsspannung Seit über 50 Jahren sieht Harman Kardon seine Aufgabe darin, die bestmögliche Klangwiedergabe für Musik und Entertainment zu ermöglichen – und nutzt hierfür die jeweils verfügbare Spitzentechnik.
AVR Bedienelemente an der Frontseite Bedienelemente an der Frontseite Abstimm-ModusTaste (AVR 1510S)/ RDS-Taste (AVR 151S) Netzstromanzeige LautstärkeregelTaste Ein/AusTaste Einrichten-Taste InfrarotSensor FrontDisplay LautstärkeRegler 1510S Kopfhörerbuchse USBPort Audio-Eingangs-Taste 244 Links-/RechtsTasten Auf/Ab-Tasten/ Frequenztasten SurroundModuskategorieAuswahltasten Surround-ModuskategorieTaste QuellenauswahlTasten
AVR Bedienelemente an der Frontseite Bedienelemente an der Frontseite, Fortsetzung Set (Einrichten)-Taste: Mit dieser Taste bestätigen Sie den gerade markierten MenüEintrag. Betriebsanzeige/Ein/Aus-Taste: Der AVR verfügt über vier verschiedene Energiemodi: Links/Rechts-Tasten: Diese Tasten dienen zur Navigation durch die Menüs des AVRs. • Off (Aus) (Betriebsanzeige leuchtet konstant orange): Wenn Sie den AVR nicht verwenden, wird der Energieverbrauch im Off (Aus)-Modus minimiert.
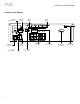
AVR Anschlüsse auf der Rückseite Anschlüsse auf der Rückseite Digitale Audio-Anschlüsse RadioantennenAnschlüsse Analoge Audio-Anschlüsse 246 Netzwerkanschluss HDMIAusgänge HDMIEingänge Subwoofer Pre-OutAnschluss Lautsprecheranschlüsse IR- und TriggerAnschlüsse Analoge Video-Anschlüsse Netzanschluss (Nur AVR 151S) Netzkabel (Nur AVR 1510S)
AVR Anschlüsse auf der Rückseite (Fortsetzung) Digitale Audio-Anschlüsse: Wenn Ihr Quellgerät ohne HDMI-Anschluss über digitale Ausgänge verfügt, schließen Sie diese an die digitalen Audio-Anschlüsse des AVRs an. HINWEIS: Stellen Sie von jedem Gerät nur eine digitale Verbindung (HDMI, optisch oder koaxial) her. Weitere Informationen finden Sie auf Seite 15 unter Anschluss der Audiound Video-Quellgeräte.
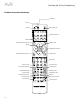
AVR Funktionen der System-Fernbedienung Funktionen der System-Fernbedienung Infrarotsender Aus-Taste Mute (Stumm)-Taste Ein-Taste Server Quellenauswahl-Tasten AVR-Taste Back/Exit (zurück/Beenden)-Taste OSD/Menü-Taste OK-Taste Auf/Ab/Links/Rechts-Tasten Info/Option-Taste Back/Exit (zurück/Beenden)-Taste Info/Option Zahlen-Tasten Testgeräusch-Taste Clear (Lösch)-Taste Sleep (ruhe)-Taste Delay (Verzögerungs)-Taste Kanal/Tuner-Tasten Lautstärke Auf/Ab-Tasten Tone Tone (Klang)-Taste Display
Funktionen der System-Fernbedienung Funktionen der System-Fernbedienung, Fortsetzung Back/Exit (Zurück/Beenden)-Taste: Durch Drücken dieser Taste gelangen Sie zurück zum vorherigen Menü oder beenden das Menüsystem. Die Fernbedienung des AVR dient nicht nur der Bedienung des AVR, sondern kann acht andere Geräte sowie einen iPod/ein iPhone (am USB-Port auf der Vorderseite des AVRs angeschlossen) steuern.
AVR Einführung zum Heimkinosystem und Aufstellen der Lautsprecher Einführung zum Heimkinosystem Aufstellen der Lautsprecher Diese Einführung gibt Ihnen die Möglichkeit, sich mit den grundlegenden Konzepten vertraut zu machen, die für Mehrkanal-AVRs mit Surround Sound typisch sind. Dies wird Ihnen die Einrichtung und Bedienung des Receivers erleichtern. Bestimmen Sie die Plätze, wo Sie die Lautsprecher des Systems entsprechend den Herstelleranweisungen und dem Grundriss Ihres Raumes aufstellen.
AVR Anschlussarten eines Heimkinosystems Anschlussarten eines Heimkinosystems Subwoofer-Anschlüsse Es gibt verschiedene Arten von Audio- und Videoverbindungen, mit denen der AVR an Lautsprecher, Fernseher oder Videoanzeige und die Quellgeräte angeschlossen werden kann. Die Consumer Electronics Association hat den CEA®-Farbcodestandard definiert. Der Subwoofer ist ein Lautsprecher, der ausschließlich die tiefen Frequenzen (Bässe) wiedergibt, die mehr Leistung erfordern.
AVR Digitale Audioverbindungen – Koaxial Koaxiale digitale Audiobuchsen sind normalerweise orange gekennzeichnet. Obwohl sie wie eine standardmäßige analoge Cinch-Buchse aussehen, sollten Sie koaxiale digitale Audio-Ausgänge nie an analogen Toneingänge anschließen oder umgekehrt. Digitale Audioverbindungen – Optisch Optische digitale Audio-Anschlüsse werden normalerweise durch eine Abdeckung vor Staub geschützt. Diese Abdeckung öffnet sich, wenn ein Kabel eingeführt wird.
AVR Herstellen der Anschlüsse ACHTUNG: Bevor Sie mit der Verkabelung Ihres Audio/Video-Receivers beginnen, sollten Sie sicherstellen, dass das Netzkabel vom Stromnetz getrennt ist. Bleibt der Receiver während der Verkabelung eingeschaltet, könnte dies zur Beschädigung Ihrer Lautsprecher führen.
AVR Herstellen der Anschlüsse Anschließen einer TV- oder Videoanzeige Falls Ihr TV-Gerät einen HDMI-Anschluss besitzt und Sie auch über HDMIQuellgeräte verfügen: Verwenden Sie ein HDMI-Kabel (nicht im Lieferumfang enthalten) für den Anschluss des HDMI-Out-Anschlusses am AVR. Dadurch erhalten Sie die bestmögliche Bildqualität.
AVR Herstellen der Anschlüsse Anschließen von Audio- und Video-Quellgeräten Quellgeräte sind Geräte, die ein Wiedergabesignal senden, z. B. Blu-ray Disc - oder DVDPlayer, Kabel-,Satelliten- oder HDTV-Tuner usw. Ihr AVR besitzt mehrere unterschiedliche Eingangsanschlüsse für Audio- und Videoquellgeräte: HDMI-, Composite Video-, optischdigitale Audio-, koaxial-digitale Audio- und analoge Audio-Anschlüsse. Die Anschlüsse sind nicht für spezifische Typen von Quellgeräten gekennzeichnet.
AVR Herstellen der Anschlüsse Anschließen von HDMI-Geräten Anschließen von optisch-digitalen Audiogeräten Wenn Ihre Quellgeräte über HDMI-Anschlüsse verfügen, können Sie diese verwenden, um die bestmögliche Video- und Audioqualität zu erhalten. Da HDMI-Kabel sowohl digitale Video- als auch digitale Audiosignale übertragen, müssen Sie keine zusätzliche Audioverbindung für Geräte herstellen, die über HDMI-Kabel angeschlossen sind.
AVR Herstellen der Anschlüsse Anschließen der Radioantennen Anschließen von analogen Audiogeräten Verwenden Sie die analogen Audio-Anschlüsse des AVRs für Quellgeräte, die weder über HDMI-Anschlüsse noch digitale Audio-Anschlüsse verfügen.  Analoge Audio-Anschlüsse am AVR • Schließen Sie die mitgelieferte UKW-Drahtantenne an den 75-Ω-UKWAntennenanschluss an. Optimalen Empfang erreichen Sie, wenn Sie das Kabel der UKW-Antenne vollständig abrollen.
AVR Herstellen der Anschlüsse Anschließen des Trigger-Ausgangs Wenn in Ihrem System Geräte angeschlossen sind, die über ein DC-Trigger-Signal gesteuert werden können, schließen Sie diese mit einem Kabel mit Mono-3,5-mmMini-Stecker an den Trigger-Ausgangsanschluss des AVRs an. Der AVR stellt nach dem Einschalten ein 12-V-DC(100 mA)-Trigger-Signal am Anschluss zur Verfügung.
AVR Einrichten der Fernbedienung Einrichten der Fernbedienung Einlegen der Batterien in die Fernbedienung Nehmen Sie die Batterieabdeckung der Fernbedienung ab, legen Sie die zwei mitgelieferten AAA-Batterien wie in der Abbildung dargestellt ein und setzen Sie die Batterieabdeckung wieder auf.  1. Abdeckung 2. Batterien 3. Abdeckung entfernen einlegen anbringen nach. Notieren Sie alle erforderlichen Code-Nummern. 3.
AVR Einrichten des AVRs Einrichten des AVRs Konfigurieren des AVRs für die Lautsprecher In diesem Abschnitt wird der AVR für Ihre Systemkonfiguration konfiguriert. Obwohl es möglich ist, den AVR nur mit der Fernbedienung über die Meldungen auf dem Display auf der Frontseite zu konfigurieren, ist es wesentlich bequemer, das Bildschirm-Menüsystem zu verwenden. Einschalten des AVRs Drücken Sie die Ein/Aus-Taste.
AVR Speakers (Lautsprecher) Mit dieser Auswahl können Sie die korrekte Einstellung für jede Lautsprechergruppe programmieren. Die Einstellungen in diesem Menü haben Auswirkungen auf den restlichen Einrichtungsprozess der Lautsprecher sowie auf die ständige Verfügbarkeit der verschiedenen Surround-Modi. Wählen Sie „ON (EIN)“, wenn die Lautsprecher im System vorhanden sind. Wählen Sie „OFF (AUS)“, wenn keine Lautsprecher angeschlossen sind.
AVR Einrichten des AVRs Während die Einstellungen vorgenommen werden, können Sie die Kanalpegel mit einer der folgenden Methoden messen: • Verwenden Sie vorzugsweise ein tragbares SPL-Meter, das auf C-Bewertung eingestellt ist. Passen Sie jeden Lautsprecher an, sodass das Messgerät 75 dB misst, wenn das integrierte Testgeräusch des AVRs wiedergegeben wird. • Nach Gehör. Stellen Sie die Pegel so ein, dass das Testgeräusch über jeden Lautsprecher gleich laut zu hören ist.
AVR 6. Falls Sie für „Video In (Video-Eingang)“ HDMI gewählt haben, wählen Sie nun „Audio In (Audio-Eingang)“ und den Audio-Eingangsanschluss, welcher der Source (Quellen)Taste zugewiesen werden soll. Drücken Sie die OK-Taste. Einrichten des AVRs und Betrieb des AVRs Wenn Ihr Netzwerk eine automatische IP-Adresse verwendet, sollte keine Netzwerkeinrichtung erforderlich sein.
AVR Einrichten des AVRs und Betrieb des AVRs Lautstärkeregelung Auswahl eines Surround-Modus Sie können die Lautstärke mit dem Lautstärkeregler auf der Gerätevorderseite (im Uhrzeigersinn wird sie erhöht, gegen den Uhrzeigersinn wird sie gesenkt) oder mit den „+“- und „–“-Tasten der Fernbedienung für die Lautstärkeregelung (VOL.) regeln. Die Lautstärke wird als negative Dezibelzahl (dB) unter dem Referenzpunkt von 0 dB wiedergegeben (-80 dB – +10 dB).
AVR Wiedergeben von UKW- und MW-Radio Wählen Sie eine Radioquelle. Ein der Abbildung unten gleichender Bildschirm wird angezeigt. Betrieb des AVRs bis 16 kHz und einer Bitrate von 5 kBit/s bis 16 kBit/s, VBR Pass Encoding und Quality Encoding 10 – 98, mit einer Abtastrate von 44 kHz und 48 kHz. Es werden keine anderen Medienformate unterstützt. Abspielen von Dateien auf einem USB-Gerät 1. Stecken Sie das USB-Gerät in den USB-Port auf der Vorderseite des AVRs.
AVR Betrieb des AVRs Wiedergabe von einem iPod/iPhone/iPad Wiedergeben von vTuner (Internetradio) Wenn ein iPod, ein iPhone oder iPad an den USB-Port auf der Frontseite des AVRs angeschlossen ist, ist es ggf. möglich, Audiodateien über Ihre hochwertige Audioanlage wiederzugeben. Bedienen Sie den iPod, den iPad oder das iPhone mit der Fernbedienung oder den Bedienelementen auf der Frontseite des AVRs. Der iPod, das iPhone oder der iPad werden aufgeladen.
AVR Bevor Sie über das Netzwerk auf Dateien zugreifen können, die sich auf anderen Geräten befinden, muss zuerst jedes Gerät der Freigabe von Dateien auf dem AVR zustimmen. So geben Sie Medien auf einem PC frei: 1. Ö ffnen Sie den Windows Media Player. 2. Ö ffnen Sie das Menü „Library (Medienbibliothek)“ und wählen Sie „Media Sharing (Medienfreigabe)“. Das Fenster „Media Sharing (Freigabe von Medien)“ wird angezeigt. 3. Setzen Sie ein Häkchen bei „Share My Media (Medien freigeben)“.
AVR Betrieb des AVRs und Erweiterte Funktionen Digital 5.1, Dolby Digital Plus (7.1), Dolby TrueHD (7.1), DTS-HD High-Resolution Audio (7.1), DTS-HD Master Audio (7.1), DTS 5.1, DTS 96/24 (5.1), 2-Kanal-PCM-Modi bei 32 kHz, 44,1 kHz, 48 kHz, 88,2 kHz oder 96 kHz sowie 5.1- oder 7.1-Mehrkanal-PCM. (Ihr AVR mischt bei 6.1- und 7.1-Kanal-Aufnahmen die separaten Surround-Signale für die hinteren Kanäle in die linken und rechten Surround-Kanäle Ihres Systems.
AVR Systemeinstellungen Über das System-Einstellungsmenü des AVRs können Sie die Funktionsweise vieler Funktionen des AVRs anpassen. Drücken Sie die OSD/Menu (Menü)-Taste und navigieren Sie zur Zeile „System“. Um das Menü System Settings (Systemeinstellungen)“ aufzurufen, drücken Sie die OK-Taste. Systemeinstellungen WICHTIG: Während einer Software-Aktualisierung dürfen Sie den AVR nicht ausschalten oder eines seiner Bedienelemente verwenden. Andernfalls kann der AVR dauerhaft beschädigt werden.
Fehlerbehebung AVR Problem Gerät funktioniert nicht Fehlerbehebung Ursache • Keine Netzspannung Lösung • Stellen Sie sicher, dass das Netzkabel in eine stromführende Steckdose eingesteckt ist • Prüfen Sie, ob die Steckdose geschaltet ist Front-Display leuchtet auf, jedoch sind Bild und Ton nicht vorhanden • Kabel an den Eingängen haben einen Wackelkontakt • Stummschaltung ist aktiviert • Lautstärkeregler ist vollständig heruntergedreht Kein Ton von den Lautsprechern Kein Ton aus dem Center- od
AVR Technische Daten Technische Daten MW-Radio Audio Frequenzbereich: 520 – 1710 kHz (AVR 1510S) 522 – 1620 kHz ((AVR 151S) Signal/Rauschabstand: 38 dB Eingangsempfindlichkeit (Rahmenantenne): 500 µV Verzerrung (1 kHz, 50 % mod): 1,0 % Trennschärfe (±10 kHz): 30 dB Stereoleistung: 75 W pro Kanal, zwei Kanäle bei 6/8 Ohm, 1 kHz, <0,9 % THD Mehrkanalleistung: 75 W pro Kanal, zwei Kanäle bei 6/8 Ohm, 1 kHz, <0,9 % THD Eingangsempfindlichkeit/Impedanz: 250 mV/27 kOhm Signal/Rauschabstand (I
Anhang AVR Anhang Anhang – Standardeinstellungen, Arbeitsblätter, Produktcodes für die Fernbedienung Tabelle A1 – Empfohlene Anschlüsse der Quellkomponenten Gerätetyp AVR-Quelle AudioAnschlüsse VideoAnschlüsse Medien-Server Server HDMI 1 HDMI 1 DVD Audio/Video, SACD, Blu-ray Disc, HD-DVD-Player Disc HDMI 2 HDMI 2 Kabel-, Satelliten-TV-, HDTVoder andere Geräte, mit denen Fernsehprogramme empfangen werden können Cable/Sat (Kabel/Sat) HDMI 3 HDMI 3 DVD/VHS-Recorder oder Digitalempfänger STB
AVR Anhang Tabelle A2 – Einstellungen für Lautsprecher/Kanäle Standardeinstellungen Linke/Rechte Front-Lautsprecher ON (EIN) Center-Lautsprecher ON (EIN) Linke/Rechte Surround-Lautsprecher ON (EIN) Subwoofer ON (EIN) Überschneidungsfrequenz der linken/rechten FrontLautsprecher 100 Hz Überschneidungsfrequenz des Center-Lautsprechers 100 Hz Überschneidungsfrequenz der linken/rechten SurroundLautsprecher 100 Hz Überschneidungsfrequenz des Subwoofers 100 Hz Subwoofer-Modus (falls die Front-Lau
AVR Anhang Tabelle A4 – Quelleneinstellungen Kabel/ Sat Disc Server iPod/USB Netzwerk/ vTUNER Radio TV Video-Eingang k. A. k. A. k. A. k. A. Audio-Eingang Radio HDMI ARC/ Optisch USB Netzwerk „Night Mode“ (Nachtbetrieb) k. A. k. A. k. A. Adjust Lip Sync (Lippensynchronisierung anpassen) k. A. k. A. k. A. Name ändern (Name ändern) k. A. k. A. k. A. Spiel AUX STB Angeschlossenes Gerät Surround-Modus k. A.
AVR Anhang Tabelle A6 – Fernbedienungscodes Quelleneingang Gerätetyp (falls geändert) Produktmarke und Code-Nummer Cable/Sat (Kabel/Sat) Disc DVR (DVD/VHS-Recorder) Media Server (Medien-Server) TV Game (Spiel) AUX Tabelle A7 – Systemeinstellungen Voreinstellung Front-Display Abschaltung Aus Automatische Abschaltung 8 Stunden Menü-Abschaltung Statusmeldung Lautstärkestandard Standard-Lautstärkeeinstellung Ihre Einstellung Aus 5 Sekunden Aus –25 dB HDMI Audio zu TV Aus HDMI Link Aus DEUTSCH F
AVR Anhang Tabelle A8 – Surround-Modi Surround-Modus Dolby Digital Beschreibung Liefert bis zu 5 separate Lautsprecherkanäle und einen speziellen Tiefbass-Kanal (Low Frequency Effect – LFE). Datenstrom oder Signal – Eingehend • Dolby Digital 1/0/.0 oder .1, 2/0/.0 oder .1, 3/0/.0 oder .1, 2/1/.0 oder .1, 2/2/.0 oder .1, 3/2/.0 oder .1 • Dolby Digital EX (Wiedergabe als 5.
AVR Anhang Tabelle A8 – Surround-Modi - Fortsetzung Surround-Modus Virtual Speaker Beschreibung Simuliert 5.1-Kanäle, wenn nur zwei Lautsprecher vorhanden sind oder ein umfassenderes Klangfeld gewünscht wird. Datenstrom oder Signal – Eingehend • Dolby Digital • Analog (2-Kanal) • Radio • PCM (32 kHz, 44,1 kHz oder 48 kHz) DTS Digital DTS Digital verwendet eine andere Methode zum Codieren/Decodieren • DTS 1/0/.0 oder .1, 2/0/.0 oder .1, 3/0/.0 oder .1, 3/1/.
AVR Anhang Tabelle A8 – Surround-Modi - Fortsetzung Surround-Modus Beschreibung Datenstrom oder Signal – Eingehend DTS Neo:6 Modusgruppe DTS Neo:6 Analog-Verarbeitung ist bei DTS-und DTS 96/24-Signalen, bei analogen 2-Kanal- oder PCM-Signalen verfügbar, um 3-, 5- oder 6-Kanal-Erlebnis zu bieten. Siehe unten DTS Neo:6 Cinema Wählen Sie je nach Anzahl der Lautsprecher 3-, 5- oder 6-Kanal-Modi, die für Film- oder Video-Wiedergabe verbessert wurden. • DTS 2/2/.0 oder .1, 3/2/.0 oder .
AVR Anhang Server DEUTSCH Info/Option Verwenden Sie für die Funktionsliste die nummerierten Tasten in Tabelle A9.
AVR Anhang Tabelle A9 – Liste „Funktionen der Fernbedienung“ Radio Nr.
AVR Anhang Tabelle A9 – Liste „Funktionen der Fernbedienung“- Fortsetzung Nr. Tastenbezeichnung Kabel/Sat Spiel HDTV DVD/VHS-Recorder Tragb.
AVR Anhang Zur Programmierung der Codes für Ihre Komponente in der Fernbedienung siehe Tabellen A10 bis A20.
AVR Tabelle A11 – Produkt-Codes für die Fernbedienung: AUX-HDTV VideorecorderHersteller/Marke Einrichtungscode Fernseher-Hersteller/ Marke Einrichtungscode NAD 439 APEX 614 616 NATIONAL 440 612 NEC 318 348 LG 604 NORDMENDE 348 MAGNAVOX 607 608 609 610 611 OPTIMUS 459 MOTOROLA 605 ORION 447 601 612 PANASONIC 425 450 467 472 SAMSUNG 603 PHILCO 340 TATUNG 618 PHILIPS 340 375 TIVO Siehe Tabelle A20 PORTLAND 394 602 606 619 PULSAR 376 QUASAR 301 425 RADIO SHACK 355
AVR Anhang Tabelle A13 – Produkt-Codes für die Fernbedienung: AUX-CD CD-Hersteller/Marke Einrichtungscode CD-Hersteller/Marke Einrichtungscode RCA 024 081 093 150 ADCOM 063 069 REALISTIC 058 093 095 104 105 108 164 166 AIWA 072 111 118 156 170 SANSUI 047 081 134 157 172 AKAI 050 177 184 SANYO 033 082 095 AUDIO TECHNICA 053 SCOTT 108 AUDIOACCESS 125 SHARP 058 105 114 151 159 167 180 181 AUDIOFILE 211 SHERWOOD 003 041 058 105 133 BSR 044 SONY 103 115 116 118 132 139 163 205
AVR Anhang SAT-ReceiverHersteller/Marke Einrichtungscode BIRDVIEW 425 CHANNEL MASTER 320 321 325 361 CHAPARRAL 315 316 451 CITOH 360 DIRECTV 309 310 314 DISH NETWORK 364 DRAKE 313 317 318 413 481 DX ANTENNA 331 352 379 483 ECHOSTAR 364 395 397 452 453 463 477 478 484 485 ELECTRO HOME 392 FUJITSU 324 329 334 GENERAL INSTRUMENT 303 311 323 365 403 454 468 474 HITACHI 304 455 HOUSTON TRACKER 463 HUGHES 305 306 437 489 JANIEL 366 JERROLD 454 468 484 LEGEND 453 MACOM 317
AVR Anhang Tabelle A17 – Produkt-Codes für die Fernbedienung: Kabel Fortsetzung Kabel-Hersteller/Marke Einrichtungscode SPRUCER 053 081 177 189 STARCOM 002 011 163 STARGATE 120 TANDY 024 TELECAPATION 028 TEXSCAN 036 TFC 122 TIVO 029 030 und siehe Tabelle A20 TOCOM 170 205 UNITED CABLE 011 UNIVERSAL 033 034 039 042 113 VIDEOWAY 124 211 VIEWSTAR 019 025 053 086 089 190 ZENITH 065 125 211 219 Tabelle A18 – Produkt-Codes für die Fernbedienung: MedienServer Hersteller/Marke Einri
DEUTSCH AVR 287
HARMAN International Industries, Incorporated 8500 Balboa Boulevard, Northridge, CA 91329 USA © 2015 HARMAN International Industries, Incorporated. Alle Rechte vorbehalten. Harman Kardon ist ein Warenzeichen von HARMAN International Industries, Incorporated, registriert in den Vereinigten Staaten und/oder anderen Ländern. Andere Warenzeichen und Handelsnahmen sind Eigentum ihrer jeweiligen Eigentümer. Apple, iPhone, iPod, und iTunes sind Warenzeichen von Apple Inc.