
Owner`s manual


AVR
13
English
Making Connections
Making Connections
CAUTION: Before making any connections to the AVR, ensure that the AVR’s AC
cord is unplugged from the AVR and the AC outlet. Making connections with
the AVR plugged in and turned on could damage the speakers.
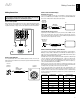
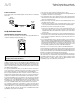
Connect Your Speakers
After you have placed your loudspeakers in the room as explained in Place Your Speakers,
on page 10, connect each speaker to its color-coded terminal on the AVR as explained
in Speaker Connections, on page 11. Connect the speakers as shown in the illustration.
FL
C
FR
SR
SL
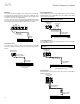
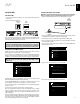
Connect Your Subwoofer
Use a single RCA audio cable to connect the AVR’s Subwoofer Pre-Out connector to your
subwoofer. Consult your subwoofer’s user manual for specific information about making
connections to it.
Receiver
Subwoofer
Connector
Powered
Subwoofer
Single
RCA Audio Cable
(not supplied)
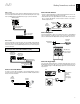
Connect Your TV or Video Display
HDMI Monitor Out connector
If your TV has an HDMI connector and you have HDMI or component video source
devices, use an HDMI cable (not included) to connect your TV to the AVR’s HDMI Monitor
Out connector. It will provide the best possible picture quality.
HDMI Cable
(not supplied)
TV
AVR HDMI
Monitor Out
Connector
Composite Video Monitor Out connector
If your TV does not have an HDMI connector, or if your TV does have an HDMI connector
but you are connecting some source devices with only composite video connectors,
use a composite video cable (not included) to connect the AVR’s Composite Monitor Out
connector to your TV’s composite video connector.
Composite Video Cable
(not supplied)
TV
AVR Composite
Monitor Out
Connector
Connect Your Audio and Video Source Devices
Source devices are components where a playback signal originates, e.g. a Blu-ray Disc or
DVD player; a cable, satellite or HDTV tuner; etc. Your AVR has several different types of
input connectors for your audio and video source devices: HDMI, composite video, optical
digital audio, coaxial digital audio and analog audio.
Your AVR’s various Source Selector buttons have default assignments to different input
connectors (listed in the “Default AVR Input Connector” column of the table below).
For ease of setup and remote control programming, you should connect each source
device to the connector where the corresponding default source button is assigned (e.g.,
connect your Cable/Satellite tuner box to HDMI 1).
However, you can connect your source devices as you wish and re-assign any of the
video and audio input connectors to any of the Source Selector buttons listed in the table
according to where you actually connect each of your source devices.
As you connect your various source components, fill out the “Connected Device” and
“Assigned AVR Input Connector(s)” columns in the table – it will make it easier for you to
assign the connectors to the Source Selector buttons after you have completed making
all of the connections. (You will make any changes to the connector assignments later
in the setup process.)
Source Selector
Button
Default AVR Input
Connector
Connected
Device
Assigned AVR Input
Connector(s)
Video Audio
Cable/Sat HDMI 1
TV HDMI ARC
Disc HDMI 2
Server HDMI 3
Aux COMP. VID. 1/AUX AUDIO
Game HDMI 5
STB HDMI 6
Audio ANALOG AUDIO 2
Network NETWORK Home Network –––– ––––
Input Connections and Source Buttons