BLU-RAY DISC™ PLAYER OWNER’S MANUAL
SAFETY INFORMATION Important Safety Instructions 1. Read these instructions. 2. Keep these instructions. 3. Heed all warnings. 4. Follow all instructions. 5. Do not use this apparatus near water. 6. Clean only with a dry cloth. 7. Do not block any ventilation openings. Install in accordance with the manufacturer’s instructions. 8. Do not install near any heat sources such as radiators, heat registers, stoves or other apparatus (including amplifiers) that produce heat. 9.
SAFETY INFORMATION Verify Line Voltage Before Use Your BDP 10 has been designed for use with 110–240-volt AC current, and the plug is specifically designed for 230-volt applications. Connection to a line voltage other than that for which the plug is intended can create a safety and fire hazard and may damage the unit.
TABLE OF CONTENTS 2 SAFETY INFORMATION 5 INTRODUCTION 6 FEATURES 7 MEDIA COMPATIBILITY 8 FRONT-PANEL CONTROLS 10 MESSAGE DISPLAY 11 REAR-PANEL CONNECTIONS 13 REMOTE CONTROL FUNCTIONS 15 INSTALLATION 17 INITIAL SETUP 17 Step One – Turn On the BDP 10 17 Step Two – Display the Setup Menu 17 Step Three – Language Setup 17 Step Four – Display Setup 18 Step Five – Audio Setup 18 Step Six – System Setup 19 Step Seven – Network Setup ` 20 OPERATION 20 Turning On the BDP 10 20 Playback Basics 21
INTRODUCTION Please register your product at www.harmankardon.com. Note: You’ll need the product’s serial number. At the same time, you can choose to be notified about new products and/ or special promotions. Thank you for choosing Harman Kardon ! ® For more than fifty years, Harman Kardon products have been at the cutting edge of audio and home theater technology. The first audio receiver wore a Harman Kardon badge, and the company has been producing innovative entertainment products ever since.
FEATURES Audio/Video Outputs • Analog Audio: Left and Right channels • Digital Audio: coaxial and optical (S/P-DIF) • Digital Audio/Video: HDMI ( V.1.3a with x.v.Color), Dolby TrueHD, DTS-HD Master Audio and PCM up to 7.
MEDIA COMPATIBILITY The BDP 10 will also play most recordable discs, but complete playbackcompatibility cannot be guaranteed, due to the wide variation in recorders and blank discs. Round 8cm (3”) or 12cm (5”) discs may be used. Do not use oddshaped, noncircular discs. Blu-ray Disc Compatibility: • Single-sided discs • Single-layer or dual-layer discs • Dolby Digital, Dolby Digital Plus, Dolby TrueHD, DTS-HD Master Audio, DTS®, MPEG or linear PCM digital audio tracks • MPEG-2, H.
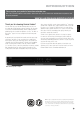
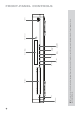
Play / Pause Open / Close Stop Skip / Reverse Video Output Resolution Skip/Step Forward Message Display Remote IR Sensor USB Port NOTE: To make it easier to follow the instructions throughout the manual that refer to this illustration, a copy of this page may be downloaded from the Product Support section at www.harmankardon.com.
front-Panel Controls Power Indicator: Turns amber when the BDP 10 is plugged in and the rear-panel Master Power Switch is turned on, indicating that the BDP 10 is in Standby mode and may be turned on using either the front-panel or remote Power switch. Turns white when the BDP 10 is turned on. Power: Press to turn on the BDP 10, when it is connected to an AC power source and the rear-panel Master Power Switch is on. ENGLISH Disc Drawer: Holds the discs to be played.
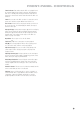
MESSAGE DISPLAY Disc Type Video Output Resolution USB Title Track / Chapter Network Parental Lock Repeat Playback Mode Time NOTE: To make it easier to follow the instructions that refer to this illustration, a larger copy may be downloaded from the Product Support section for this product at www.harmankardon.com. Disc Type: Indicates the current disc as BD (Blu-ray Disc), DVD or CD. USB: Lights when a USB drive is selected as the playback source.
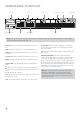
Coaxial Digital Audio Output Network Jack HDMI Output Fan Vents AC Power Input Master Power Switch ENGLISH NOTE: To make it easier to follow the instructions throughout the manual that refer to this illustration, a copy of this page may be downloaded from the Product Support section at www.harmankardon.com.
REAR-PANEL CONNECTIONS Remote Infrared (IR) Input and Output: When the front-panel Remote IR sensor is blocked, connect the IR Output of your receiver/ processor or an optional IR receiver to the Remote IR Input jack. The Remote IR Output may be connected to the Remote IR Input of a compatible product for remote control through the BDP 10. When several devices are used, connect them in “daisy chain” fashion.
REMOTE CONTROL FUNCTIONS IR Transmitter Lens Open/Close Dimmer Disc Menu Return OK Previous Search Reverse Power Off ENGLISH Power On Status Pop-up/Title Menu Find ⁄/¤/‹/› Navigation Next/Step Search/Slow Forward Play Setup Stop Pause Soft Keys Repeat A-B Repeat Subtitle Audio Angle Numeric Keys PIP PIP Audio Backlight Clear NOTE: To make it easier to follow the instructions throughout the manual that refer to this illustration, a copy of this page may be downloaded from the Product Sup
REMOTE Control FUNCTIONS IR Transmitter Lens: When buttons are pressed on the remote, infrared codes are emitted through this lens. Make sure it is pointing toward the BDP 10. Power On: Press to turn on the BDP 10 when it is in the Standby mode. Power Off: Press to turn off the BDP 10, placing it in the Standby mode. Open/Close: Press to open or close the disc drawer. Dimmer: Press to change the front-panel display to half- or fullbrightness, or to turn it off.
INSTALLATION IMPORTANT NOTE: All components, including the BDP 10, should be turned off and unplugged from AC power before beginning installation. Do not plug any components back in until after all connections are completed. Other system components, especially audio/video receivers and amplifiers, generate massive amounts of heat that will damage the sensitive laser components of the BDP 10.
INSTALLATION Step Eight – Insert Batteries in Remote The BDP 10 remote control uses two AA batteries (included). To remove the battery cover located on the back of the remote, lift the tab until the latch releases, and lift the battery cover up. Insert the batteries as shown in Figure 9, observing the correct polarity.
INITIAL SETUP IMPORTANT NOTE: When the HDMI Output is used, turn on the system components in this order: the video display (TV) first, any receiver or processor, and the BDP 10 last. Turn on the Master Power Switch, placing the BDP 10 in Standby mode. See Figure 10. Figure 10 – Master Power Switch The Power Indicator will turn amber. Press the Power Button on either the front panel or the remote to turn on the BDP 10. See Figure 11.
INITIAL SETUP Screen Saver: Turn this setting on to prevent permanent “burn-in” damage to a plasma or CRT video display when the same still image is left on screen for more than a minute or two. This can happen when a video disc is paused, a JPEG file is left on screen or when a menu is left on screen. When you have finished, use the ⁄/ ¤/ ‹ / › Buttons to navigate to another setup menu, or press the Setup or Clear Button to clear the menus from view.
INITIAL SETUP Clear BD-Live Memory: Erases BD-Live bookmarks (which allow discs to resume play after being paused) and any content downloaded from the Internet. Software Version: This item is informational only. ENGLISH DivX Registration: This setting shows your personal DivX Video On Demand (VOD) code. This code allows you to rent and purchase videos using the DivX VOD service. For more information, visit www. divx.com/vod.
OPERATION Turning On the BDP 10 Press the front-panel Power Button or remote Power On Button to turn on the BDP 10 when the Power Indicator is amber. The Power Indicator will turn white. As explained in the note at the beginning of the Initial Setup section, the BDP 10 may take up to a minute before it is ready for playback. If the unit is left turned on but with no activity, the BDP 10 will automatically power off after 25 minutes.
OPERATION Playback Control To control playback, use the transport controls, which are shown on pages 8 and 13. Front Panel: Play/Pause, Stop, Skip Reverse, Skip/Step Forward. Remote: Previous, Next/Step, Search Reverse, Play, Search/Slow Forward, Pause and Stop. • To begin playback, press the Play Button. • To momentarily pause playback and freeze the current picture frame, press the Pause Button. To resume playback after pressing the Pause Button, press the Play Button.
OPERATION BD and DVD Menus BD and DVD playback is simple. Load the disc, and it will begin playing automatically if the Auto Play setting is on, or select “Disc” from the Media Launcher menu. Allow at least one minute for the BDP 10 to identify the disc and load its contents into memory before playback begins. You may skip the introductory promotional materials by pressing the Disc Menu Button to skip to the disc’s main menu.
OPERATION To change the subtitle language or turn the subtitles on or off, press the Subtitle Button while the disc is playing. The current Subtitle will appear at the top of the screen. Each press of the Subtitle Button will change the current language, or turn subtitling off. When your desired selection appears, wait 5 seconds for the display to clear on its own. Angles Some discs contain multiple-camera angle views, which allow the disc’s creators to provide different views of the same scene.
OPERATION Programming a Playlist You may program a playlist consisting of only a single audio track, or of all folders on the media, or anything in between. • File level: If you have opened all folders and are viewing the individual files, press the Disc Menu Button to display the menu. Highlight the “Playlist” option, and press the › Button to continue. A new dropdown menu will appear. Choose “Add to Playlist”, and another dropdown menu will appear.
OPERATION Slideshows A slideshow is a continuous display of the image files in the current folder. As explained below, if one or more audio files are stored on the same disc or USB drive as the images, the slideshow may be accompanied by background music. • Begin slideshow: Highlight the folder containing the images, or highlight the first image file, or start viewing an image. Press the Disc Menu Button. In each case a different dropdown menu will appear, but all will offer the “Start Slideshow” option.
TROUBLESHOOTING GUIDE SYMPTOM Unit does not turn on Unit does not respond to remote commands.
Aspect Ratio: This is a description of the width of a video image in relation to its height. A conventional video screen is four units wide for every three units of height, making it almost square. Wide-aspect ratio video displays are 16 units wide for every nine units of height, more like the screen in a movie theater.
GLOSSARY WMA Files: WMA (Windows Media Audio) is an audio compression format developed by the Microsoft Corporation for use with its Windows Media Player. WMA files may be created with greater compression than MP3 without sacrificing audio quality so that even more songs may be recorded on a disc. There have been a number of versions of Windows Media, and the BDP 10 is compatible only with files that end in the “wma” extension and that were recorded using the Windows Media Series 9 encoding, up to 320kbps.
APPENDIX Table A1 – Language Setup Menu Setting Default Player Menus English Audio Auto Subtitle None Disc Menus Auto Your Settings Table A2 – Display Setup Menu Default 16:9 Full Resolution HDMI Auto Color Space x.v.Color Film Mode Off Screen Saver On Your Settings ENGLISH Setting Aspect Ratio Table A3 – Audio Setup Menu Setting Default Digital Output PCM 7.
APPENDIX Table A6 – Audio Output Formats Audio Output Format Digital Analog Program Audio Format Digital Output Setting HDMI S/P-DIF 2-Channel Dolby Digital (5.1-Channel, 48kHz) Bitstream Native Dolby Digital 5.1 Dolby Digital 5.1 Stereo DTS Transcoded DTS 5.1 DTS 5.1 Stereo PCM 7.1 PCM (5.1-channel, 48kHz) PCM (2-channel, 48kHz) Stereo PCM Stereo PCM (2-channel, 48kHz) PCM (2-channel, 48kHz) Stereo Dolby Digital Plus (7.1-Channel, 48kHz) Dolby TrueHD (7.
APPENDIX Table A7 – Audio Content Availability for Blu-ray Disc Media Digital Output Setting Bitstream Native DTS Transcoded PCM 7.1 PCM Stereo Dolby Digital, Dolby Digital Plus, Dolby TrueHD, DTS-HD, DTS Primary Audio (Main Feature) only Mixed (Main Features; Secondary content, e.g.
BDP 10 TECHNICAL SPECIFICATIONS Applicable Disc: Disc Formats: Region Code: Analog Audio Output: 12cm (5”) or 8cm (3”) BD-Video, DVD-Video, standard-conforming DVD-R, DVD+R, DVD-RW DVD+RW, DVD-RAM, CD, CD-R, CD-RW, DivX or MP3 discs BD-Video disc with Code B or Open Region DVDVideo disc with Code 2 or 0 only 2V RMS (1kHz, 0dB) Frequency Response: DVD (Linear PCM): 2Hz – 22kHz +0/–0.5dB (48kHz sampling) 2Hz – 44kHz +0/–1.5dB (96kHz sampling) 2Hz – 88kHz +0/–0.
ENGLISH
250 Crossways Park Drive, Woodbury, New York 11797 www.harmankardon.com © 2009 Harman International Industries, Incorporated. All rights reserved. Part No.