® ® Power for the Digital Revolution.
DVD 101 3 4 5 6 7 8 9 11 12 12 13 14 15 16 17 17 17 17 17 18 19 20 21 22 23 23 23 23 24 24 24 24 24 24 24 24 25 25 25 25 26 26 26 27 28 28 28 28 28 29 29 29 30 31 32 33 34 35 DVD PLAYER Introduction Safety Information Features & DVD Compatibility DVD Terminology Front-Panel Controls Front-Panel Information Display Remote Control Functions Rear-Panel Connections Setup and Connections Connecting to a TV and Analog Receiver Connecting to a Receiver/Amplifier With Dolby Digital or DTS Decoder Connecting to a
INTRODUCTION Thank you for choosing the Harman Kardon® DVD 101. The DVD 101 is a multipurpose DVD player that delivers the highest level of playback quality from a wide range of optical media formats. Along with conventional DVD and CD audio discs, the DVD 101 is also compatible with CD-R and CD-RW discs, VCD discs and discs recorded with audio files in the MP3 format.
SAFETY INFORMATION Verify Line Voltage Before Use Your DVD 101 has been designed for use with 120volt AC current and the plug is specifically designed for 120-volt applications. Connection to a line voltage other than that for which it is intended can create a safety and fire hazard and may damage the unit. If you have any questions about the voltage requirements for your specific model, or about the line voltage in your area, contact your selling dealer before plugging the unit into a wall outlet.
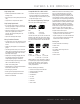
FEATURES & DVD COMPATIBILITY High-Quality Video Compatible With CD as Well as DVD • Advanced sophisticated 10-bit MPEG-2 video decoding circuits. • Test-screen signal for testing video performance and setup. • The DVD 101 will play any conventional Audio CD and most recordable (CD-R) or erasable (CD-RW) CDs, bearing the logos shown here, MP3 or any VCD or DVD with the Region Code 1. • Progressive Scan component video outputs.
DVD TERMINOLOGY Since they share some of the characteristics and technology of CD players, many of the terms and operational concepts used in a DVD player are similar to what you may be familiar with from CD players and changers, or older video disc formats such as Laser Disc. However, if this is your first DVD product, some of the terms used to describe the features of a DVD player may be unfamiliar.
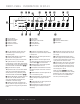
FRONT-PANEL CONTROLS 3456789 DVD 101 2 1 Main Power On/Off 1 Power On/Off (Standby) 2 Eject 3 Play 4 Pause 5 Stop 6 Skip (Previous) 7 Skip (Next) 8 Dimmer 9 Test Main Power On/Off: Press this switch to apply power to the DVD 101. Once the unit has been turned on with this switch, it may be operated from either the front panel or remote control. Press the switch again to turn the unit completely off. 4 Pause: Press this Button to momentarily pause playback.
FRONT-PANEL INFORMATION DISPLAY E A D F VCD PROGRESSIVE SCAN DVD CD 96kHz/24bit MP3 B C TEST G H I J K V OFF REPEAT 1 ALL PBC RANDOM A-B TITLE TRACK CHAPTER HOUR N O L MIN PROG M SEC P A Disc-Type Indicators B Playback-Mode Indicators C 96kHz/24-Bit Indicator D Parental Lock Indicator E Progressive Scan Indicator F Test Indicator G V-OFF Indicator H Repeat Indicator I VCD Playback Control Indicator J Random Indicator K A-B Repeat Indicator L Program Indicator M Angle Indicator N Title
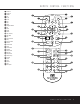
REMOTE CONTROL FUNCTIONS 0 Power On 1 Power Off 2 Subtitle 3 Title 4 Angle 5 Audio 6 Test 7 Eject 8 Setup 9 Navigation Buttons A Info B Menu C Pause D Status E Skip (Previous) F Skip (Next) G Play H Search Reverse I Stop J Search Forward K Dimmer L Slow Forward M Zoom N Slow Reverse O Random P Step Forward Q Video Off Step Reverse Numeric Keys Program Check Clear Repeat Light A-B Repeat 3 2 4 POWER 0 OFF ON TITLE SUBTITLE 1 ANGLE AUDIO TEST EJECT SET-UP 6 5 7 8 MENU INFO 9
REMOTE CONTROL FUNCTIONS 0 Power On: Turns on the player when it is in Standby mode (the Harman Kardon logo appears on-screen). 1 Power Off: Turns off the player to Standby mode. 2 Subtitle: When a DVD is playing, press to select a subtitle language or to turn subtitles off. 3 Title: When a disc is playing, press to jump to the subsequent title (with the next title number) on the disc. 4 Angle: Press to access various camera angles on a DVD (if the DVD contains multiple camera angles).
REAR-PANEL CONNECTIONS VIDEO OUT/COMPONENT DVD 101 120V/60Hz 20 Y/Y CLASS 1 LASER PRODUCT KLASSE 1 LASER PRODUKT LUOKAN 1 LASER LAITE KLASS 1 LASER APPARAT Pb/ Cb 1 Pr/ Cr ¡ ™ £ ¢∞ § ¶• ª ¡ Optical Digital Output ™ Coaxial Digital Output £ Analog Audio Outputs ¢ Composite Video Output ∞ S-Video Output § Component Video Outputs ¶ Remote Control Output • Remote Control Input ª AC Power Cord ¡ Optical Digital Output: Connect this jack to the optical digital input of an A/V receiver or surround
SETUP AND CONNECTIONS • Ensure that the power switch of this unit (and of other equipment to be connected) is set to “Off” before commencing connection. • Do not block the ventilation holes of any of the equipment and arrange them so that air can circulate freely. • Read through the instructions before connecting other equipment. • Ensure that you observe the color-coding when connecting audio and video cables.
SETUP AND CONNECTIONS Connecting to a Receiver/Amplifier With Dolby Digital or DTS Decoder • NOTE: With multiple video sources, your audio/video device can be used for selecting the video signal and routing it to the TV. Connect the video or S-Video output of the DVD 101 (whatever is provided with your device) to the video or S-Video input on your device, and the video/S-Video output of this device to your TV. For more details, see the manual of your audio/video amplifier/receiver.
SETUP AND CONNECTIONS Connecting to a TV or Monitor With Component Connectors – Component Video Connection If the video display has component video inputs, connect the component video outputs on the DVD 101 to the corresponding input jacks on your television. If you are using a Progressive Scan television or projector, you must also change the scan type in the DVD player’s Video Setup menu from “Interlaced” to “Progressive.” See page 17.
REMOTE CONTROL OPERATION Battery Installation Remote Control Operation Range Insert the batteries supplied while observing the correct (+) and (–) polarities. Point the remote control unit from no more than about 20 feet from the remote control sensor and within about 60 degrees of the front of the unit. DVD 101 • The operating distance may vary according to the brightness of the room.
DIGITAL AUDIO CONNECTIONS Optical Digital Audio Connection Notes For Your Reference: • Remove the dust protection cap from the optical digital audio output and connect the cable firmly so that the configurations of both the cable and the connector match. • Dolby Digital is a digital sound compression technique developed by the Dolby Laboratories Licensing Corporation. Supporting 5.
SYSTEM SETUP System Defaults Video Menu The final step of the installation is to establish the system’s defaults. It is helpful to take a few minutes to familiarize yourself with these settings, as they may require change before the first use and later from time to time. When you enter the Main menu, the Video submenu should be highlighted. If not, use the K/L Buttons 9 to highlight the Video menu, then press the N Navigation Button 9 or Enter Button 9 to access the Video menu.
SYSTEM SETUP Audio Menu In the Main menu, use the K/L Navigation Buttons 9 to highlight the Audio menu; press the N Navigation Button 9 or Enter Button 9 to access the Audio submenu. The left column shows the items in the Audio menu. The right column shows the current setting for each item. Audio Language This step will define the default audio language (if the disc contains different language tracks).
SYSTEM SETUP Player Setup Menu The Player Setup menu contains a number of setup parameters that are normally adjusted only once to establish basic operational settings for the DVD 101. From the Main menu, use the K/L Navigation Buttons 9 to select the Player menu, then press the N Navigation Button 9 or Enter Button 9 to access the Player menu. The left column shows the items in the menu. The right column shows the current setting of each item.
SYSTEM SETUP Menu Language The Menu Language menu allows you to select the language that will be used to display the menus generated by the DVD that is being played. Note that although this menu permits you to select a langauge, in order for that language to appear it must be present on the disc. Before making a change to this menu, consult the DVD jacket for information on the menu languages available for any particular disc.
TEST SCREEN DVD is one of the highest quality sources ever made available for in-home playback of prerecorded pictures and sound. In order to make certain that your home theater system is fully optimized to take advantage of DVD’s superb picture quality, the DVD 101 offers a built-in video test signal that makes it easy to calibrate your TV or video display for proper playback. TV Picture Adjustment With Test Screen Brightness Adjustment: 1.
PLAYBACK BASICS FOR ALL FORMATS Loading Discs To load discs in the DVD 101, first turn the DVD 101 on by pressing in the Main Power On/Off Switch and then pressing the Power On Button 2 0. Note that the LED indicator surrounding the Power On Button 2 will turn amber when the power is first applied by pressing in the Main Power On/Off Switch . It will turn green when the Power On Button 2 is pressed.
DVD PLAYBACK Using a DVD’s Menu Important Notes on DVD Playback Playback Resume Feature One of the unique features of the DVD system is that it offers a producer the opportunity to include a wide range of features on a disc, including multiplelanguage tracks; subtitles in a variety of languages; special information such as movie trailers and cast information; as well as other custom-tailored information.
PLAYING DVDs Using the On-Screen Banner Display The On-Screen Banner Display Menu, or “Status”, contains many playback features. To see the On-Screen Banner Display, press the Status Button D on the remote while a disc is playing. Use the ⁄ / ¤/ ‹ / › Navigation Buttons 9 on the remote to move through the different features in the On-Screen Banner Display. Each feature is illustrated with an icon. Use the ⁄ / ¤/ ‹ / › Navigation Buttons 9 on the remote to highlight an icon in the banner.
PLAYING DVDs Changing the Audio Track Changing the Subtitle Language Repeat Play Please remember you can only access the various Audio Track, Subtitle, Angle and Repeat Displays when playing a disc. Also, each Banner Display feature is only available if the disc was created with that particular feature (i.e., if you select the Subtitle icon, you won’t be able to change the subtitle language unless the author of the disc created the disc with subtitles). DVDs may contain a variety of subtitles.
PLAYING DVDs A-B Repeat Play Zoom Playback The Repeat A-B function allows you to select any portion of a DVD and have it repeat continually until the unit is manually stopped. The DVD 101’s advanced digital video processing circuits include a Zoom feature that allows you to enlarge the image for closer examination of the picture. To initiate a Repeat A-B playback sequence, follow these steps while a disc is playing: Four steps of enlargement are available.
PROGRAMMED PLAY WITH DVD Program Play Programmed play allows you to select any track, title or chapter from a DVD in the DVD 101 for playback in a specific order. This type of programming is particularly useful for parties or other situations where you want continuous playback of specific selections for a long period of time. To program the disc in the DVD 101 for playback, follow these steps: Program Edit 1. In Stop or Resume mode, press the Prog Button on the remote; the Program Edit Display appears.
CD PLAYBACK Audio CD Playback Features Selecting a Track When playing audio CDs, your DVD player has the same features as a CD player, including track skip, repeat play and programmed playback. The on-screen Info Display, appearing when the Repeat Button or Random Button O is pressed (see page 29), and the On-Screen Banner Display (shown below), appearing automatically when a CD is played, let you choose various playback features. 1.
CD PLAYBACK 3. When the TIME section is highlighted, press the K Navigation Button 9 to view the time remaining on the track (T-REMAIN). Press again to view elapsed time of the disc (D-ELAPSED). Press again to view the time remaining for the disc (D-REMAIN). 4. If you press the Enter Button 9 while the Time display is highlighted, the player displays SET TIME.
PROGRAMMED PLAY WITH CD Program Play Programmed play allows you to select any track from a CD for playback in a specific order. This type of programming is particularly useful for parties or other situations where you want continuous playback of specific selections for a long period of time. To program the disc in the DVD 101 for playback, follow these steps: Program Edit 1. In Stop or Resume mode, press the Prog Button on the remote. The Program Edit Display will appear. 3.
MP3 PLAYBACK The DVD 101 is rare among DVD players in that it is able to play back discs recorded with MP3 files. This means that you may enjoy the latest music using discs created in your computer through the high-quality audio components in your home theater system. As the way that MP3 files are recorded on discs differs from the way conventional CD audio discs are structured, MP3 playback is somewhat different from that of standard CDs.
VCD PLAYBACK VCD Playback VCD, a format that predates DVD, is based on a different compression format than DVD and a recording method that is similar to CD. Although the DVD has, for the most part, replaced VCD as a format, the DVD 101 offers VCD playback so that you may play your existing library of VCD discs. Using the On-Screen Banner Display for VCD Playback When playing VCD discs it is possible to access the disc’s features using the On-Screen Banner Display as shown for CD playback on page 28.
DVD LANGUAGE CODES The availability of specific languages for the main audio track or subtitles is dependent on the choices made by a disc’s producer. You should always consult the disc’s jacket for information on languages for any disc. In the case of some languages, you may be required to enter a code from the list below to access that language. See pages 18–20 for more information on entering language codes.
TROUBLESHOOTING GUIDE TROUBLESHOOTING GUIDE SYMPTOM POSSIBLE CAUSE SOLUTION Unit does not turn on • Main Power Switch turned off • No AC power • Press in Main Power Switch . • Check AC power plug and make certain any switched outlet is turned on. Disc does not play • Disc loaded improperly • Load disc label-side up; align the disc with the guides and place it in its proper position.
TECHNICAL SPECIFICATIONS Applicable Disc: Disc formats: 5-inch (12cm) or 3-inch (8cm) DVD-Movie, Standard conforming DVD-R, DVD+R, DVD-RW, DVD+RW, VCD, CD, CD-R, MP3 or CD-RW discs Region code: DVD Movie disc with Code 1 only DVD-Layers: Single Side/Single Layer, Single Side/Dual Layer, Dual Side/Dual Layer Audio formats: Linear PCM, MPEG, Dolby Digital or DTS Audio Discs Video Signal System: NTSC Composite Video Output: 1V p-p/75 ohms, sync negative polarity S-Video Output: Y/Luminance: 1V p-p/75 oh
® 250 Crossways Park Drive, Woodbury, New York 11797 www.harmankardon.com © 2003 Harman International Industries, Incorporated Part No.: WLD8.810.