guide + play ™ GPS -500 Portable Touchscreen Navigation System and A/V Media Player User Manual
Contents Introduction . . . . . . . . . . . . . . . . . . . . . . . . . . . . . . . . . . . . . . . . . . . . . . . . . . . . . . . . . . . 3 Unpacking . . . . . . . . . . . . . . . . . . . . . . . . . . . . . . . . . . . . . . . . . . . . . . . . . . . . . . . . . . . . . 3 Controls and Features . . . . . . . . . . . . . . . . . . . . . . . . . . . . . . . . . . . . . . . . . . . . . . 4 – 5 Before You Begin . . . . . . . . . . . . . . . . . . . . . . . . . . . . . . . . . . . . . . . . . . . . . . . . . .
Introduction Your new GPS-500 is a powerful portable touchscreen navigation system and audio/video media player. The GPS-500’s GPS-powered navigation features will make it easy for you to travel to almost anywhere in North America with remarkable accuracy. Its A/V media player lets you listen to your favorite music, and you can even watch videos on its high-resolution 480 x 272 pixel screen.
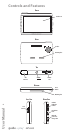
Controls and Features FRONT Touchscreen BACK Speaker Mounting Slot TOP GPS Antenna ON/OFF Button SD Card Slot BOTTOM Reset Button Mounting Slot LEFT SIDE Volume/ Brightness Control 4 User Manual RIGHT SIDE Lock Switch Headphone Jack Mini USB Connector/ Charger Port guide + play ™ GPS-500
Controls and Features Front: T OUCHSCREEN : 480 x 272 pixel WQVGA LCD touchscreen. Back: S PEAKER : Built-in speaker plays navigation voice guidance commands and audio/video files that are stored on an SD memory card (see below). M OUNTING S LOT: Lets you lock the GPS-500 onto the included fold-flat mounting bracket for use in a vehicle. Top: GPS A NTENNA : Must have a clear “view” of the sky to receive signals from GPS satellites.
Before You Begin Before you begin using your GPS-500, you will need to charge its battery for a minimum of 6 hours. 1. Plug the included wall charger into a wall outlet. 2. Use the included USB cable to connect the GPS-500’s Mini USB Connector/Charger port to the wall charger. 1. 2. After the battery has charged for at least 6 hours: 1. Make sure the LOCK switch is in the DOWN (unlocked) position. 2. Go outdoors to obtain GPS reception. 3. Hold down the ON/OFF button until the unit turns on. 2.
Initial Setup When you turn your GPS-500 on for the first time, the Setup Wizard will appear. The Wizard will guide you through the GPS-500’s initial setup steps: 1. Touch the button for the screen language you want to use (English, French or Spanish). Touch the NEXT button. 2. Touch the button for the distance units you want to use (kilometers/meters, miles/ feet or miles/yards). Touch the NEXT button. 3. Touch the button for the time zone where you are located. Touch the NEXT button. 4.
The geographic information provided by this device serves as a navigational aid only and does not include information pertaining to construction, road closures, speed restrictions, road or traffic conditions, or other circumstances relevant to public safety. The driver must always be aware of the actual road conditions and surroundings, and decide whether or not to follow the information provided by this device. Obey all traffic laws and observe safe driving practices.
3. Spell the name of the desired city. When you have finished, touch the DONE button. The ENTER STREET NAME screen (right) appears. • In most cases, once you’ve entered some letters, the screen will display all of the cities that fit. Select the desired city from the list. 4. Spell the name of the street. When you are finished, touch the DONE button. The ENTER HOUSE NUMBER screen appears. • In many cases, once you’ve entered some letters, the screen will display all of the streets that fit.
T O N AVIGATE TO A P LACE : 1. Touch the PLACE button on the WHERE WOULD YOU LIKE TO GO? screen (see page 8). The FIND A PLACE screen (right) appears. 2. Select the desired area. The SELECT A CATEGORY screen (right) appears. (If you know the name of the place, you can enter it instead of searching by category.) 3. Use the up/down arrow buttons to find the desired category, then touch it. The SELECT PLACE screen (right) appears. 4.
3. Touch the GO button to begin navigation. The map screen will appear. Once you start driving, the GPS-500 will guide you to the center of the city you selected. (See Navigating to Your Destination, on page 13.) N AVIGATING TO AN I NTERSECTION : 1. Touch the INTERSECTION button on the WHERE WOULD YOU LIKE TO GO? screen (see page 8). The IN WHICH CITY IS THE INTERSECTION? screen (right) appears. 2. Select the city. The ENTER STREET NAME screen appears. 3. Enter the name of the first street.
5. Touch GO to begin navigation. The map screen will appear. Once you start driving, the GPS-500 will guide you to the address you’ve entered. (See Navigating to Your Destination, on page 13.) N AVIGATING TO YOUR H OME The GPS-500 stores your home address so you can easily select it as a destination, no matter where you are in North America. 1. Touch the HOME button on the WHERE WOULD YOU LIKE TO GO? screen (see page 8). The CONFIRM HOME ADDRESS screen (right) will appear. 2.
C ONFIRM A DDRESS S CREEN O PTIONS Besides touching the GO button to begin navigation, the CONFIRM ADDRESS screen (see page 12) also gives you these options: V IEW M AP : Touch to see a map showing your destination. You can change the map view and zoom the view in and out (see Map Screen Options, on page 14). NOTE: Touching the V IEW M AP button does not begin nagivation. S IMULATE : Touch to have the GPS-500 simulate the trip.
M AP S CREEN O PTIONS M A P S C R E E N L O C K /U N LO C K B U T TO N : Touching this button locks and unlocks the map screen. When the screen is locked, the MAP VIEW and MAP ZOOM buttons do not function. Map Screen Lock/Unlock Button (Shown Unlocked) Map Zoom Buttons When the map screen is unlocked, you can move the map position by moving your finger on the touchscreen in the direction you want the map to move. (See illustration, below, left.
Navigation Options Touching the MENU button on the MAP screen (see page 13) displays the NAVIGATION screen (below, right). M AP B UTTON : Takes you back to the MAP screen. P LAN A T RIP B UTTON : Lets you select a navigation destination. (See Planning a Trip, on page 8.) S TO P N AV I G AT I O N B U T TO N : Stops the current GPS-500 navigation session. N AVIGATION S ETTINGS B UTTON : Lets you change the GPS-500’s navigation settings. (See Changing Navigation Settings, on page 16.
Changing Navigation Settings Touching the NAVIGATION SETTINGS button displays the NAVIGATION SETTINGS screen (right). When the A VO I DA N C E S : GPS-500 calculates navigation routes, you can set it to always avoid the following: • U-turns • Unpaved roads • Toll roads • Roads requiring permits • Highways • Border crossings • Ferries NOTE: The GPS-500 comes from the factory with the U NPAVED R OADS avoidance set to ON.
The SOURCE Screen Touching the SOURCE button on any of the GPS-500’s screens displays the SOURCE screen (right). The SOURCE screen lets you select the GPS-500’s navigation, music player or video player functions. The SOURCE screen lets you change the GPS-500’s settings, as well. (See Changing Settings, on page 22.
To use the MTP mode, you must have a PC that is running the Windows® XP operating system (Service Pack 2 or higher) and has Windows Media Player 10 or higher installed. T O T RANSFER F ILES TO THE GPS-500 IN MTP M ODE : 1. Insert an SD card into the GPS-500’s SD card slot (see page 4). 2. Make sure the USB cable is disconnected from the GPS-500. 3. Set the GPS-500’s USB mode to MTP (see page 17). 4. Connect the GPS-500 to your computer’s USB hub (right). 5. Launch Windows Media Player. 6.
USB M ASS S TORAGE The USB Mass Storage mode lets you transfer files the using drag-and-drop method on your computer – the same method you use to transfer files from one folder or drive to another. However, when transferring files in the USB Mass Storage mode, video files that are in formats not supported by GPS-500 will be transferred without transcoding. These files won’t be playable on your GPS-500 but will take up space on your SD card.
Listening to Music Touch the MUSIC button on the SOURCE screen. The Music menu (below) will appear. Repeat Play Button Scroll UP/DOWN Buttons Shuffle Play Button File Name Buttons File Display Option Buttons Navigation Guidance Prompts You can sort and display your music by touching the ARTIST, ALBUM, GENRE, PLAYLIST or SONG File Display Option buttons. S ELECTING M USIC BY A RTIST: Touching the ARTIST button displays an alphabetical list of all of the artists with songs stored on the SD card.
S HUFFLE P LAY Touching the SHUFFLE PLAY button plays all the songs currently displayed in random order. T HE N OW P LAYING S CREEN The GPS-500 will display the NOW PLAYING screen (right) while songs are playing. This screen shows the elapsed time of the song, and provides buttons for skipping to the next or previous song, and for pausing the song. NOTE: During navigation, guidance prompts appear at the bottom of the N OW P LAYING screen (above) and the M USIC menu screen (see page 20).
Changing Settings Touching the SETTINGS button on the SOURCE screen displays the SETTINGS screen (right). This lets you change any of these GPS-500 settings: Brightness The BRIGHTNESS button lets you adjust the GPS-500’s screen brightness so you can clearly see it in various lighting conditions. NOTE: You can adjust the screen brightness at any time by pressing the Volume Control knob in.
Battery Charge The BATTERY CHARGE screen shows the GPS-500 battery’s charge level. It also lists your unit’s current software version and serial number. Note: The orange battery/lightning bolt symbol indicates that the GPS-500 is being powered through its charger port. USB Lets you switch the GPS-500 between the MTP and USB Mass Storage modes. See Loading Media on Your SD Card, on page 17, for details.
Install the Mounting Bracket F OR W INDSHIELD -M OUNTING : 1. Hold the mounting bracket’s base against the windshield. 2. Push the mounting bracket lever towards the base to lock the bracket to the windshield. 1. Hold Base Against Windshield 2. Push Lever Towards Base to Lock F OR D ASHBOARD -M OUNTING : 1. Clean the dashboard mounting location with the supplied alcohol pad. 2. Peel the mounting base adhesive covering. 3. Attach the mounting base to the mounting location. 4.
AT TACHING THE GPS-500 TO THE B RACKET 1. Fit the bottom mounting slot into the bracket cradle. 2. Snap the rear mounting slot into the bracket cradle. To unlock and remove the unit, press the lever on the botton of the cradle up. L ISTENING TO A UDIO YOUR V EHICLE 2. Snap Rear Mounting Slot Into Cradle IN 1. Plug the supplied car 1. Fit Bottom Mounting Slot charger into your vehicle’s Into Cradle 12V power outlet and into the GPS-500’s mini USB connector.
User Manual 26 Troubleshooting Problem Solution GPS-500 does not turn on at all Check the LOCK switch (see Controls and Features, on pages 4 – 5); charge the battery for 6 hours (see Before You Begin, on page 6) GPS-500 does not have a good GPS signal Make sure GPS-500 has a clear, unobstructed “view” of sky (see Before You Begin, on page 6) GPS-500 will not play music or videos Insert an SD card that has media loaded on it (see Loading Media on Your SD Card, on pages 17 – 19) Unable to load media
Troubleshooting (continued) Problem Solution Screen color unexpectedly changes mode (DAY > NIGHT or NIGHT > DAY) Color Mode is set to AUTO.
Declaration of Conformity We, Harman Consumer Group International 2, route de Tours 72500 Château du Loir France declare in own responsibility that the product described in this manual is in compliance with technical standards: EN 60950-1:2001+A11 EN 55022:1998+A1:2000+A2:2003 EN 55024:1998+A1:2001+A2:2003 EN 61000-3-2:2000 EN 61000-3-3:1995+A1:2001 Klaus Lebherz Harman Consumer Group International Château du Loir, France 2/07 guide + play ™ 250 Crossways Park Drive Woodbury, New York 11797 ©2007 Harma