Printed in the United States Part #1111-HKSIG20 HA160-0004-A
.0 Processor/Tuner Owner’s Manual
Owner’s Manual Signature 2.0 Processor/Tuner Table of Contents Introduction . . . . . . . . . . . . . . . . . . . . . . . . . . . . . . . . . . . . . . . . . 1 Safety Information . . . . . . . . . . . . . . . . . . . . . . . . . . . . . . . . . . 2–3 Unpacking and Installation . . . . . . . . . . . . . . . . . . . . . . . . . . . . . . 3 Quick Start Instructions . . . . . . . . . . . . . . . . . . . . . . . . . . . . . . 4–7 Front Panel Controls . . . . . . . . . . . . . . . . . . . . . . . . . . . . . . .
Staple or clip your original invoice here.
Signature 2.0 the meaning of the on-screen and front panel display messages will enable you to take advantage of all the power the Signature 2.0 is able to deliver. Harman Kardon has been a part of the audio world since it invented the first high-fidelity receiver over fortyfive years ago. With the combination of state-of-the-art circuitry and time honored design philosophies, the Signature 2.0 is one of the most innovative products ever offered by Harman Kardon.
Signature 2.0 CATV or Antenna Grounding Important Safety Information If an outside antenna or cable system is connected to this product, be certain that it is grounded so as to provide some protection against voltage surges and static charges. Section 810 of the National Electrical Code, ANSI/NFPA No.
Signature 2.0 Cleaning NOTE: Changes or modifications may cause this unit to fail to comply with Part 15 of the FCC Rules and may void the user’s authority to operate the equipment. Unpacking and Installation The carton and shipping materials used to protect your new 2.0 during shipment were specially designed to cushion it from shock and vibration. We suggest that you save the carton and packing materials for use in shipping if you move or should the unit ever need repair.
Quick Start Instructions Signature 2.0 Quick-Start Instructions Equipment Required for Quick-Start Installation: The Signature 2.0 is a powerful, yet easy-to-use product. In order to obtain the maximum benefit from its many features and options, it is strongly recommended that you take the time to carefully read the instructions in the manual. It contains a wealth of information that will help you to safely and properly install and use this product. ✓ Signature 2.
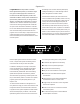
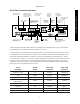
Signature 2.0 Quick Start Connection and Setup Connect AM loop antenna here FM ® 1 AM 1 NRTL / C LR110480 CSA E65 2 3 4 5 MAIN MODEL NO.: SIGNATURE SERIES 2.
Quick Start Instructions Signature 2.0 NOTE: To use the sources when they are connected as shown in the chart on the previous page, press the button name shown. The button names may not correspond exactly to the type of source used for any input profile, but you may rename the input source for the on-screen display by following the instructions shown on page 27 of this manual. 9.
Signature 2.0 mode automatically selected by the 2.0 to match the input source. For example, when the Pro Logic* mode is selected, but a Dolby Digital source is playing, the 2.0 will automatically select Dolby Digital, but the mode will flash to remind you that while it is correct, it is not the mode originally selected. • Note that when a DVD is in use, the digital audio output is interrupted when the player is in the pause, fast search, slow speed or reverse modes. Since the 2.
Signature 2.0 Front Panel Controls Front Panel Controls ! ) 9 2.0 DVD Vol Standby Dolb y Di g ital Source Surround 10 Tune Mute On/Off 1 2 3 4 5 6 7 8 1 Master Power Switch 5 Standby LED 9 Volume Control 2 Standby Switch 6 Power Indicator ) Information Display 3 Source Selectors 7 Tune Buttons ! Remote Sensor Window 4 Surround Selectors 8 Mute Button 1 Master Power Switch: This is the main power control for the 2.0.
Signature 2.0 7 Tune Buttons: Press these buttons when the tuner is the input source to select the station being listened to from the frequencies previously entered into the preset memories. in both the front panel Information Display ) and the on-screen control system (see figure OSD-13 on page 38) to provide information about the relative volume setting. ) Information Display: This two-line display is your window into the status and operation of the 2.0.
Signature 2.0 Rear Panel Connections Rear Panel Connections IMPORTANT NOTE: Never make or remove any connections to the Signature 2.0 with the Master Power Switch in the “ON” position. It is also a good practice to make certain that the power amplifiers connected to the 2.0 are also turned off when making or removing any connections. This eliminates the risk of possible damage to your speakers or other system components. When making connections to the Signature 2.
Signature 2.0 ¤ S-Video Main Output: Connect this jack to the S-Video input of the TV, video monitor, projector or display that will be used to view the On-Screen Control Menus of the 2.0 along with any selected S-Video input. ‹ S-Video Inputs: Connect the output of S-Video sources to these input jacks. Once the inputs have been connected they may be assigned to any of the 2.0’s seven source positions using the Source Menu (see figure OSD-5 on page 27).
Signature 2.
Signature 2.0 g Source Selection: Pressing these buttons will select the input source for the 2.0. It will also activate the transport and numeric control buttons associated with that device, enabling control of the source with the 2.0 remote. If the 2.0 is in the Standby mode when one of these buttons is pressed, the unit will automatically turn on and switch to the selected input. a Main Power On/Off: Press these buttons to turn the 2.0 on or to place it in the standby mode.
Remote Control Operation Signature 2.0 m Bass Boost: Press this button to activate the Bass Boost feature. When the button is pressed a menu will appear on the screen (see figure OSD-20 on page 42) and you may adjust the subwoofer output volume by pressing the ‹ or › Menu Control buttons i. When you have completed the adjustment, press this button again to enter the setting and remove the menu from the screen.
Signature 2.0 c) Pressing the Movies button will scroll through the list of surround modes that are most appropriate for movie soundtracks. d) Pressing the Stereo button will switch between pure two-channel stereo sound and the previously selected surround mode. v Enter: Press this button to select a station after you have entered its frequency or preset location using the Numeric Keys w. IMPORTANT NOTE: Using these buttons will change the surround mode for a current listening session only.
Signature 2.0 3. Close the cover until it clicks shut. Remote Control Programming Remote Control Programming This product is equipped with a powerful remote control. As supplied, it will operate the 2.0, as well as most CD players and tape decks manufactured by Harman Kardon. If your equipment requires different codes, it may be programmed to copy the codes from most infrared remotes.
Signature 2.0 Programmable Keys Many of the buttons on the remote control may be user programmed to new functions to operate virtually any component in your system. Eleven CANNOT be programmed with a new code, as they control high-level functions of the 2.0. These keys are Main Power On, Main Power Off, and the nine source input keys: TV, Vid 1, Vid 2, Vid 3, Tuner, CD, Tape 1 and Aux. WARNING: These keys transmit codes that are vital to the operation of the product.
Remote Control Programming Signature 2.0 Resetting the Remote Memory To program the remote, follow these steps. Note that it is not necessary to program all keys, only those that are required to operate the subject device. Keys not programmed will retain the codes preprogrammed at the factory. In normal operation, codes for a new device may be programmed “over” the codes that have been previously programmed into the remote.
Signature 2.0 When making audio/video connections it is a good idea to note the connection points on the User Worksheet provided in Appendix B. System Installation For simple installations, connect your audio and video sources according to the chart on page 6. Audio Inputs The 2.0 accepts inputs from conventional analog audio products and both coaxial digital and optical digital audio sources. The flexibility of the 2.
System Installation Signature 2.0 The 2.0 may also be connected to an optional, external audio processor or decoder that accommodates digital systems the 2.0 cannot handle internally. The analog output connections from any external processor should be made to the 6-CH Direct Inputs ¡. If the 2.0’s front panel remote sensor is blocked by cabinet doors or other obstructions, an optional, external IR sensor may be connected to the IR Input ¶.
Signature 2.0 NOTE: The 2.0’s input switching system will convert S-Video inputs for display on a standard composite video monitor, but it will NOT convert composite video signals to the S-Video format. If your system uses a mix of both standard and S-Video it is easiest to make connections only to the standard video input of a monitor, although that will remove the signal quality benefits of an “S” connection.
Signature 2.0 Center Front Speaker Once you have made the physical connections between the Signature 2.0 and the other equipment in your system, it is necessary to make certain adjustments that “tell” the 2.0 about the speakers and where they are located in the listening room and to make adjustments for the acoustics in the room. These adjustments will also enable you to use the power of the 2.0’s menu system so that input sources may be grouped and named to suit your requirements.
Signature 2.0 Using these guidelines, you may find that it takes some experimentation to find the correct location for the front speakers in your particular installation. Don’t be afraid to move things around until the system sounds correct. Optimize your speaker positions so that pans across the front of the room sound smooth, and that sounds from all speakers appear to arrive at the listening position at the same time.
System Configuration Signature 2.0 The final preparation before proceeding with the configuration is to make certain that your television, monitor, or projector or other video display device is turned on, and that it is adjusted so that the 2.0 is the current video input. At this point you should also make one last check that all sources, amplifiers and speakers are properly connected to the 2.0, plugged into AC power, turned on or in their standby modes.
Signature 2.0 When the Front L & R: line is highlighted use the ‹ or › Menu Control buttons i to select Large or Small in accordance with the definition above. When Small is selected, all signals assigned i to select Yes when a subwoofer is installed, and None when a subwoofer will not be used in the system. to the front left/right speakers that are below 100Hz will be sent to the subwoofer output. When Large is selected, the front left/right speakers will receive a full-range signal.
Signature 2.0 System Configuration Once the reference level has been established, press the At the Speaker Dist Adj menu (Figure OSD-4) you will enter the information that will permit the 2.0 to automatically calculate the proper delay time for each analog and digital surround mode. Thanks to the advanced circuitry of the 2.0 it is no longer necessary to calculate delay times and enter them manually.
Signature 2.0 Source Configuration Source S N V A M V I E The 2.0 is unique in that it gives users the option to assemble any of the audio and video sources it is connected to into easy to understand input source profiles that allow you to “mix and match” combinations and then identify them with a name that makes sense.
Source Configuration Signature 2.0 Input Assignment As with other menu selection choices, use the ‹ or › At the Video line select the rear panel Composite or S-Video Input ‹ fl that will appear on screen when the remote button whose profile you are adjusting is pressed. You may select any of the video inputs, even if you use an input connection more than once.
Signature 2.0 Input Level Adjust This option line permits you to select whether the 2.0 will continually search for incoming video, or if the circuits for automatic detection will be turned off. When an analog input is selected, the next step is to set the input level. Correct input level adjustment is needed so that the surround sound processing circuitry has both enough information to decode, and to make certain that the information in both input channels is at the same level.
Signature 2.0 Source Configuration With the source unit in play, make certain that you are at the Source Menu (Figure OSD-5) and that the Input Level > line is highlighted. Press the NOTE: When adjusting the input level using the front panel display, note that only the indication of Ref, High, or Low, will appear on the bottom line. The reference offset numbers appear only in the on-screen display (Figure FPD-5). › Menu Control button i to move to the Set Input Levels menu (Figure OSD-7).
Signature 2.0 The Center control allows you to select the Center Channel option for this input. This is an override to the normal settings for the selected mode. Make certain that the Effects Menu is on the screen and that the Center line is highlighted. line is highlighted, and use the ‹ and › Menu Control buttons i to create the desired level. Note that since this is a subtractive filter, the on-screen indications are shown as negatives, such as -2 dB.
Source Configuration Signature 2.0 The adjustment screen for Balance is an X/Y graph (Figure OSD-9) with the center of the graph indicating the place in the room where you were sitting when the Speaker Level Adjustments were made as shown on page 25. Keep in mind that this may, or may not, be the actual center of the room, although it appears at the center on the graph.
Signature 2.0 Advanced Setup T P S U D S u w y n i y Settings r r s i s s : e: rol: n On Vol Up Stat tem Cont t ID: play Opt tem Rese ions t 10 On Lstn 1 > > Figure OSD-10 However, for the advanced audiophile, or where special system installations require changes to the factory settings, the 2.0 provides a means to adjust settings that do not normally need any change. The following section describes those changes.
Advanced Setup Signature 2.0 removed with the exception of the volume control. Thus, if the unit was in Standby when power was removed, it will return to Standby when power is restored. If the unit was On and in an operating condition when power was removed, it will turn on and resume operation when the power is restored.
Signature 2.0 To make a change in this option, press the ‹ or › Menu Control buttons i until the desired setting is Display O F O P M V The Unit ID setting is used only when the 2.0 is programmed for use in a control system using RS-232 interfaces. The setting here establishes the “Unit ID” for the 2.0, so that the master system knows where to direct commands intended for the 2.0.
Signature 2.0 Advanced Setup panel Information Display will illuminate whenever a remote control command is sent to the 2.0 but it will go blank after the time interval set in the OSD Time Out line. parts of South America and many Asian countries, and the PAL system which is used in most other parts of the world. The 2.0 comes preset from the factory for the video standard used in your country. However, in special circumstances it may be appropriate to change the video standard.
Signature 2.0 will briefly appear in both the front panel Information Operating the Signature 2.0 Display (Figure FPD-2) and the On-Screen Display System (Figure OSD-12). The Power Indicator 6 will go dark and be replaced by the Standby LED 5 illuminating in amber. The power-on trigger will also turn off automatically, causing any amplifiers connected to the 2.0 to also return to the Standby mode.
Signature 2.0 to transfer the codes from your TV’s remote to the 2.0 remote. Remember that in the factory default configuration, the TV Volume buttons q operate only when the TV Source button g has been pressed. To Video 1 Dolby ProLogic No AC-3 Info V o l 1 0 Operation program the codes for use when other inputs are active, follow the instruction on page 17.
Signature 2.0 After turn on/off and volume, the most frequently used controls on any audio video product are the input source selectors. The current input source is always displayed in the front panel Information Display (Figure FPD-4) and may be shown on screen (Figure OSD-14) when the Display button x is pressed. . Tuner To change the input source, press the Source ⁄ or Source ¤ buttons 3 on the front panel or the individual direct access Source Selection buttons g on the remote.
Signature 2.0 when a digital datastream is present. An alternate mode will be selected by the 2.0’s processing system and the unit will automatically switch to it. The alternate mode name will be displayed in the on-screen message, or it may be seen by pressing the Display button x for a full status report (Figure OSD-18). Operation Surround Mode Change The Signature Series 2.0 offers a number of options for changing the surround mode.
Signature 2.0 The complete list of modes, and mode groups is found in Appendix C, but in general, the groupings are as follows: You may also change the surround mode by pressing the Surround Selectors 4 on the front panel. When using the front panel buttons, the unit will scroll up or down through the complete list of modes that is available for the type of input source selected.
Signature 2.0 To change the Treble Cut setting, press the Treble Operation button k, and note that the default setting will appear in the on-screen display (Figure OSD-19) and the front panel Information Display. Use the ‹ or › Menu Control buttons i to change the setting to the desired level. Bass Boost: +0 dB Figure OSD-20 When you have completed the adjustment, press the Bass button m again to enter the setting and return to normal operation.
Signature 2.0 Balance Press the ‹ or › Menu Control buttons i to change the setting to any of the available modes, which are described on page 31. You will immediately hear the result of any change, and the new center channel mode will be shown in the on-screen display and in the front panel Information Display. When the adjustment is completed, press the Center button o to enter the setting and return to normal operation.
Signature 2.0 When you have finished this adjustment, press the Surr Tuner Music 1 Vol 10 button p again to enter the setting and return to normal operation. Remember, the setting is temporary and will be canceled as soon as you switch to another mode or when the 2.0 is turned off. P 9 K P S 1 X U e . X B t: 0 4 5 F M X-F M LIC Operation Display Status Report With the flexibility of the 2.0, you may occasionally want a quick reference as to what is playing through the system.
Signature 2.0 • PGM Content describes the number of surround channels encoded in the disc or broadcast being received. a higher or lower data rate depending on the number of channels encoded, the running time of the disc and the quality of the audio. When there is a mismatch between the selected surround mode and the incoming signals that prevents the 2.
Signature 2.0 When the tuner is selected it will play the last station selected when the tuner was in use. To change from the FM band to the AM band, or vice versa, press the Tuner However, it may occasionally be necessary to change the tuner to mono reception even when stereo broadcasts are being received. This is advisable when you are tuning a weak station or are in an area where there is severe multipath distortion due to reflections of the FM signal off neighboring tall buildings.
Signature 2.0 T u n e r S t e r e o PSet: 790 24 Tuner Stereo Ð Ð 0 1 Operation Figure OSD-28 PSet: Figure OSD-29 Within five seconds press the Enter button v and the station will be tuned. Within five seconds press the Store button to enter the number to the 2.0’s memory. The entry will be confirmed by noting that the preset number will move to the top line of both displays (Figures FPD-11 and OSD-30).
Signature 2.0 • Preset stations may be recalled directly by entering their preset number using the Numeric Keys w, and then pressing the Enter button v within five seconds. network affiliation or other information. In rare cases, some stations program a lengthy message here that will appear in the display in eight-character pieces. The middle portion of the lower line on the display will show the program type or “PTY”, chosen by the station.
Signature 2.0 To return to the RDS ID and PTY messages press the RDS RDS button and note that the RDS ID... message will appear in the front panel Information Display (Figure FPD-19). 04 91.5 FM . SEARCH 10 Figure FPD-19 IMPORTANT NOTE: Radio stations are free to use all, some or no parts of the RDS system. For that reason, you may not see certain aspects of the messages on some FM stations. For example, some stations may choose to transmit an ID and PTY, but not a text message.
Operation Signature 2.0 The tuner will search upward through the FM band, automatically examining each station to see if it is sending RDS data and looking to see what the PTY is. When the next FM station that meets the search criteria is tuned, the scan will stop and the station will be tuned. If no station is found that matches the desired PTY type after a complete scan of the FM band, the tuner will return to the last station tuned.
Signature 2.0 Tuner P F B R I T T Manual: When Manual is displayed, the tuner will not display RDS data-fields unless the RDS button is pressed. When Manual is displayed, you may also enter data fields for FM stations that will display a section name or ID and attach an RDS PTY search code, even when the station does not S R a D D y y e E n S : p p t: Q: d: : Menu Ð 9 F M ÐÐ 0.
Signature 2.0 IMPORTANT NOTE: When a station is transmitting RDS data, but is manually assigned a different PTY type name, the station will be searchable only by the newly assigned PTY name, not the actual RDS code being transmitted. audio from another. With the flexibility of the 2.0, it is possible to establish a permanent input source profile that matches different input sources.
Signature 2.0 this option, the feed to the devices connected to the Rec Record Outputs £ ⁄ › will be the same as the input source profile selected for listening through the 2.0’s main outputs. Put another way, when Track Input is selected, whatever you hear through the system will also be sent to the recorder.
Signature 2.0 mode, as no digital data is typically output unless the disc is playing. To confirm that the lack of data is the cause of the error message, press the Display button Troubleshooting Guide Troubleshooting Guide The Signature 2.0 is designed for trouble-free operation. In normal use, most users will not encounter any trouble with the unit. However, as with any sophisticated electronic device, there may be occasional problems on initial installation or during the life of the unit.
Signature 2.0 At the Advanced Settings menu (Figure OSD-10), press the ¤ Menu Control button i twice until SYSTEM RESET > is highlighted. Press the › Menu Control button i again. Follow that instruction by holding the Store button until the Reset Completed message appears This will bring up the System Reset Menu (Figure OSD-40). If you wish to exit at this point, press the Menu button j.
Signature 2.0 Troubleshooting Guide Troubleshooting Chart Symptom Possible Cause Solution Unit does not operate when standby switch or remote power is pressed. • No AC Power. • Make certain AC power cord is plugged into a live outlet. • Check to see if AC outlet is switch controlled. • Turn on Main Power Switch. • Main Power Switch Off. Display lights, but no sound is heard from any channel. • Intermittent Connections. • Mute is engaged. • Amplifier is off.
Signature 2.0 Factory Presets Speaker Setup Front Left and Right Small Center Small Surrounds Small Subwoofer Yes Speaker Distances Measurements Using the option and condition sets shown as a starting point, you may customize many aspects of the 2.0 to suit the acoustical requirements of your listening space, the type of equipment installed in your system or your personal listening preferences. Contact your dealer or installer if you have any questions concerning how to customize your system.
Signature 2.0 User Worksheets Appendix B As you become familiar with the capabilities of the Signature 2.0, you may make some changes to the factory configuration. The Worksheets provide a means for you to record the new settings so that they are available for reference. Recording the settings will also make it possible to recreate settings that may be lost due to system resets or equipment malfunctions.
Signature 2.0 Dolby Pro Logic System Control Abbreviations and Control Parameters Space limitations prevent a full explanation of the Signature Series 2.0’s Surround modes, RDS system and the Bass Boost and Treble Cut controls when they are viewed in the on-screen graphics or menus. The charts and graphs in this section provide additional details that will assist you in the selection of the Surround mode, the use of the RDS data system and adjustment of the Bass Boost and Treble Cut controls.
Signature 2.0 Appendix C Dolby Pro Logic is your best choice when listening to a movie or television program through an analog input. When Dolby Pro Logic is required by a digital input, the 2.0 will automatically select it for you.
Signature 2.0 DTS Applicable Mode Groups: As DTS is used for both audioonly discs as well as movies and other video-related programs, all DTS modes are available in both the Music and Movies mode groups. Note that when a DTS 5.1 program is playing and you press the Stereo button y, the 2.0 will indicate DTS 2 Chan. NOTE: Due to the way in which DTS operates, there is no data available when the Display button x is pressed while a DTS source is playing.
Appendix C Signature 2.0 Mono Mono + When you are playing an older monaural recording or movie and wish to listen to it in its pure state without any enhancement or processing, select the Mono mode. This mode will combine all audio channels and send them to the center channel speaker only. Playing a single-channel, monaural recording does not mean that you have to sacrifice availability of surround sound.
Signature 2.0 The RDS Data System The Signature 2.0’s RDS data system enables you to search for stations with specific program formats when an FM station is transmitting the proper data. The following chart will help you to compare the abbreviations used in the 2.0’s display system to the actual names of each program type, or PTY.
Signature 2.0 Bass Boost This chart, using data from a sample Signature 2.0 unit and automated test equipment, shows the frequencies at which low-frequency information is boosted when settings are changed with the Bass Boost control m, or through the use of the Effects Menu (Figure OSD-8). Appendix C +10 +9 +8 +8 +7 +6 +6 d B r +5 A +3 +4 +4 +2 +2 +1 +0 +0 -1 -2 -3 20 50 100 200 500 1k 2k 5k 10k 20k 30k Hz Treble Cut This chart, using data from a sample Signature 2.
Signature 2.0 Signature 2.0 Processor/Tuner Specifications Inputs: Six Stereo pairs via RCA jacks Digital Audio: Four Coaxial S/P-DIF, Two Optical TosLink External Adapter: Six Direct Analog channels via RCA jacks Composite Video: Six RCA jacks S-Video: Two 4-pin mini DIN IR Sensor Input: 3.
Signature 2.0 Signature 2.0 Processor/Tuner Specifications (continued) Technical Specifications Tuner Section FM: Frequency Range: Usable Sensitivity: 87.5 to 108.0MHz in 200kHz steps <1.0 µV/11.2dBf Signal-To-Noise: 70dB (Stereo, A-weighted) S/N 50dB Sensitivity: <45dBf THD + N: <0.5% Capture Ratio: <2.
Signature 2.0 Figure Index Operating the Signature Series 2.0 is dependent on understanding the meaning of the various on-screen menus, front panel display messages and other status messages. To conserve space, each on-screen message appears once in this manual, although many are referred to frequently throughout the manual.
Signature 2.0 Subject Index Balance Adjust . . . . . . . . . . . . . . . . . . . . . . . . . . . . 32, 43 Display Options . . . . . . . . . . . . . . . . . . . . . . . . . . . . . . 35 Source Configuration Input Name . . . . . . . . . . . . . . . . . . . . . . . . . . . . . . 27 Input Assignment . . . . . . . . . . . . . . . . . . . . . . . . . 28 Surround Mode Assignment . . . . . . . . . . . . . . . . . 28 Dolby Digital . . . . . . . . . . . . . . . . . . . . . . . . . . . . .