HKTS 11 Home Theater Speaker System OWNER’S MANUAL Power for the Digital Revolution®
Table of Contents 3 Introduction 4 SUB-TS11 Subwoofer Amplifier Panel Controls and Connections 6 Speaker Placement 7 Mounting Options 8 Speaker Connections 8 Speaker-Level Connection Guide 9 Dolby Digital or DTS (or Other Digital Surround Mode) Connection 10 Dolby Pro Logic (Non-Digital) – Line Level 11 Dolby Pro Logic (Non-Digital) – Speaker Level 12 Operation 12 Volume 12 Additional Bass Adjustments Declaration of Conformity We, Harman Consumer International 2, Route de Tours 72500 Château-du
Introduction Introduction Thank you for purchasing the Harman Kardon HKTS 11, with which you’re about to begin many years of listening enjoyment. The HKTS 11 has been custom-designed to provide all the excitement and power of the cinema experience in your own living room. While sophisticated electronics and state-of-theart speaker components are hard at work within the HKTS 11, hookup and operation are simple. Color-keyed cables and connections, and simple controls make the HKTS 11 easy to use.
Rear Panel Connections SUBWOOFER LEVEL SUB-TS11 For use with HKTS 11 System ¡ FILTER ON ™ MAX MIN OFF CAUTION £ RISK OF ELECTR IC SHOCK DO NOT OPE N ON AUTO PHASE ¢ ∞ REVERSE NORMAL SUB § H I G H ¶ • ª ‚ L R LINE LEVEL IN L E V E L "WARNING: FOR CONTINUED PROTECTION AGAINST RISK OF FIRE, REPLACE ONLY WITH SAME TYPE T 2.5A L/250 VOLT FUSE" L "AVERTISSEMENT: UTILISEZ UN FUSIBLE DE RECHANGE DE MEME TYPE T 2.
Rear Panel Connections Line-Level Subwoofer (SUB) Input: Connect the subwoofer output of a receiver with digital surround sound decoding, such as Dolby* Digital or DTS®, to this input. This input bypasses the SUB-TS11’s internal crossover circuitry, and should only be used with a filtered signal. If your receiver does not have digital decoding, you should use the Line-Level Full-Range Inputs instead.
Speaker Placement Color-Coding System Center Channel Speaker The HKTS 11 uses the channel color-coding system established by the Consumer Electronics Association to make setting up your home theater speaker system as easy as possible. Your system includes a set of colored stickers that may be placed near the speaker terminals of each of the four satellite speakers according to the key below. It doesn’t matter which satellite speaker is used for any of the front or rear positions.
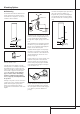
Mounting Options Wall-Mounting Wires to Speaker Unscrew the bolt that attaches the black shelf stand to the bottom of the speaker. Store the stand and bolt in a safe place in case they are needed for a future installation. Terminal Cover Overhead View The wall-mounted speaker may be pivoted from side to side; however, the bracket is not designed to tilt up or down, and attempting to tilt it will damage the bracket and possibly the wall, which would not be covered by your warranty.
Speaker Connections Speaker-Level Connection Guide IMPORTANT NOTE: Before making speaker connections, be certain that your receiver or audio power amplifier is turned off and preferably unplugged from its AC power source. The SUB-TS11 subwoofer should not be connected to an AC power source until all speaker wire connections have been made. Speakers and electronics terminals have corresponding (+) and (–) terminals.
Speaker Connections Dolby Digital or DTS® (or Other Digital Surround Mode) Connection Use this installation method for Dolby Digital, DTS® or other digital surround processors: Make sure that you have configured your surround-sound processor for “Subwoofer On.” The front left, front right, center and rear speakers should all be set to “Small.” jack to the LFE output or subwoofer output on your receiver or amplifier. Connect each speaker to the corresponding speaker terminals on your receiver or amplifier.
Speaker Connections Dolby Pro Logic (Non-Digital) – Line Level Use this installation method for Dolby Pro Logic applications (not Dolby Digital, DTS® or other digital processing), where the receiver/processor is equipped with a subwoofer output, or a volume-controlled preamp (line-) level output: Use RCA-type patch cords to connect the linelevel subwoofer output on your receiver or to amplifier either the left or right line-level input on the subwoofer.
Speaker Connections Dolby* Pro Logic* (Non-Digital) – Speaker Level Use this installation method for Dolby Pro Logic applications (not Dolby Digital, DTS® or other digital processing), where the receiver/processor does not have a subwoofer output, or a volumecontrolled preamp (line-) level output: Connect your receiver or amplifier’s front left and right speaker terminals to the left and right terminals on the subwoofer that are marked “High Level In.
Operation Move the Master Power switch (marked “Power” ) to the “•” (On) position to use the subwoofer. The SUB-TS11 subwoofer will automatically turn itself on or go into standby mode depending on whether or not a signal is being sent to it by your receiver or surround processor, and provided that the Music Sense On/Off Switch is moved down so that it is in the "AUTO" position.
Troubleshooting If there is no sound from any of the speakers: • Check that receiver/amplifier is on and a source is playing. • Check that the powered subwoofer is plugged in, its Power switch is switched on to the “ON•” position. • Check all wires and connections between receiver/ amplifier and speakers. Make sure all wires are connected. Make sure none of the speaker wires are frayed, cut or punctured. • Review proper operation of your receiver/amplifier.
Specifications HKTS 11 System CEN-TS14 Center SUB-TS11 Subwoofer Frequency Response 35Hz – 20kHz (–6dB) Recommended Power 10 – 120 Watts Amplifier 200 Watts RMS Impedance 8 Ohms nominal Bass 10" Woofer, bass-reflex enclosure Sensitivity 86dB @ 1 Watt/1 meter Dimensions (H x W x D) 479mm x 340mm x 340mm Tweeter One 3/4" dome, video-shielded Weight 15kg SAT-TS14 Satellites Recommended Power 10 – 120 Watts Impedance 8 Ohms nominal Sensitivity 86dB @ 1 Watt/1 meter Tweeter One 1/2" dome, video-shiel
250 Crossways Park Drive, Woodbury, New York 11797 www.harmankardon.