MAS 101/102/111 Music system Owner’s Manual
MAS SYSTEM SAFETY INSTRUCTIONS 3 INTRODUCTION AND FEATURES 4 Harman Kardon® High-Performance Audio system 2 Table of Contents 4 FRONT-PANEL CONTROLS (Controller and Amplifier) 5 REAR-PANEL CONNECTIONS (Controller) 6 REAR-PANEL CONNECTIONS (Amplifier) 7 REMOTE CONTROL FUNCTIONS 8 INSTALLATION 10 OPERATION 11 Using the Remote Control 11 Turning On the MAS System 11 Setting the Clock 11 Setting the Alarms 11 Volume Control 13 Speaker Setup (Tone Controls) 13 Source Selection 13
MAS SYSTEM Safety Instructions Important Safety Instructions 1. 2. 3. 4. 5. 6. 7. 8. 9. 10. 11. 12. 13. 14. 15. 16. 17. 18. Read these instructions. Keep these instructions. Heed all warnings. Follow all instructions. Do not use this apparatus near water. Clean only with a dry cloth. Do not block any ventilation openings. Install in accordance with the manufacturer’s instructions.
MAS SYSTEM More than 50 years ago, Harman Kardon sold the very first audio receiver, a highperformance component that combined the functions of several products that previously had only been available separately. Our mission was and is to deliver high-fidelity sound in an easy-to-use package, and we are confident that you will enjoy the quality and convenience of the MAS 101/MAS 102/MAS 111 music system for many years to come.
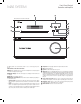
Front-Panel Controls Controller and Amplifier MAS SYSTEM Note: Controls are the same for all models. The MAS systems use touch-sensitive controls. To use a control, tap gently on its lit icon. NOTE: Controls are the same for all models. Power: Turns the MAS system on or places it in Standby mode. To completely power off the unit, unplug the power supply. Message Display: The time and messages are displayed in this two-line text display. CD Slot: Load compatible discs here.
Rear-Panel Connections Controller MAS SYSTEM FM Antenna Terminal: Connect the included FM antenna wire here. DAB Antenna Terminal (MAS 111 Only): Connect the included DAB antenna wire lead here to enjoy programming from digital DAB, DAB+ or T-DMB-Audio radio stations available in your area. SB Port B: Connect a compatible USB device here to enjoy playback of audio MP3 U or WMA files.
Rear-Panel Connections Amplifier MAS SYSTEM Right and Left Speaker Output Terminals: Use two-conductor speaker wire to connect each set of terminals to the correct speaker. Remember to observe the correct polarity (positive and negative connections). Input From Controller: Connect the included ribbon cable to this connector and to the corresponding connector on the MAS controller.
MAS SYSTEM Remote Control Functions Power Sleep Source Selectors Display Settings Info Back Time 1/57/3 Navigation Enter FM Mode Clear Eject Check Program/Memory Random Auto Store Transport Controls Preset Folder +/– Volume +/– Mute Numeric Keys –10 Numeric Keys Power: Turns the MAS system on or off. To completely power off the unit, unplug the power supply. Sleep: Each press increases the time until turn-off, from 10 to 90 minutes, in increments of 10 minutes.
MAS SYSTEM Remote Control Functions Clear: Clears the current preset station or a playlist entry. s Radio: To delete the current preset station, press the Clear button while it is playing. • Playlist: While programming a playlist, press the clear button to delete the track just entered. After the playlist has been saved by pressing the Stop button, press the Clear button to delete the entire playlist.
MAS SYSTEM Installation 1. Carefully unpack the controller, amplifier, speakers, FM antenna, DAB antenna (MAS 111 systems only), analog audio cable, ribbon cable, detachable AC power cord, The Bridge IIIP dock for iPod, remote control and batteries. 6. The MAS system features eight audio inputs for other devices, such as portable players. This step is optional, and may be skipped if you have no external devices. If your player has: 2.
MAS SYSTEM Operation Using the MAS system is simple and intuitive. The front-panel controls use advanced touch-sensitive technology. To use the front panel, place a finger over any of the illuminated icons. A gentle tap is all that is necessary. Wait a few seconds for the system to process each command. To remove fingerprints, wipe the front panel with a dry microfiber cloth. 3. Press the Enter button to display “Clock.
MAS SYSTEM Operation 3. Press the Enter button to display “Alarm 1.” Use the 7/3 buttons to display “Alarm 2.” When the desired alarm is displayed, press the Enter button to set it. The “Weekday: On” message will appear. Use the 7/3 buttons to display the Weekday Time, Weekend On/Off, Weekend Time or Source Settings, and press the Enter button to make a change. You may adjust the Weekday, Weekend and Source settings for either alarm.
MAS SYSTEM At the set time, the MAS system will automatically turn on and begin playing the selected source. The system will play at the volume selected at the Level setting of the Alarm Setup menu, and will continue to play for the period specified by the Timeout setting. Press the Power button or the Sleep button to place the unit in Snooze mode. It will remain off for the period of time set by the Snooze setting, and then the alarm will resume.
MAS SYSTEM Operation Figure 4: Speaker Setup Settings (Tone Controls) Settings Speaker Setup Enter > Enter or Back Speaker Setup Bass Right > < Speaker Setup Tr e b l e Right Left Enter < Enter or Back Set Bass 00dB > < > Speaker Setup Balance Left Enter < Enter or Back S e t Tr e b l e 00dB DAB Tuner (MAS 111 Systems Only) The MAS 111 system is equipped with a DAB/DAB+/T-DMB-Audio tuner for use with compatible digital radio stations, where available.
MAS SYSTEM Use the numeric keys to directly access a track. If the disc is organized into folders, press the Folder +/– buttons to open a folder. Additional presses skip to the next or previous folder. Within a folder you may search through the tracks more quickly by pressing the +10 and –10 numeric keys. Operation Playlists are lost when the system is turned off or the disc or USB device is removed. The playlist will also be lost when the source is changed.
MAS SYSTEM NOTES: • Only connect a turntable with an MM-type cartridge to the Phono Input. Do not connect a turntable to any other input without using a phono preamp. • When one of the digital audio inputs is selected, if no signal is present – e.g., if the device is turned off or paused – the “UNLOCK” message will appear. This does not reflect a problem; it is simply an indication that no signal is present.
MAS SYSTEM Troubleshooting Troubleshooting This unit is designed for trouble-free operation. Most problems users encounter are due to operating errors. So if you have a problem, first check this list for a possible solution. If the problem persists, consult your authorized Harman Kardon service center. If the problem is... Make sure that... Unit does not function when Power On Switch is pressed. t Make sure the AC power cord is securely plugged into an unswitched outlet.
MAS SYSTEM Specifications Specifications System Power output: 65 watts per channel, 20Hz – 20kHz, THD <0.07%, into 6 ohms, both channels driven Bandwidth: 20Hz–35kHz, –3dB System frequency response: 20Hz–20kHz, ±0.5dB Signal-to-noise ratio, A-weighted: 90dB (Analog inputs), 96dB (Digital inputs) Channel separation: ≥65dB Crosstalk between sources: ≥70dB Line-level input sensitivity at 1kHz: 250mV RMS, ±1dB Phono MM input sensitivity at 1kHz: 7.
MAS SYSTEM Specifications CD Section Disc compatibility: CD, CD-R, CD-RW, MP3, WMA THD+N (20Hz – 20kHz): <0.025% Frequency response: 20Hz to 20kHz, 0dB ±0.
Harman Consumer, Inc. 8500 Balboa Boulevard, Northridge, CA 91329 USA 516.255.4545 (USA only) © 2010 Harman International Industries, Incorporated. All rights reserved. Features, specifications and appearance are subject to change without notice. Harman Kardon and MMD are trademarks of Harman International Industries, Incorporated, registered in the United States and/or other countries. The Bridge IIIP logo is a trademark of Harman International Industries, Incorporated.