
Electronics Electric Heater User Manual


11
PP38+ Pellet Stove 3-90-08422R27_09/12
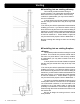
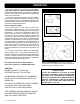
#4 Installing into an existing chimney
This method provides excellent venting for
normal operation. This method also provides natural
draft in the event of a power failure. If the chimney
condition is questionable* you may want to install a
liner as in method #7.
In some places in the US and Canada it is required
that the vent pipe extend all the way to the top of the
chimney.
*The chimney should be inspected and cleaned before
installing your stove. If you discover that the chimney
doesnothaveaclaytilelinerorhascracksorakingof
the tile liner you will need to install a stainless steel liner
within the chimney. In most cases the inside diameter
ofthislinershouldbe4".Eitherexibleorrigidliner
may be used for this purpose. Refer to Method 6 & 7.
Be sure to design the venting so that it can be easily
cleaned.
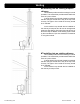
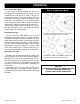
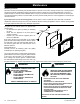
#5 Installing into an existing replace
chimney
This method provides excellent venting for normal
operation. This method also provides natural draft in
the event of a power failure. If the chimney condition
is questionable* you may want to install a liner as in
method #6.
In some places in the US and Canada it is required
that the vent pipe extend all the way to the top of the
chimney.
*The chimney should be inspected and cleaned before
installing your stove. If you discover that the chimney
doesnothaveaclaytilelinerorhascracksorakingof
the tile liner you will need to install a stainless steel liner
within the chimney. In most cases the inside diameter
ofthislinershouldbe4".Eitherexibleorrigidliner
may be used for this purpose. Refer to Method 6 & 7.
The chimney should be sealed at the damper using
a steel plate. Kaowool, mineral wool or an equivalent
non-combustible insulation is recommended to be
installed on top of the sealing plate to reduce the
possibility of condensation. The connector pipe should
extend through the smoke chamber to the base or into
therstuetile.
Be sure to design the venting so that it can be
easily cleaned.
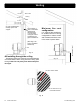
Fig. 10
Fig. 11
Venting