User’s Manual P-801T Portable Radio Copyright © 2000 M/A-COM. All rights reserved. No part of this publication may be reproduced, transmitted, transcribed, stored in a retrieval system or translated into any language, in any from or by any means, electronic, mechanical, photocopying, recording or otherwise, without prior written permission from M/A-COM. The information furnished herein is believed to be accurate and reliable.
Copyright © 2000, M/A-COM, Inc. Notice of Copyright The name M/A-COM, the OpenSky product name, and the M/A-COM and OpenSky logos are all trademarks of M/A-COM, Inc. Revision History Date 05/01/00 06/05/00 11/22/00 12/15/00 Update by Matt Wachowiak Matt Wachowiak Joe Xavier Joe Xavier M/A-COM Contact Information M/A-COM, Inc. 1011 Pawtucket Blvd. Lowell, MA 01853 Phone: 978.442.4000 Software Version: OTP 4.
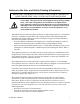
Notices to the User and Safety Training Information IMPORTANT INFORMATION ON SAFE AND OPTIMAL OPERATION. READ THIS BEFORE USING YOUR P-801T PORTABLE RADIO WARNING Your P-801T radio generates RF electromagnetic energy during transmit mode. This radio is designed for and classified as “Occupational Use Only” meaning it must be used only during the course of employment by individuals aware of the hazards and the ways to minimize such hazards.
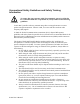
Occupational Safety Guidelines and Safety Training Information CAUTION To ensure that your exposure to RF electromagnetic energy is within the FCC allowable limits for occupational use, always adhere to the following guidelines. Your P-801T portable radio may transmit using either an integral antenna or remote speaker microphone/antenna. When it is ON, it receives and also sends out radio frequency (RF) signals.
The information listed above provides the user with the information needed to make him or her aware of a RF exposure, and what to do to assure that this radio operates within the FCC exposure limits of this radio.
Table of Contents Notices to the User and Safety Training Information .................................................................. i Occupational Safety Guidelines and Safety Training Information ............................................. ii OpenSky Overview ......................................................................................................................... 1 P-801: An Introduction..................................................................................................
OpenSky Overview Overview The P-801T Portable Radio is a key component of the OpenSky network. This section gives an overview of: • The OpenSky network, and • OpenSky features and benefits. The OpenSky network The P-801T Portable Radio is a part of the OpenSky network. The OpenSky network is an integrated voice and data communications system. The system provides a communication backbone that enables voice to be converted to digital information and then transmitted over a wireless network.
P-801: An Introduction Introduction The P-801T is a "soft" radio; its function is determined by software applications in much the same way that computer programs are used for different functions on a personal computer. Voice communication is handled digitally; this provides noise-free audio reception and allows for added features such as voice grouping to be supported. Operating modes The P-801T is a digital multi-mode radio that can operate in one of many modes.
Terms and Concepts User Groups Explained User group A user group is a set of users who regularly need to communicate. There can be any number of users in a user group. Your OpenSky network administration personnel establish and organize user groups. An OpenSky user group is similar to a channel in a conventional FM radio system. Diagram The figure below illustrates the user group concept.
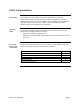
Profiles Explained Profile A profile is a set of up to 16 user groups. An OpenSky profile is similar to a bank of channels in a conventional FM radio system. Diagram The figure below illustrates the profile concept. Profile User Group 1 User Group 2 User Group 16 User Group 3 ...... Example Police officers on the same shift could be in the same profile – P01. The user groups that make up this profile might be organized by the physical location of the police stations.
Talk and Listen Groups Explained Overview The concept of talk and listen groups is key to understanding how the radio scans active voice calls. You can change the way your radio scans for active voice calls. Talk group A talk group is the primary user group in a profile. This is the group of users you will talk with and listen to the most. The first user group in each profile is your talk group. Listen group The rest of the 15 possible user groups in a profile are listen groups.
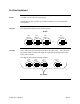
Radio Personality Explained Radio personality The radio personality is a collection of up to 16 profiles. When you turn on your radio, the personality is downloaded into the radio so that you have access to the profiles you need. Of the 16 possible profiles, only one is active at any given time. Diagram The figure below illustrates the radio personality concept. User Group 1 User Group 2 User Group 3 User Group 16 Profile 1 ...... Profile 2 ...... Profile 3 ...... ...... Profile 4 . . . . . .
Voice Feature Summary Voice feature summary User groups contain radio users who have a common need to communicate using the radio network. User groups are characterized as either talk groups or listen groups. • Your talk group is the primary group of radio users that you will listen and talk to. • Listen groups contain users that you normally only listen to. You do not normally transmit voice to users in your listen groups.
Before You Start Controls and Indicators General Four top panel switches and four side panel switches provide user control of major radio functions. The display and status indicators show key operating information. Diagram The following diagram shows the controls and indicators for the P-801T radio.
Controls and Indicators, Continued Parts and Functions The following table shows the parts of the P-801T radio and their related functions. Part Power/ Volume Switch Profile Selector Antenna Connector Toggle Switch Menu Buttons Display Indicator Light Emergency Button Push-to-talk Button Select Buttons Microphone Speaker Universal Connector P-801 User’s Manual Function Turns the radio on and off and sets the volume level of the speaker. Sets the active profile.
Display Overview Overview The radio display shows the active user group and profile, menu selections, and status information. The display is divided into two major elements: • Menu display & control area, and • Status area. Diagram The picture below shows the components of the display area. Menu Display and Control Area Status Area Parts and Functions The table below describes the parts of the radio display and their functions.
Menu Display and Control Area Description After you turn on the radio and the startup sequence finishes, the radio display shows the active profile, user group and menu selections. Pressing either Menu button changes the display to the next available menu item. Background The primary menu is displayed if you are not pressing the menu keys. If you move to another menu, the radio will return to the primary menu if no key is pressed for 10 seconds. Diagram The diagram below shows the menu items.
Menu Display and Control Area, Continued Menu structure The table below describes the menu items and display formats for the radio. Menu Name Display Format Menu Description (Menu Display & Control Area) Primary Menu (Default Screen) Profile Displays and changes the active profile. A profile is identified by its number and the name of the talk group.
Menu Display and Control Area, Continued Side Tone Switches side tones ON and OFF. Side tones are audible beeps that occur when you press a Menu or Select button. ON or OFF based on selection Brightness Increases or decreases the display brightness. Level ranges from 1 to 3 Mode Displays active software and version number. Change Mode Changes the mode of the radio. Once selected, the menu advances to the mode change menu sequence.
Basic Operation Turning the Radio On and Adjusting the Volume Procedure Follow the steps below to turn your radio on and adjust the volume. Step 1 Action Rotate the power/volume switch clockwise until it clicks. The startup sequence lasts approximately 10 seconds. The radio is ready to use after this sequence. Use the figure below to see how the radio may appear as it is ready for use.
Turning the Radio Off Procedure Follow the step below to shut off the radio. Step 1 Action Turn the power/volume switch counter-clockwise until it clicks. Result: The display changes to show SHUTDWN and the radio shuts down. The operating mode of the radio is saved and recalled on the next start-up of the radio.
Turning off the Display Lighting and Side Tones Background For some users, it is important to be able to turn off the radio’s display lights and side tones. For example, in covert operations, lights and sounds could inadvertently expose an otherwise unobservable radio user. For this purpose the radio has a toggle switch which disables the radio display light, indicator light and audible side tones. Figure The following figure shows the location of the toggle switch and the features it controls.
Listening to Voice Calls Background Once the radio is turned on and active on your OpenSky network, you can begin to hear voice calls. Process The table below describes what happens when you receive a voice call. Stage 1 2 3 P-801 User’s Manual Description Your radio display changes briefly to show the name of the user group that the call is coming from. The indicator light will turn green and blink while the call is being received. At the end of the call, you will hear a single end tone.
Making a Voice Call Background The steps for making a voice call are similar to those of a conventional portable radio. Procedure Follow the steps below to make a voice call. Step 1 2 Action If needed, turn on the radio by turning the power/volume switch clockwise until it clicks. The radio will be ready to use following the startup sequence. When you see the primary profile displayed, you are ready to talk. Choose your next step from the table below.
Changing the Side Tone Setting Background Your radio will beep when you press the VOL, MENU, or SEL switch. These beeps are known as side tones. You can turn the beeps on or off to suit your needs. Procedure Follow the steps below to change the side tone setting. Step 1 2 Action Press a Menu button until the side tone menu shows. Use the table below to determine your next step.
Adjusting the Display Brightness Background You can adjust the display brightness to suit your needs. Procedure Follow the steps below to change the display brightness. Step 1 2 Action Press a Menu button until the brightness menu shows. Use the table below to determine your next step. If you want to… Increase brightness Decrease brightness 3 Then press… The upper Select button. The lower Select button. To return to the menu display, choose from the following table.
Changing the Active Profile Background You can change the active profile of your radio from the default profile to any of the other profiles in your radio personality. A change of the active profile enables you to change the list of talk groups and listen groups that you communicate with. Procedure Follow the step below to change the active profile. Step 1 Action Turn the Profile selector to move to the desired profile. Result: The displayed profile is now active.
Using Your Radio in Emergency Situations Background Your radio is capable of sending an emergency alert and making emergency calls on the network. OpenSky handles emergency calls with the highest priority, allowing you or the people you serve to get needed help. Procedure The following table describes the procedure for using your P-801T radio in an emergency. Step 1 Action Press the orange emergency button on your radio to send the emergency alert. Other users hear a distinctive 3 tone burst of sound.
Advanced Operation Increasing the Scanning Priority of a User group Background Increasing the scanning priority lets you prioritize transmissions from one specific listen group over other listen groups in an active profile. The talk group is set as the default for scanning priority Process The table below describes the process for increasing a user group’s scanning priority. Stage 1 2 3 Procedure Description The profile containing the user group you wish to prioritize is activated.
Increasing the Scanning Priority of a User group, Continued Procedure (continued) 2 Press the Menu B button to access the priority menu. 3 Press the upper Select button until the user group you want to prioritize is displayed. 4 Result: The selected user group’s transmission priority is increased. To return to the menu display, choose from the following table. To return… Immediately After a brief wait Then Press a Menu button. Wait approximately 10 seconds.
Changing the Scanning Mode Background Changing the scanning mode can broaden or narrow the span of your communications. Changing the scanning mode changes the way you interact with listen groups. Talk groups are not affected by changes to the scanning mode. There are three available scanning modes: • No scanning • Normal scanning, or • Talkback Scanning. Choosing one of the three available scanning modes changes the way your radio scans all of the profiles for your radio personality.
Changing the Scanning Mode, Continued Procedure The following table details the procedure for changing the scanning mode of the radio. Step 1 2 Action Press a Menu button until the scanning menu appears. Choose the scanning mode: To … Narrow your scanning list to only the active talkgroup Press SEL until… SC NONE is displayed. SC NORM is displayed. Use normal scanning Broaden your voice SC TLKB is displayed.
Changing the Active Radio Channel Background You can change the active radio channel of your radio. If your radio reception is poor or you are repeatedly denied channel access, you can manually change the radio to a different channel. Procedure The table below describes the procedure for displaying and changing the active radio channel. Step 1 Action Press a Menu button until the channel display shows. 2 Press a Select button to display a different radio channel.
Changing the Operating Mode Background The radio normally uses OTP (OpenSky Trunked Protocol) to provide the full features of your digital voice and data network. To work with radios using other protocols such as conventional FM, you can manually change the mode of operation. Procedure The table below describes the steps to follow for changing the operating mode of the radio. Step 1 Action Press a Menu button until the mode change menu appears.
Changing the Operating Mode, Continued Procedure (continued) Step 4 Action Press the upper Select button until the desired mode is displayed. • OTP is OpenSky Trunking Protocol. • OCF is OpenSky Conventional FM. • OAT is Over the Air Trunked-Download. 5 Press the Menu B button to change the mode. 6 Choose the next step from the table below. To … Press… Abort the mode change Menu A Result: The radio will display ABORTED and the change will be aborted.
Locking Out User groups Background To focus your voice communications, you can lock out user groups that you do not want to hear. Locking out a user group does not prevent you from getting emergency calls or calls that come from your priority scan group. Process The lock out menu pertains to the active profile. As you receive voice calls, the lockout menu is loaded with the names of the calling user groups. You then select the name of the user group to be locked out from the menu.
Locking Out User groups, Continued Procedure (continued) Step 3 Action Press the lower Select button to lock out the displayed user group. Result: You will not hear voice calls from the user groups you have locked out. 4 To return to the menu display, choose from the following table. To return… Immediately After a brief wait Then Press a Menu button. Wait approximately 10 seconds. Result: The radio will return to the menu display.
Troubleshooting Troubleshooting table Use the table below as a troubleshooting guide if your radio does not operate properly. If additional assistance is required, contact a qualified service technician for help. Symptom Radio will not turn on. Likely Cause Low battery. Suggested solutions Change your battery pack to a fully charged pack. No audio. Speaker volume is muted. Increase the volume level. Poor audio. You are in a poor coverage area or you are not on the network.