REPORT NO : HCT-F04-0905 FCC ID : O5XHL-400B DATE : SEPTEMBER 10, 2004 ATTACHMENT E. - User’s Manual (3) HYUNDAI CALIBRATION & CERTIFICATION TECHNOLOGIES CO., LTD. SAN 136-1, AMI-RI , BUBAL-EUP, ICHEON-SI,KYOUNKI-DO, 467-701,KOREA TEL : +82 31 639 8518 FAX : +82 31 639 8525 www.hctec.co.
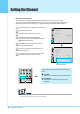
Setting the Channel a Set the favorite channel You can store of your favorite channels for each available input source (such as TV or CATV). Then, when you press the FAVORITE button on the remote control, the Monitor display only the favorite channels you previously stored, allowing you to quickly and easily find frequently wanted channels. 1 Press Menu/set button to display the main OSD menu. 2 Select the TV main menu. Auto Scan 3 Press Menu/Set to enter the TV sub menu.
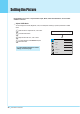
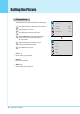
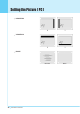
Setting the Picture Mode Your the Monitor has 3 automatic factory preset picture settings (“Standard”, “Vivid” and “Mild”). You can choose Standard, Vivid or Mild by pressing “Picture” button on the remote control (or by making a selection from the menu). Or you can select USER which automictically recalls your personalized picture setting. 1 Press Menu/set button to display the main OSD menu. 2 Select the picture main menu. 3 Press Menu/Set to enter the sub menu.
Setting the Picture Picture Mode is to set CH+ or adjust Picture Adjust, Mode, Video Noise Reduction, Screen Format and Burn Protection. Adjust USER Mode You can change the Contrast, Brightness, Color, and Sharpness according to personal preference in USER mode. 1 Select the item to adjust with CH-, CH+ button. 2 Press Menu/Set button. 3 Adjust the item with VOL-, VOL+ button. 4 To cancel all adjust, select Recall and press Menu/Set button.
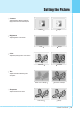
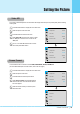
Setting the Picture Contrast Adjust brightness difference between bright part of the screen and dark part. Distinct Vague Brightness Adjust brightness of the screen. Dark Bright Decrease Increase Green color is deeper Red color is deeper Less sharp Sharp Color Adjust deep and light color of the screen. Tint Adjusts the balance between green and yellow. Sharpness Adjust vividness of the screen.
Setting the Picture Temperature Mode Your the Monitor has 5 screen temperatures (color settings): Temperature Normal 1 Press Menu/set button to display the main OSD menu. Video NR ¥ ON 2 Select the picture main menu. Film Mode ¥ OFF 3 Press Menu/Set to enter the picture menu. 4 Select Temperature and press Menu/Set to enter the sub menu. Then the Picture-Temperature sub menu appear. Screen Format 5 Select the Temperature mode with CH-/CH+ button and press Menu/Set button.
Setting the Picture Video NR This function automatically filters out and reduces the image noise and improves picture quality where receiving weak signals. 1 Press Menu/Set button to display the main OSD menu. 2 Select the picture main menu item. Temperature 3 Press Menu/Set to enter the sub menu. Video NR ¥ OFF 4 Select Video NR and press VOL+ button to enter the ¥ parts. Then the cursor moves into the ¥ parts.
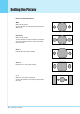
Setting the Picture Screen Format Description Wide Wide video: No change. 4:3 video: Expands 4:3 video signal horizontally to fit the Wide screen. Panorama Wide video: No change. 4:3 video: Expands 4:3 video horizontally to fit the Wide screen and to minimize distortion, sides are expanded more than center. Zoom 1 Expands Wide mode screen vertically. Zoom 2 Expands zoom 1 mode screen vertically. 4:3 Wide video: The image is suppressed. 4:3 video: No expansion. There are gray areas besides the image.
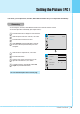
Setting the Picture ( PC ) In PC mode, you can adjust the H, V-Position, Native Mode and Phase. Also you can adjust them automatically. Geometry You can change H, V-Position, Native Mode and Phase in PC mode like usual PC monitors. You can also adjust them automatically. (Auto adjust function.) 1 Press Menu/set button to display the main OSD menu. 2 Select the picture main menu with CH+, CH- button. Temperature 3 Press Menu/Set to enter the sub menu.
Setting the Picture ( PC ) H-POSITION V-POSITION PHASE Mismatch 36 OWNER'S MANUAL Match
Setting the Sound In SOUND Menu, you can adjust balance, MTS ( Multi-Track Sound), AVC (Auto Volume Control) and select the equalizer settings. Balance This control allows you to adjust the balance of the left and right speaker output. 1 Press Menu/set button to display the main OSD menu. 2 Select the SOUND main menu. 3 Press Menu/Set to enter the sub menu. 4 Select Balance and press Menu/Set button. 5 Adjust the balance with VOL-, VOL+ button and press Menu/Set button.
Setting the Sound User Adjust You can use the OSD menu to change the Treble, Bass, Balance and DRC according to your preference. 1 Equalizer menu appear when you select USER mode. 2 Select a gain bar with VOL+, VOL- button on the remote control and adjust it with CH+/CH- button. 3 Press BACK or BACK button on the remote control to exit Equalizer. The result will be saved automatically. Select USER mode (Previous page) Equalizer 0.1 0.5 1.5 5.0 10.
Setting the Sound AVC(Auto Volume Control) This function adjust sound volume level automatically depending on the source. 1 Press Menu/set button to display the main OSD menu. 2 Select the SOUND main menu. 3 Press Menu/Set to enter the sub menu. 4 Select AVC and press VOL+ button to enter the ¥ parts. Then the cursor moves into the ¥ parts. 5 Turn on or off AVC function with CH+/CH- button and press BACK button.
Setting the Others Translucent Adjust the transparency of the OSD menu. There are 8 step from OFF to 7. 1 Press Menu/set button to display the main OSD menu. 2 Select the SET UP main menu with CH+/CHbutton on the remote control. 3 Press Menu/Set to enter the sub menu. 4 Select Translucent and press VOL+ button to enter the ¥ parts. Then the cursor moves into the ¥ parts. 5 Trucelant ¥ OFF PIP V-Chip Caption ¥ OFF Advanced Adjust with CH+/CH- button and press EXIT button.
Setting the Others SMALL LARGE TWIN Source in PIP Size ¥ SMALL Change the source of the PIP window. Source 1 2 Select Source and press Menu/Set to enter the sub menu. Then the PIP sub menu appear. Picture Swap Position The available sources will be displayed. Select the source and press Menu/Set button. TV AV 1 This picture is an example. The displayed sources may be different depending on the main input source.
Setting the Others Position in PIP Change the position of the PIP window. 1 2 Select Position with CH+/CH- button on the remote control and press Menu/Set to enter the sub menu. Then the PIP sub menu appear. In Sub Menu, there are four positions. Select the position with CH+/CH- button on the remote control and press BACK button. Size ¥ SMALL Source Picture Swap Position Right Down Right Up Left Up Left Down Advanced You can se up ID, Blue Back, Language and Front Key Lock in Advanced Menu.
Setting the Others Set ID in Advanced Set the ID of the Monitor for mass-controlling through the serial port. 1 Select Set ID and press VOL+ button to enter the ¥ part. Then the cursor moves into the ¥ part. 2 Adjust with CH+ / CH- button and press BACK button. Set ID ¥ 99 Blue Back ¥ OFF Language ¥ ENGLISH Front Key Lock ¥ OFF Blue Back in Advanced You can set to display blue-color screen instead of noise screen. 1 2 Select Blue Back and press VOL+ button to enter the ¥ parts.
Setting the Others V-Chip (TV Parental Guidelines Parental restrictions can be set up using either of two methods: The TV guidelines or the MPAA rating. 1 Press Menu/set button to display the main OSD menu. 2 Select the SET UP main menu with CH+/CHbutton on the remote control. 3 Press Menu/Set to enter the sub menu. 4 After enter the password, the V-Chip sub menu appear.
Setting the Others TV Blocking in V-Chip You can set up Restrictions Using the "TV Parental Guidelines" of FCC. 1 2 3 Select TV Blocking with CH+/CH- button on the remote control and press Menu/Set to enter the sub menu. Then the TV Blocking sub menu appear. You can independently lock the TV ratings. The locked TV (FCC) ratings are indicated by the symbol .
Setting the Others Change Password in V-Chip 1 2 Select Change Password with CH+/CH- button on the remote control and press Menu/Set to enter the sub menu. Then the Pass Word change sub menu appear. Enter the new password with numeric buttons on the remote control. TV Blocking Movie Blocking Change Password V-Chip Blocking ¥ OFF Pass Word ____ V-Chip Blocking in V-Chip 46 1 Select V-Chip Blocking with CH+/CH- buttons on the remote control. 2 Enter to the ¥ part by pressing VOL+ button.
Setting the Time In the TIME menu, you can set the current time and auto power on / off. Time Set Set the current time. 1 Press Menu/set button to display the main OSD menu. 2 Time Set AM 03:29 Select the TIME main menu. On Time AM 05:11 ON 3 Press Menu/Set to enter the sub menu. On Channel ¥ 99 On Volume ¥ 100 4 Select Time Set by pressing VOL+ button. Off Time 5 Move the cursor by pressing VOL-, VOL+ button and adjust time by CH+, CH- button.
Setting the Time On Channel Set the channel when the Monitor power turn on automatically. • Available only when the Time is set and On Time is ON. 1 Press Menu/set button to display the main OSD menu. 2 Select the TIME main menu with CH+/CH- button on the remote control. Time Set AM 03:29 On Time AM 05:11 ON On Channel ¥ 99 ¥ 100 3 Press Menu/Set to enter the sub menu. On Volume 4 Select On Channel. Off Time 5 Enter to the ¥ part with VOL+ button.
Setting the Time Off Time This the Monitor can be set to turn off automatically at specific times that you choose. Before using the timer, you must set the Monitor's clock as described previously. 1 Press Menu/set button to display the main OSD menu. 2 Select the TIME main menu with CH+/CH- button on the remote control. 3 Press Menu/Set to enter the sub menu. 4 Select Off Time with CH+/CH- button on the remote control and press VOL+ button.
Specification 40" LCD TV Display Panel Function and Specification Display Size 40-Inch 15 : 9 Diagonal Display Mode Variable 4 Modes (4:3 Mode / 16:9 X 3 Modes) Pixel Format 1028 X 768 Physical Pixel Contrast Ratio 600 : 1 Brightness 450 cd/m 2 Resolution (RGB) 1280 X 768 / 50, 60Hz PIP Advanced multi-windows viewing PIP(picture in picture) with four selectable window positions on Video mode.
Troubleshooting If your monitor is not working properly, please scan this list of problems and possible solutions. It may save you time and money. Problem No picture & No sound Quick Action for Possible Solution • Check whether the Monitor is turned on. • Power cord inserted into wall outlet? • Plug another product's power cord into the wall outlet where the Monitor's power cord was plugged in. Picture OK & No sound • Press the VOLUME() button. • Check the audio input signal.
Warranty Card Limited Warranty Subject to the Limitations, Exclusions and Disclaimers hereof, InFocus Corporation ("InFocus") warrants that the LCD Thin Display Device and Accessories (hereinafter collectively or individually referred to as "Product" as appropriate) purchased from InFocus, an InFocus dis tributor, or an InFocus reseller will conform to InFocus' specifications and be free from defects in material or workmanship for the respective Limited Warranty period provided below.
Warranty Card Limited Warranty Period The Limited Warranty periods hereof commence on the date of purchase by the end-user customer. These Limited Warranty provisions shall apply only to the end-user purchaser (first person or entity that purchased a new Product for personal or business use and not for the purpose of distribution or resale).
IF YOU NEED ASSISTANCE.... For all types of Service and Support information on InFocus products and services please go to our web site at www.infocus.com/service. Many resources are available on our website.