
Install Instructions


Model TLC chimney systems require shielded
firestops when passing through ceiling joist areas and
wall thimbles when passing through walls.
FIRESTOP/JOIST SHIELD
For all Model TLC ceiling joist penetrations below the roof
(other than that in which a ceiling support is installed), the
firestop/joist shield must be installed. (Ceiling supports
incorporate their own firestops, so no supplemental
firestopping is required.) The firestop performs the following
essential functions for both the dwelling and the chimney.
1. Together with a fully framed opening (all four
sides), it acts as a firestop to control vertical and
horizontal spread of any fire external to the chimney.
(See additional comments on firestopping.)
2. It stabilizes the chimney in the framed opening, and
defines and maintains the required 2” AIRSPACE
clearance to combustibles.
3. It provides supplemental shielding for joist areas.
INSTALLATION REQUIREMENTS
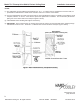
The firestop/joist shield can be installed on the top or
bottom of a joist area, but is most effective as a firestop
if installed from beneath. As such, unless otherwise
directed to do so, install firestop/joist shield in the
orientation shown in Figure 1A with the plate to the
bottom side and the shield extending up through opening
(see Figure 2).
To install:
1. Frame a level square opening for 2” clearance from
the outside of the chimney to the framing.
NOTE: If the ceiling is pitched, the joist shield needs
to be installed on the top side, and a level
frame will need to be built to ensure the joist
shield can be installed level and in a vertical
orientation (see Figure 3).
2. Place the firestop/joist shield over the chimney and
attach to the framed opening as shown in Figure 2.
3. Nail side flanges into the framing.
4. If installed on top and the firestop/joist shield is to be
installed over the flooring, cut a square opening, then
place it on top of the flooring, and nail for security.
5. Subflooring or finished floor can be placed over the
firestop/joist shield edges, provided that 2” clearance
is maintained from the chimney pipe to the flooring.
6. If the framed opening is larger than necessary, the
firestop/joist shield outer edges must be extended by
appropriate means (attaching metal plates, 26-gauge
galvanized steel or heavier) to completely block the
framed opening from any vertical airflow around the
chimney.
7. Install the lengths of chimney as necessary to extend
through the firestop, securing the joints with locking
bands (provided).
8. Continue with installation in accordance with the
instructions for the other components, as applicable.
9. Enclose the chimney below the firestop/joist shield
to prevent any accidental contact with the chimney.
Exception: Exposed portions of the chimney that
extend into the room where a freestanding appliance
is installed should not be enclosed. In an attic, to
prevent blown-in attic insulation from falling against
the chimney, either use an attic insulation shield or a
full enclosure.
Hart & Cooley, Inc.
Installation Instructions
1
Firestop/Joist Shield, Pitched Ceiling Plate
& Wall Thimble
Model TLC
WARNING
Failure to follow these Installation Instructions could cause
FIRE, CARBON MONOXIDE POISONING, OR DEATH. If
you are unsure of Installation requirements, call the phone
number listed on the back of these instructions.
Sheet
S-7
Read Sheet GS for important clearance and safety precautions before installing
any of the parts described in this sheet. Sheet GS is packaged with supports,
including ceiling support, wall support, insulated tee and anchor plate.
IMPORTANT: 10” to 14” are non-HT.