
Install Instructions


10
Model TLC
All-Fuel Chimney - 5" to 8" Installation Instructions
Hart & Cooley, Inc.
14. Use a nonhardening, high-temperature sealant
(500°F) to seal around the horizontal chimney length
where it enters through the exterior of the wall thimble
or the concrete wall.
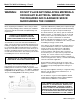
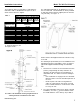
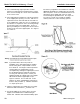
15. Insert and install the insulated tee cap into the bottom
of the support plate opening. To secure, slide the tee
cap bracket into the slot located at the front and rear
of the support plate. Make sure the tee cap bracket is
beneath the tee cap and the other end exiting through
the slot at the back of the support plate. Secure in
place by threading the securing screw into the nutsert
located on the front of the support plate. See Figures
15, 16 and 17.
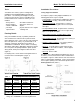
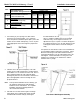
Note: If ground clearance does not permit the
installation of the wall support with the support
bracket facing down, it is permissible to invert
these brackets. Inverting the brackets (brackets
mounted above the support plate) can be
accomplished by rotating the support plate so that
the threaded stud faces toward the front and
securing each side with (2) #8 x ¾" bolts (not
supplied) through the oblong slots of the support
side brackets and the support plate as per
Figures 18 and 19. Secure with nuts. In this
position, the range of adjustability is limited to 5"
from the wall (see Table 3). Install the insulated
tee cap as per step 15.
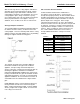
16. Chimney lengths above the insulated tee are simply
stacked on and locked with a
1
/
8
clockwise turn.
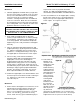
17. For lateral stability of the chimney above the wall
support, a wall band must be installed along an
outside wall. Install the first wall band midway up the
first chimney length above the insulated tee and any
additional wall band to be installed at 8-foot intervals
above this point. Secure the wall band bracket to the
wall using 2 6d (2") spiral nails or #8 x 2" wood
screws through the predrilled holes. See Figure 20.
For concrete or brick veneer walls use suitable
masonry fasteners or other anchoring systems.